Last Updated: November 06, 2025

Managing Long-Running Tasks on SaladCloud with RabbitMQ

Managing long running tasks, such as molecular simulations, LoRA training, and LLM finetuning, presents unique challenges on SaladCloud, due primarily to the interruptible nature of nodes. At the core of all solutions to this problem are a job queue, and progress checkpoints. The job queue is responsible for distributing tasks to workers, and detecting when a worker has been interrupted. Workloads should save checkpoints of their progress and upload it to cloud storage, so that they can be resumed from the last checkpoint in the event of an interruption. Workers should also upload completed artifacts to cloud storage.
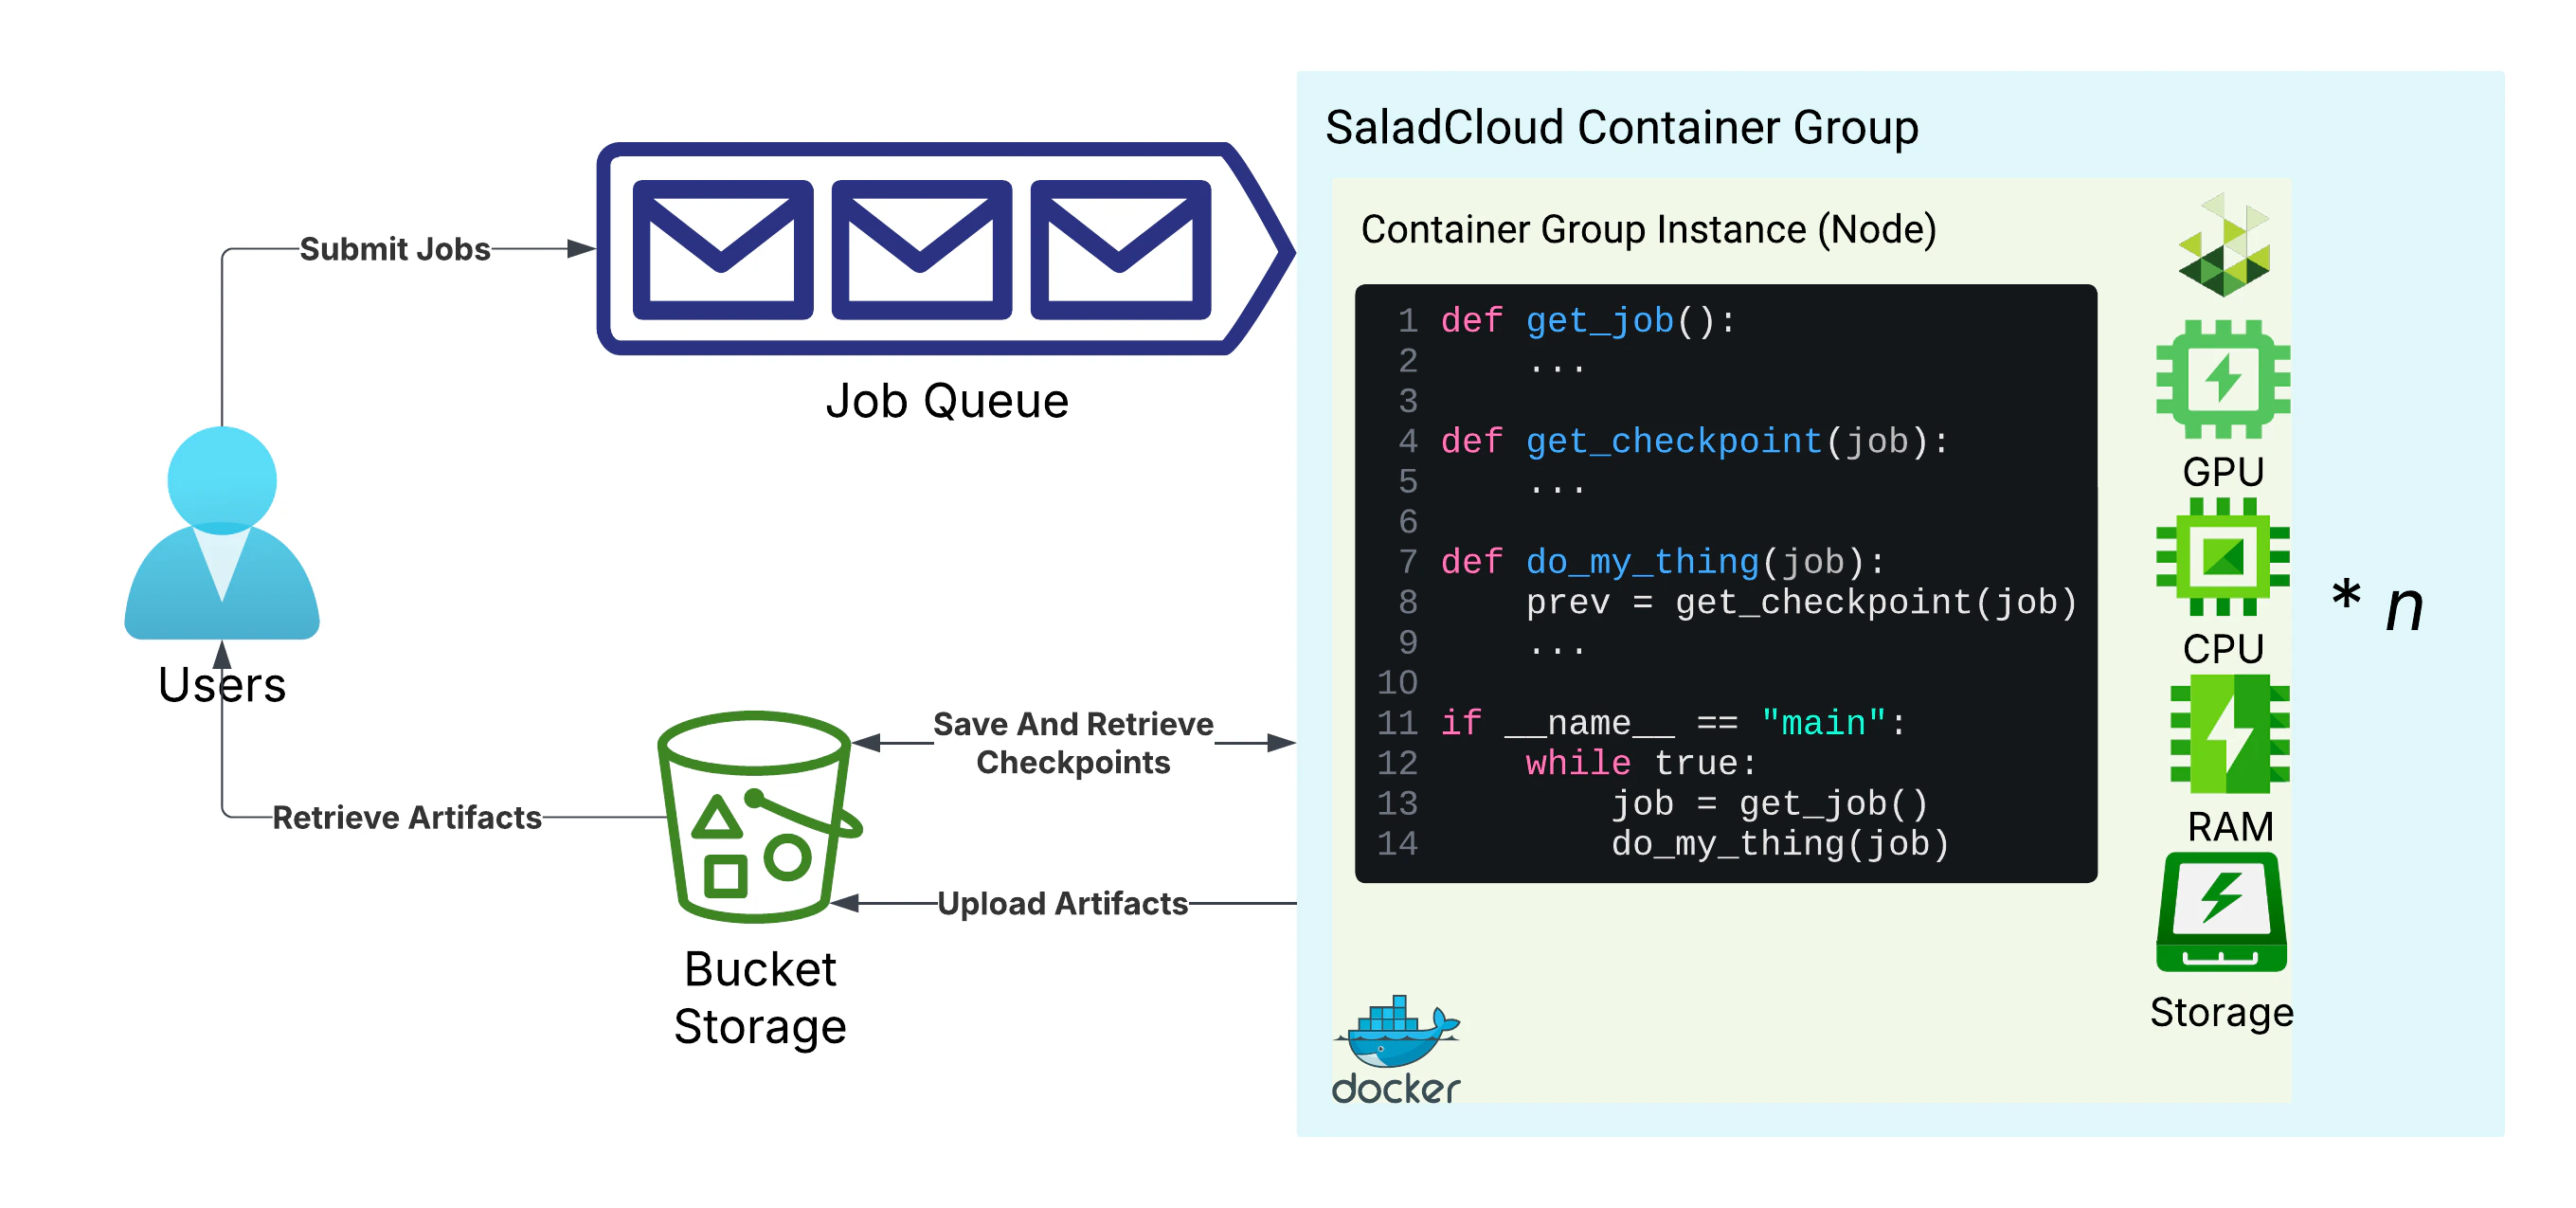
Basic Architecture

Basic architecture for long-running tasks on SaladCloud

We will be using RabbitMQ hosted on CloudAMQP as our job queue, and Cloudflare R2, an S3-compatible object storage service, as our cloud storage. We prefer R2 to AWS S3 for many SaladCloud workloads, because R2 does not charge for egress data, which helps reduce costs when distributed workers fetch inputs and upload results. Instrumenting your code to use S3-compatible storage will make it easier to switch storage providers in the future if you choose to do so. For this guide, we will build an application that slowly calculates a sum for n steps, sleeping for 30 seconds between steps to simulate work. We will set up a job queue and related resources, a storage bucket, a checkpoint saving system, and a simple auto-scaling mechanism. You will need a CloudAMQP account, and a Cloudflare account to follow this guide.

The Job Queue: RabbitMQ

RabbitMQ is a highly configurable open-source message broker that implements the Advanced Message Queuing Protocol (AMQP) and has client libraries in many languages. It is a robust and scalable solution for job queues, and is widely used in the industry. You can self-host if desired, but for this guide we will be using CloudAMQP’s hosted RabbitMQ service.

Relevant Limitations

  • While RabbitMQ itself has no such inherent limitations, The “Sassy Squirrel” plan we’ll be using on CloudAMQP supports a maximum of 1.5k connections, and up to 500 messages per second. This will be more than sufficient for this guide, where we will only be scaling up to 250 workers.
  • Maximum message size is 512MB, and further limited by the amount of RAM available on the host machine, as messages are held in memory, with optional persistence. The default max message size on CloudAMQP is 128MB. As is true for most job queues, it is recommended to keep large amounts of data in cloud storage, putting only references to the data location in the message itself.
  • CloudAMQP’s default message timeout is 2 hours, but we can disable this limit entirely, allowing for extremely long-running tasks.
  • RabbitMQ relies on long-lived connections between the message broker and clients, so it is important to handle reconnections gracefully in your code.
  • Using RabbitMQ in python in a multi-threaded environment can be a little tricky, however it is required in order to support long lived jobs and quick interruption detection. We will be using the pika library, which does have support for threaded workers.

Setting Up RabbitMQ on CloudAMQP

Once you have your account on CloudAMQP, it’s time to deploy a new instance. We will be using the “Sassy Squirrel” plan for this guide, which is $50/month (billed by the second). You can choose a different plan if you need more or less resources.
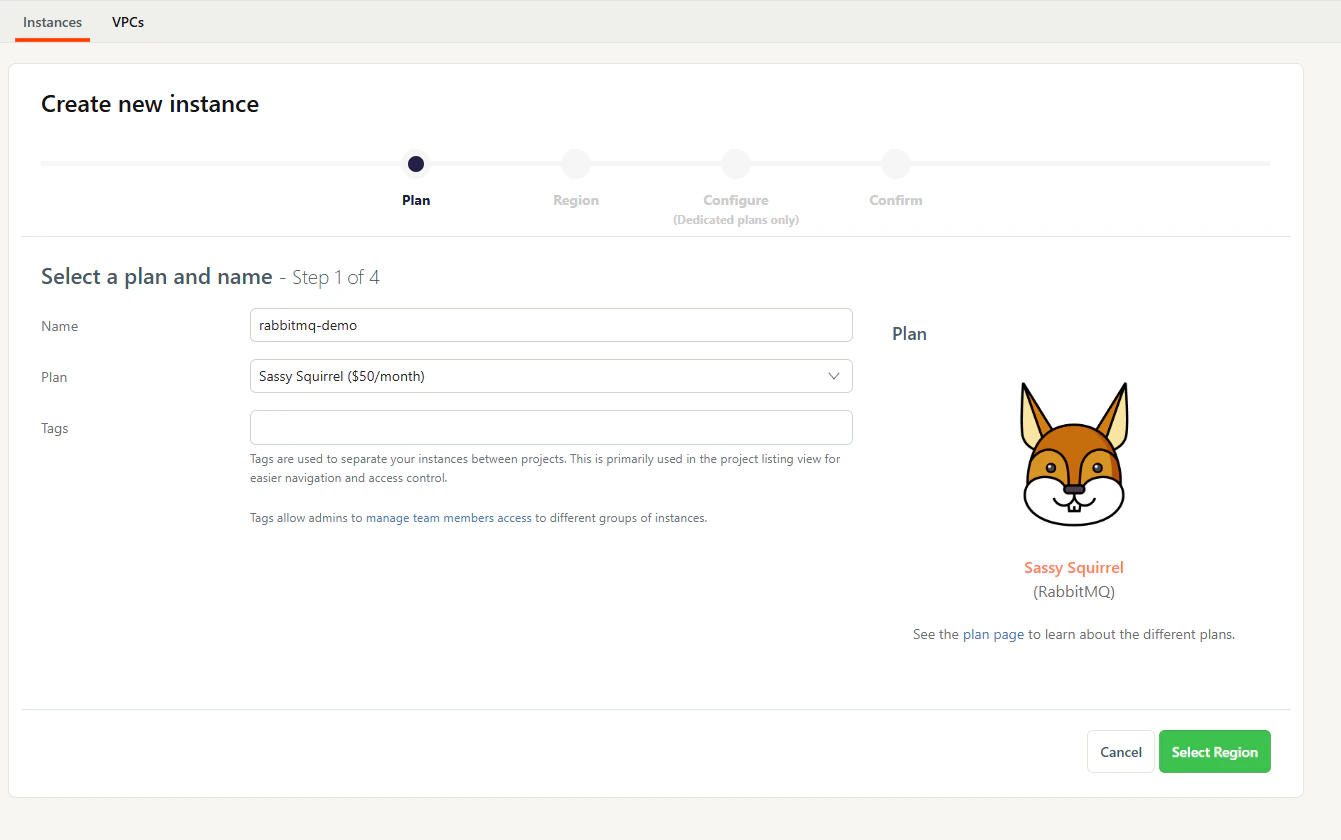
Creating a new instance on CloudAMQP
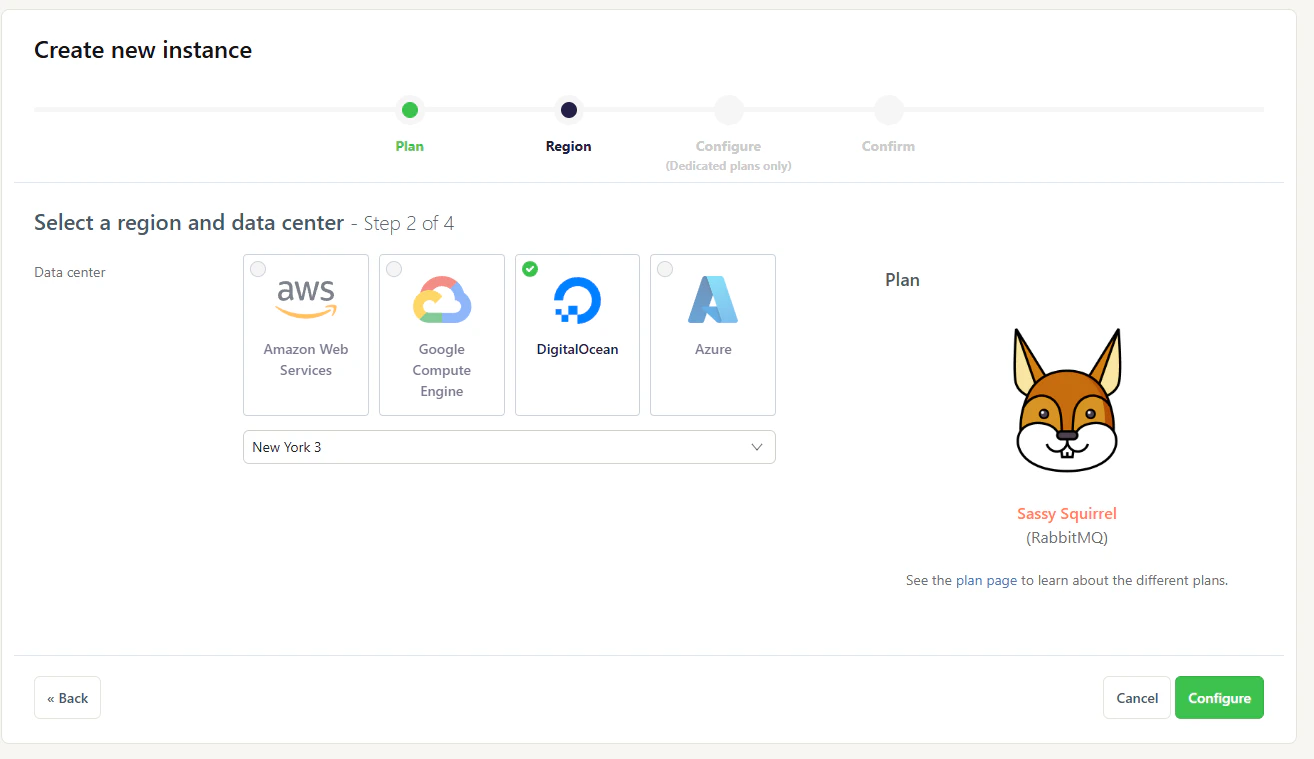
Creating a new instance on CloudAMQP

Next, you can choose the datacenter and region for your instance. We will be using DigitalOcean’s New York 3 datacenter for this guide, but if you have other application components (besides the worker) in a different cloud, you should consider deploying the broker to the same cloud and region as your other components.
Choosing a datacenter and region

Choosing a Datacenter and Region

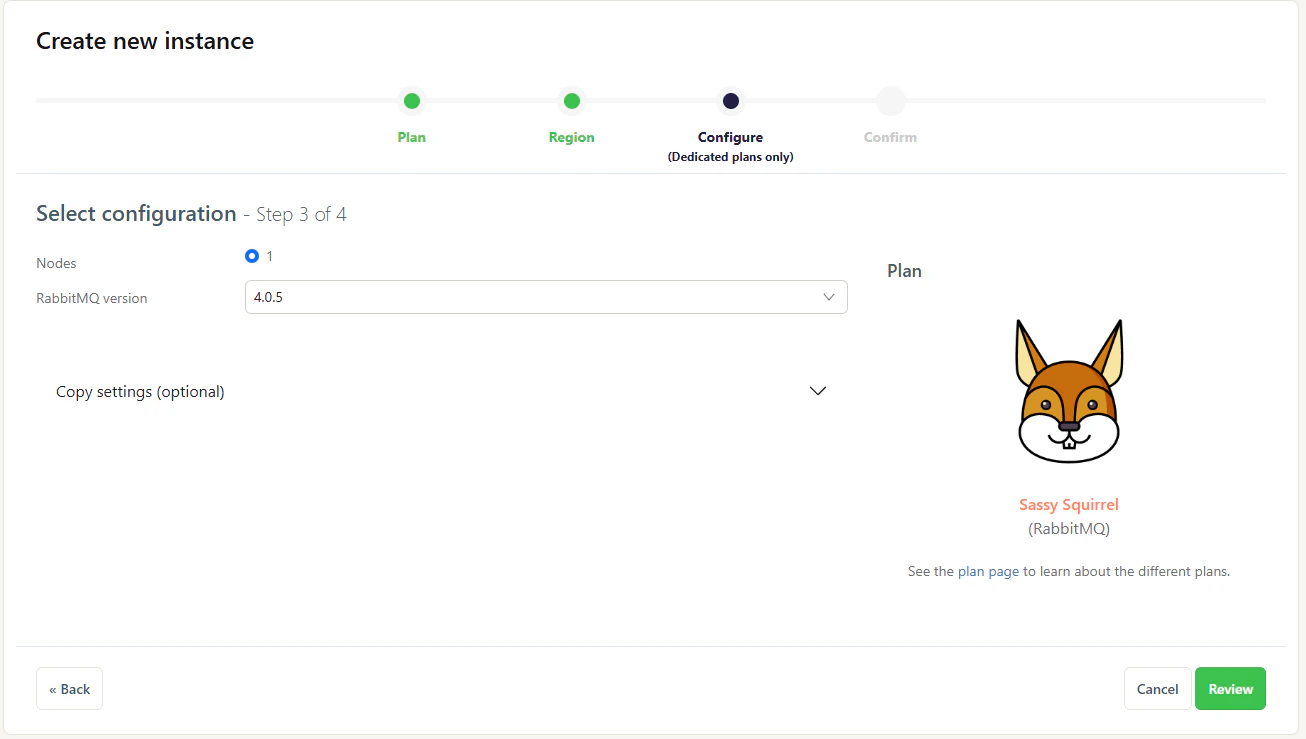
Next, select the number of nodes you want to deploy, and the version of RabbitMQ. We will be using a single node, and the latest version of RabbitMQ (4.0.5 as of the time of this writing)
Choosing the number of nodes and RabbitMQ version
Choosing the number of nodes and RabbitMQ version

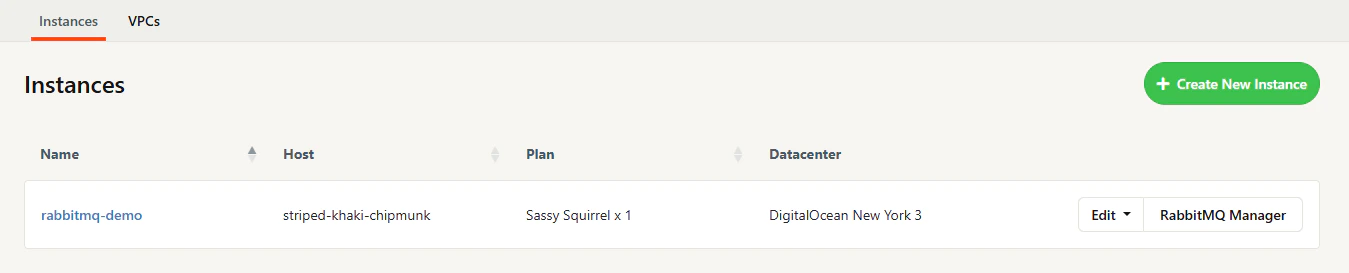
Confirm all of your settings on the next page, and deploy your instance. Once deployed, you should see something like this on the CloudAMQP console:
CloudAMQP Console

CloudAMQP Console

Click the name of the instance to pull up the details page. Later, you will need info from this page to connect to your RabbitMQ instance, but for now, just navigate to the configuration tab on the left-hand navigation bar. Once there, disable the field labeled rabbit.consumer_timeout. This will allow us to have tasks run longer than the default 2-hour timeout.
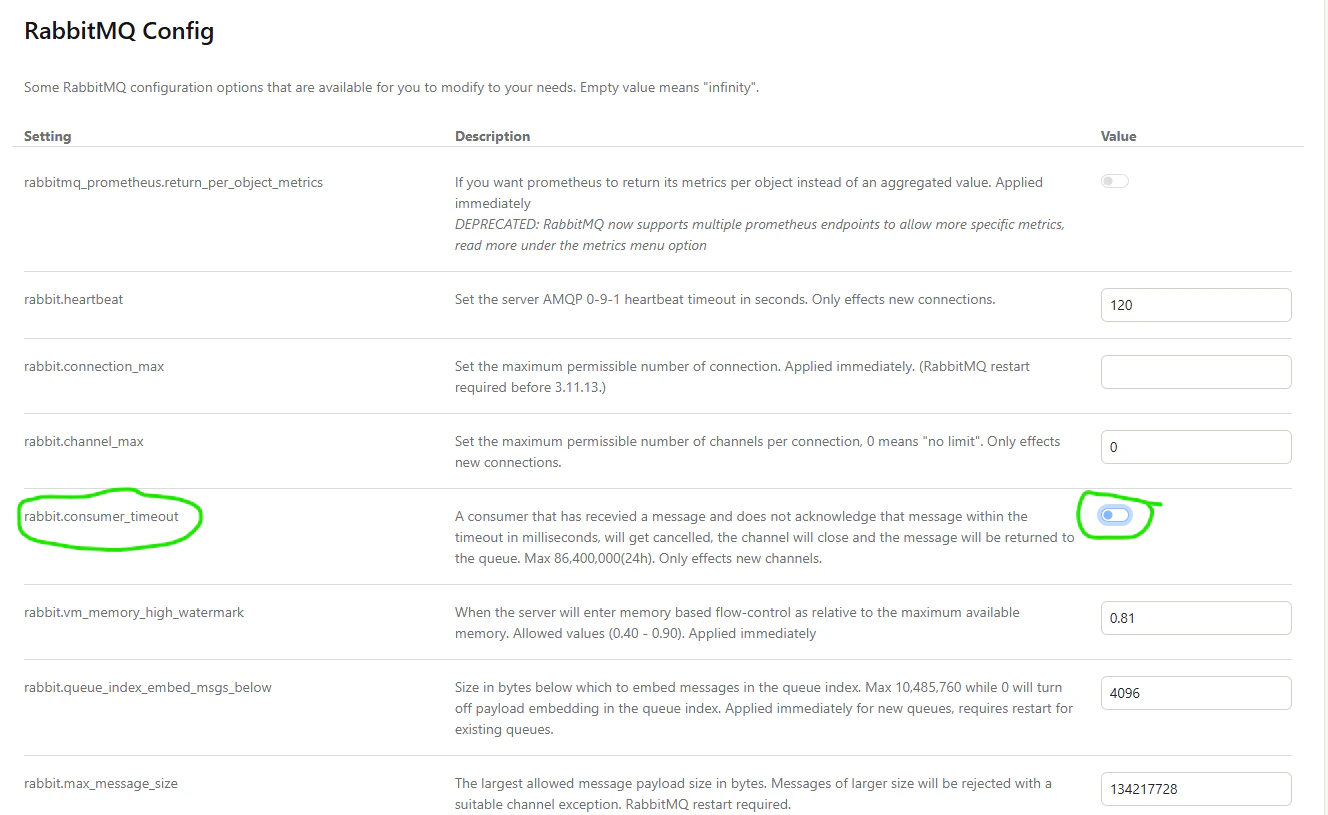
Disabling the consumer timeout
Disabling the consumer timeout

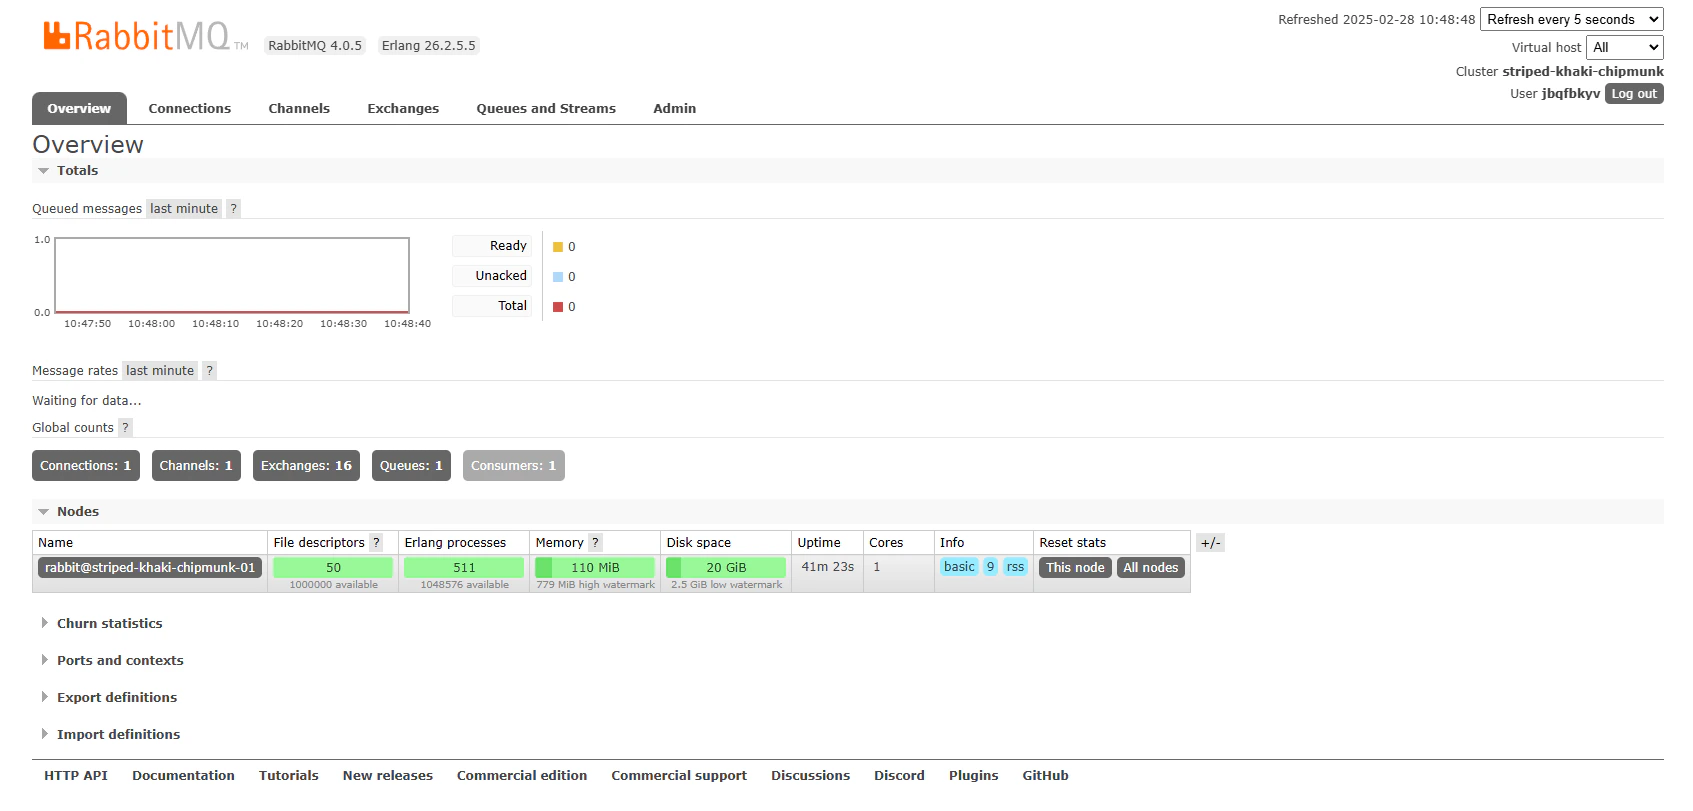
Save your changes when done, and then navigate to the “RabbitMQ Manager”, which will open a new tab. The RabbitMQ Manager is a web interface for managing your RabbitMQ instance. You can view queues, exchanges, and other RabbitMQ objects, as well as publish and consume messages. There is an HTTP API for this management layer, but for this guide we will be using the web interface.
RabbitMQ Manager

RabbitMQ Manager

Deadletter Exchange

A deadletter exchange is an exchange that messages are sent to when they are rejected by a queue. This can happen when a message is not acknowledged by a consumer, typically indicating that the consumer has gone offline, or the message is malformed. We will be creating a deadletter exchange and queue first, so that we can configure our main queue to send messages to it when they are rejected. This will allow us to inspect and requeue messages that have failed to be processed. From the RabbitMQ Manager, navigate to the Exchanges tab, and add a new exchange called “deadletter”.
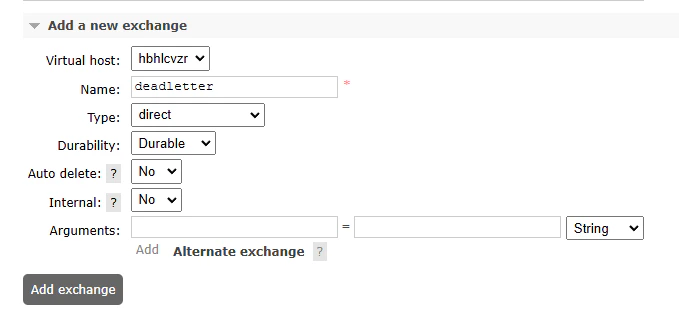
Adding a deadletter exchange
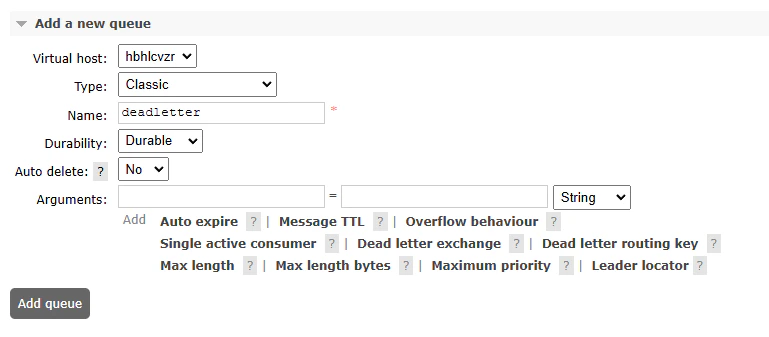
Adding a deadletter exchange

Make sure to select the non-root virtual host, and set the type to “direct.” Next, navigate to the Queues tab, and add a new queue called “deadletter”. Make sure to select the same virtual host as the exchange.
Adding a deadletter queue

Adding a deadletter queue

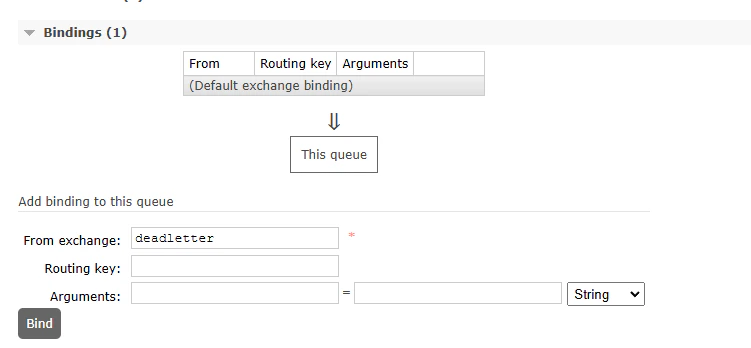
Once the queue is created, click on it in the list of queues, and create a binding from the deadletter exchange to the deadletter queue. This will ensure that messages sent to the deadletter exchange are routed to the deadletter queue.
Binding the deadletter exchange to the deadletter queue

Binding the deadletter exchange to the deadletter queue

Main Job Queue

Next, we will create the main job queue. This queue will hold messages that represent tasks to be processed by workers. Navigate back to the Queues tab, and add a new Quorum queue called “my-job-queue”, and set the deadletter exchange to the exchange we created earlier, and setting the delivery limit to 3. This will allow a message to be retried 3 times before being sent to the deadletter exchange.
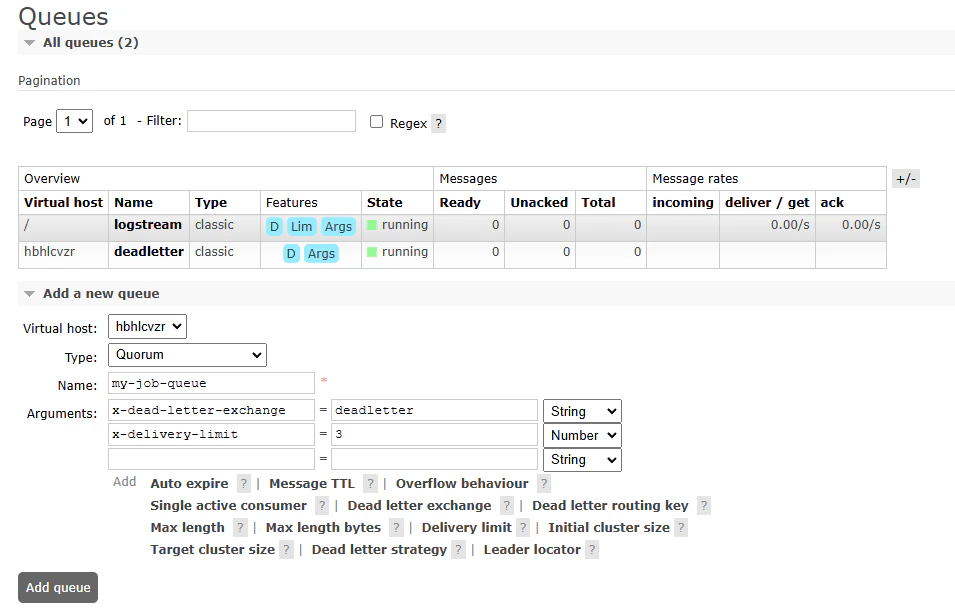
Creating the main job queue

Creating the main job queue

Cloud Storage: R2

R2 is a cloud storage service from Cloudflare that is compatible with the S3 API. It is a great choice for SaladCloud workloads because it does not charge egress fees, which helps reduce costs when distributed workers fetch inputs and upload results. From the R2 console, navigate to “R2 Object Storage”, and click “Create Bucket”.
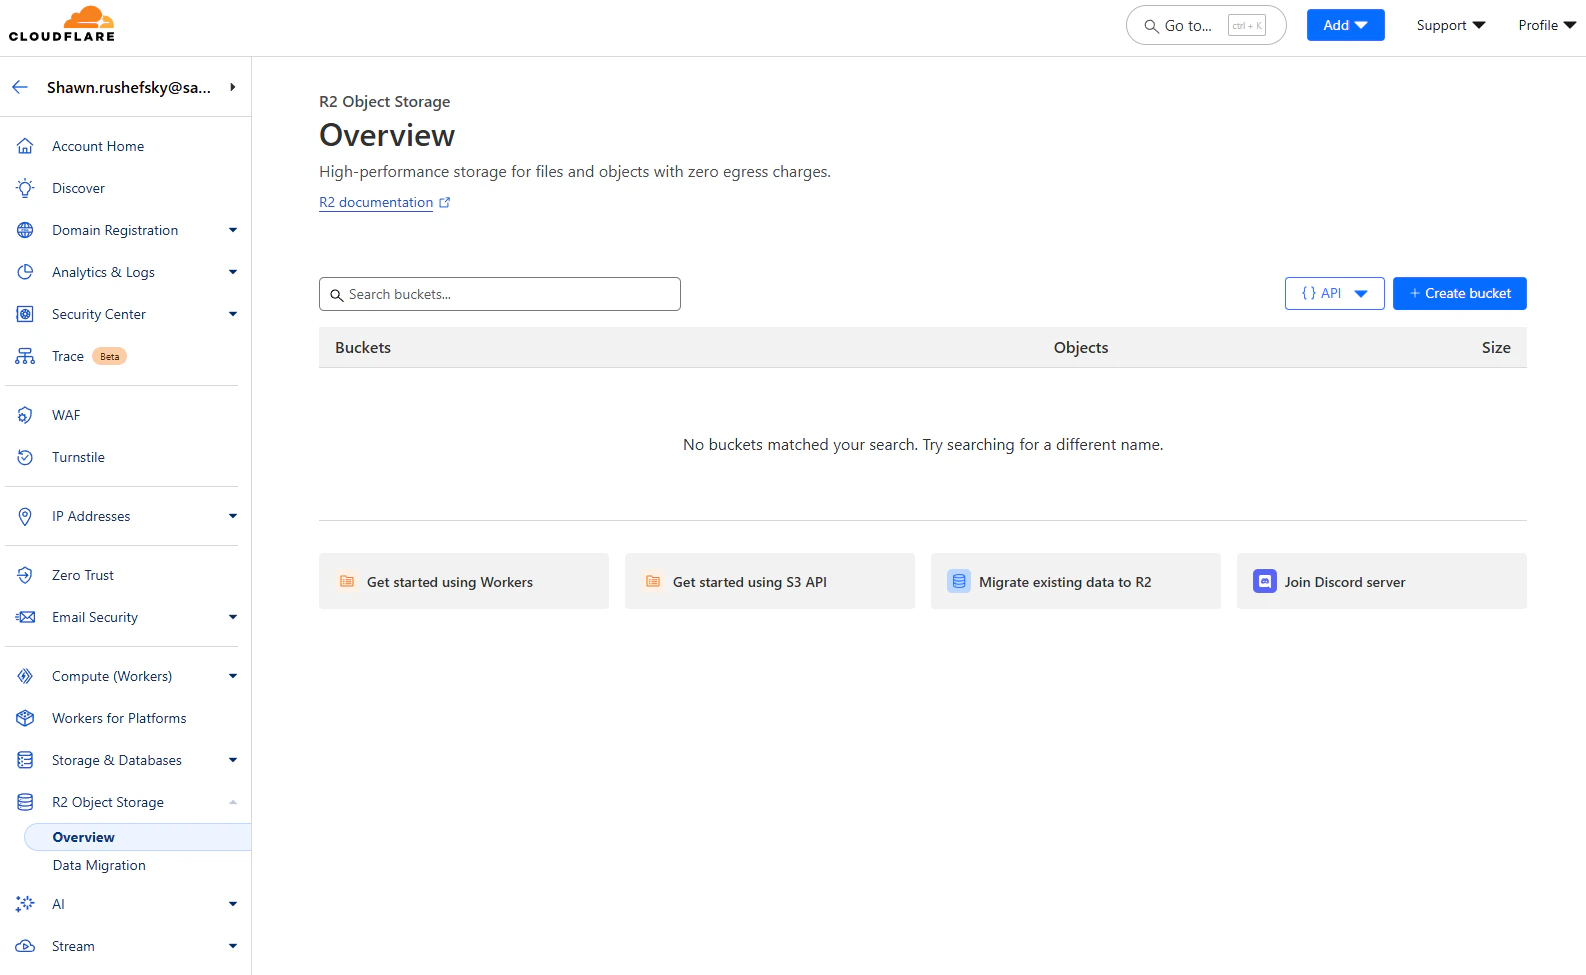
The R2 Object Storage Console
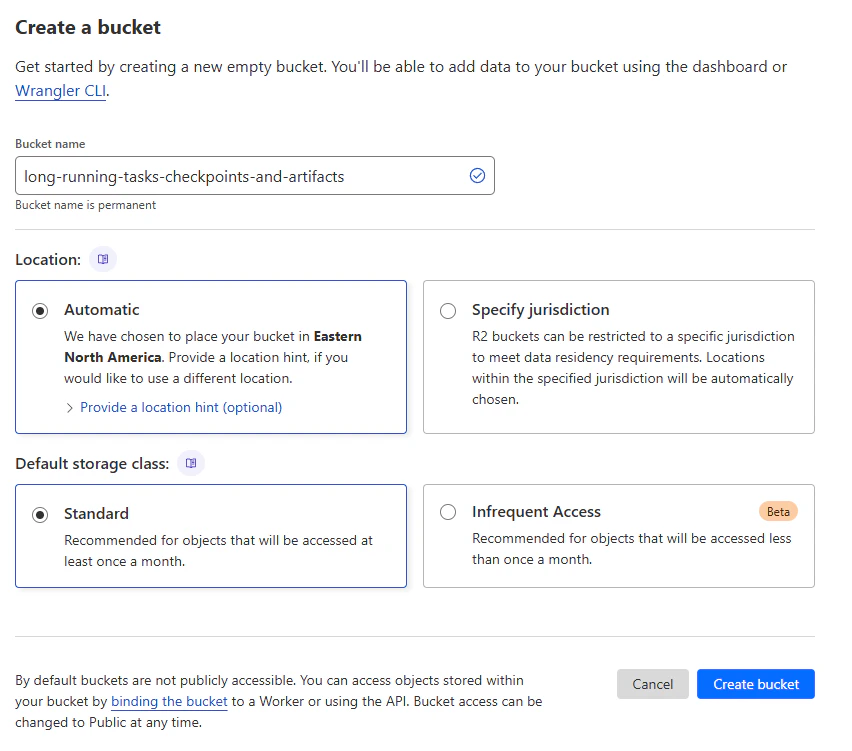
The R2 Object Storage Console

Give your bucket a meaningful name, and select an appropriate location. We are going to use the standard storage class, and automatic location.
Creating a new bucket

Creating a new bucket

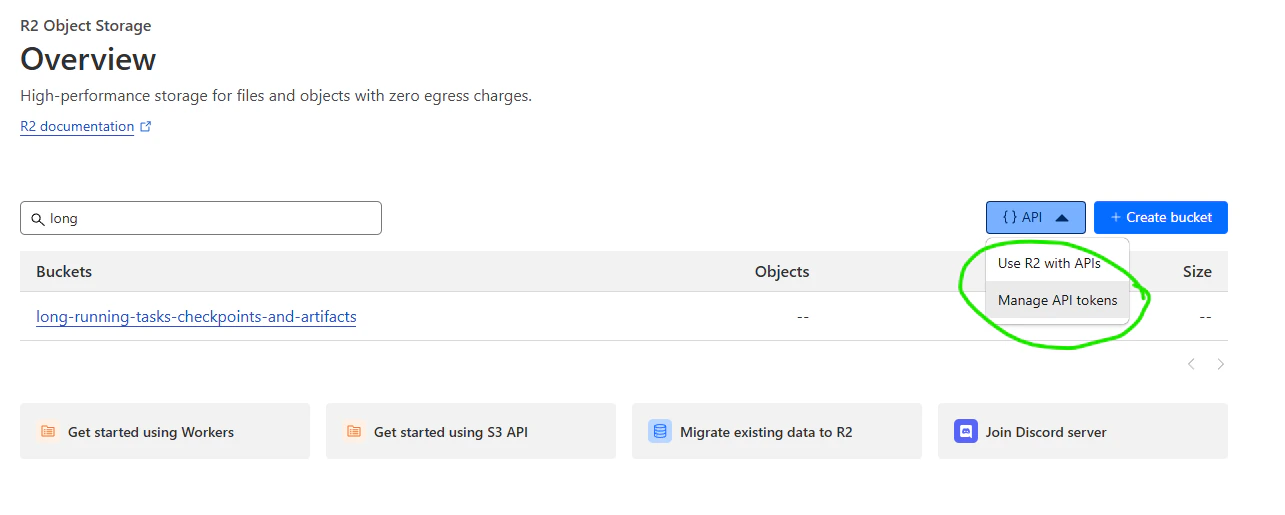
Once your bucket is created, you will need to create an access key and secret key. Select “Manage API tokens” from the ”{ } API” menu, and click “Create Token”.
Navigate to manage api tokens

You still need an API token to access your bucket

Create a token with “Object Read & Write” permissions, and only grant it access to the bucket we’ve just created. Since secret rotation is outside the scope of this guide, we’re going to use the “forever” TTL. However, it is best practice to user shorter-lived secrets and to have easy automatic mechanisms in place to rotate secrets as needed. Once created you will be given an access key and secret key. Save these somewhere safe, as you will not be able to retrieve them again. The application code will get these keys from environment variables, so you will need to set them in your environment. Also on that page will be the S3 endpoint URL for your bucket. Save this as well, as it will be needed in the application code.

Instrumenting Our Application

We’re going to use the boto3 library to interact with R2, and the pika library to interact with RabbitMQ. You can install it with pip install boto3 pika. First, we need to set up our environment variables. All of the following environment variables will be needed by the application code. There are several ways to do this, but what I’ve done for my development environment is create a file called worker.env in the root of my project, and add the following lines:
Then, to source this into my environment when I run my code, I run the following command:
Make sure *.env is in your .gitignore. You don’t want to commit your secrets to your repository. Now, create a file called main.py in the root of your project, and add the following code:
Next, let’s take a look at the “work” function, where we will do the actual work for the job. This function will simulate work by sleeping for 30 seconds and incrementing the step and sum in the checkpoint, and saving that checkpoint to R2.
Additionally, we may want a function that validates the job before starting work on it. In our simple example, we’ll just make sure the basic fields are present.
We also want functions to upload and download our progress checkpoints, and to upload the result. In this simplified example, we’re going to use a small JSON file for the checkpoint, but the principle is the same no matter what the actual checkpoint is.
We also are going to make helper functions for acknowledging and rejecting messages from the queue.
Now, we put these parts together in a function called process_job.
Now, because we need to run our long-running task in a separate thread from the rabbitmq client, we need a function that spawns that worker thread for us.
Finally, we need to connect to RabbitMQ and start consuming messages from the queue, taking care to handle all sorts of connection errors that may arise.

Completed Example

Submitting Jobs to the Queue

Next, we need a way to submit jobs to the queue. We’re going to use the pika library for this as well, with the same AMQP_URL and JOB_QUEUE from worker.env. I’ve saved mine in a file called submitter.env, and I’m going to source them into my environment with the following command:
Suppose we have a csv with our 10,000 jobs, and we want to submit them all. Our CSV (data.csv) looks like this, with 10,000 rows.
It is pretty straightforward to submit these jobs to the queue. Here’s an example script that does just that:

Running the Job Submitter

Run the job submitter with python submit-jobs.py. It will read the csv file and submit all the jobs to the queue. Once that has run, we can see in the RabbitMQ management interface
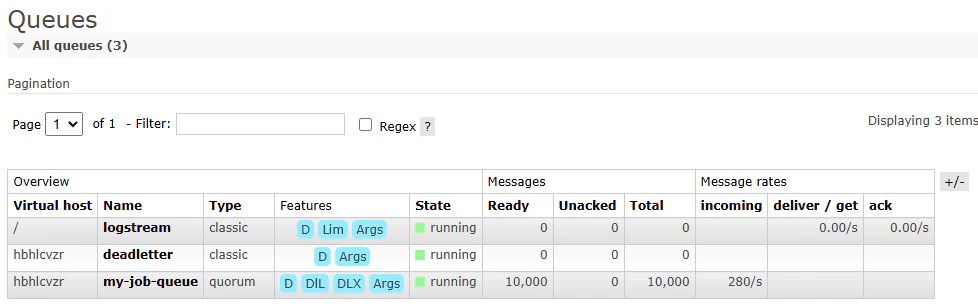
RabbitMQ Management Interface showing a full queue

RabbitMQ Management Interface showing a full queue

Containerize the Worker Application

Now that we have our worker application and our job submitter, we can package our worker in a docker container, and run it on a SaladCloud Container Group. First, let’s make sure our dependencies are documented in requirements.txt.
Now, create a new file called Dockerfile. Our application is simple, so a basic python base image should be fine.
Now, build the docker image, and use a tag that makes sense for you.
Now, we can test it locally to make sure it works, before we deploy it to SaladCloud.
You should see it start up and begin processing a job. Once this is working, you can go ahead and terminate the container with Ctrl+C. Now, we can push the image to Docker Hub.

Deploying the Worker to SaladCloud

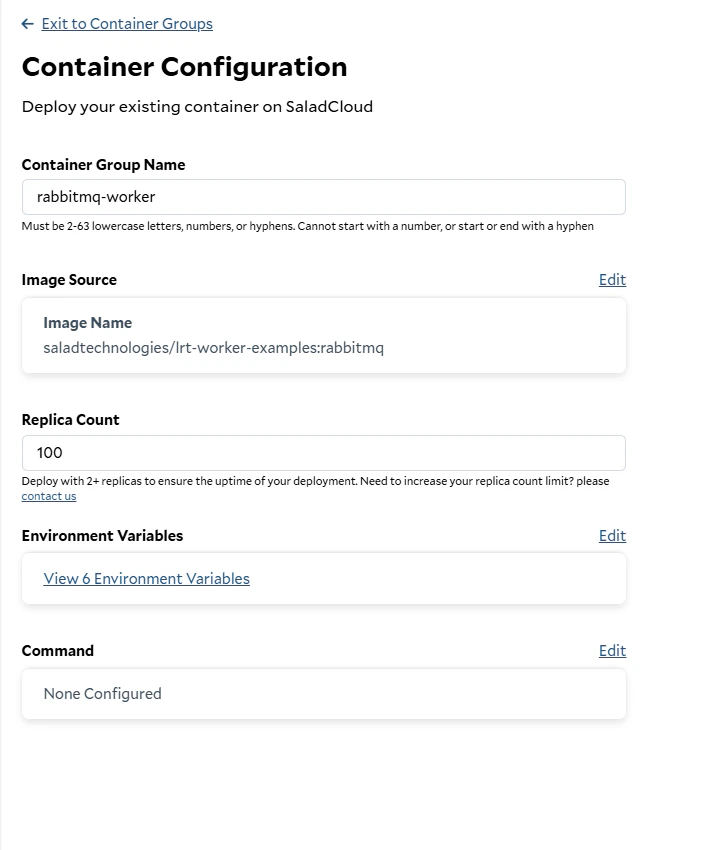
To deploy our worker to SaladCloud, we need to create a new Container Group. This can be done via the API, SDKs, or the Portal. We’re going to use the Portal. We’re going to create a new Container Group, and we’re going to use the image we just pushed to Docker Hub. We’re going to request 100 replicas (the max via the portal), and we’re going to set all of our environment variables from worker.env.
Creating a new Container Group
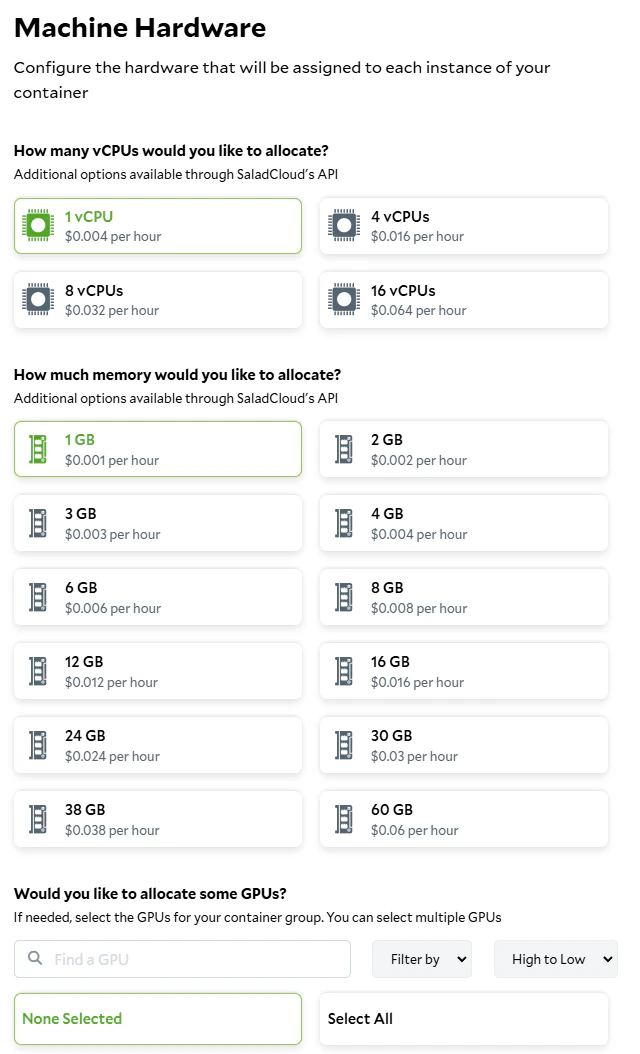
Creating a new Container Group

Our application is extremely simple, so we’re going to only request 1 vCPU, 1 GB of RAM, and no GPU. Your hardware requirements are likely significantly higher than this.
Setting the hardware requirements

Setting the hardware requirements

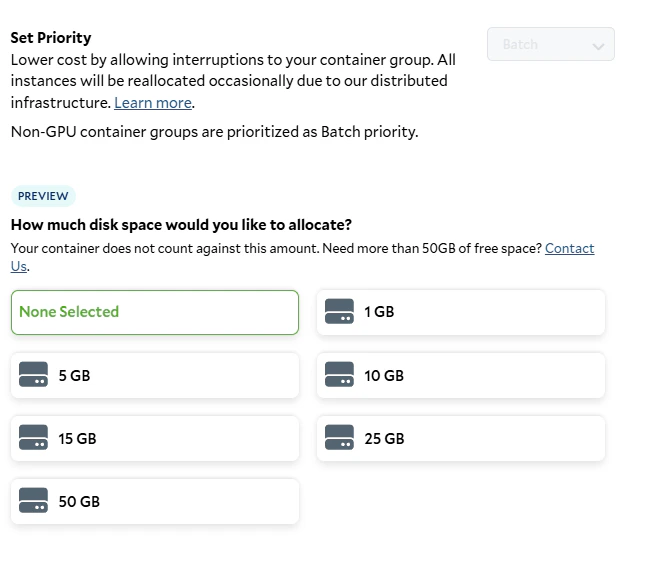
All CPU-only jobs are prioritized as “Lowest”, and we don’t need any additional storage for this particular application.
Setting the job priority and storage requirements
Setting the job priority and storage requirements

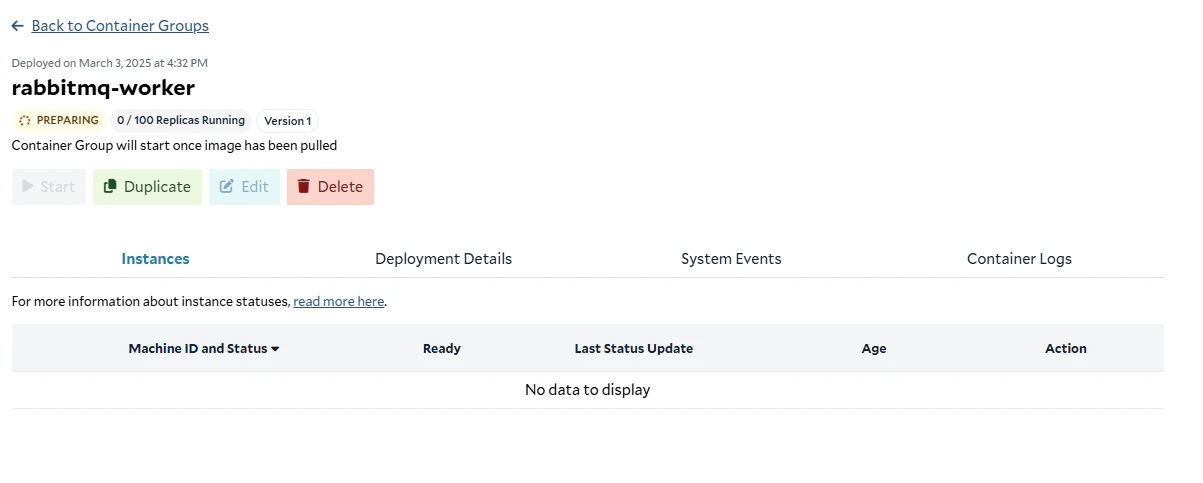
We do not need the container gateway, as our application pulls its work from a queue. We also do not need health probes, as those are primarily for services accessed via Container Gateway. Go ahead and hit deploy, and you’ll be taken to the container group page, where you can see its status. First, it will prepare by pulling the container image into our high-performance cache.
Preparing the container

Preparing the container

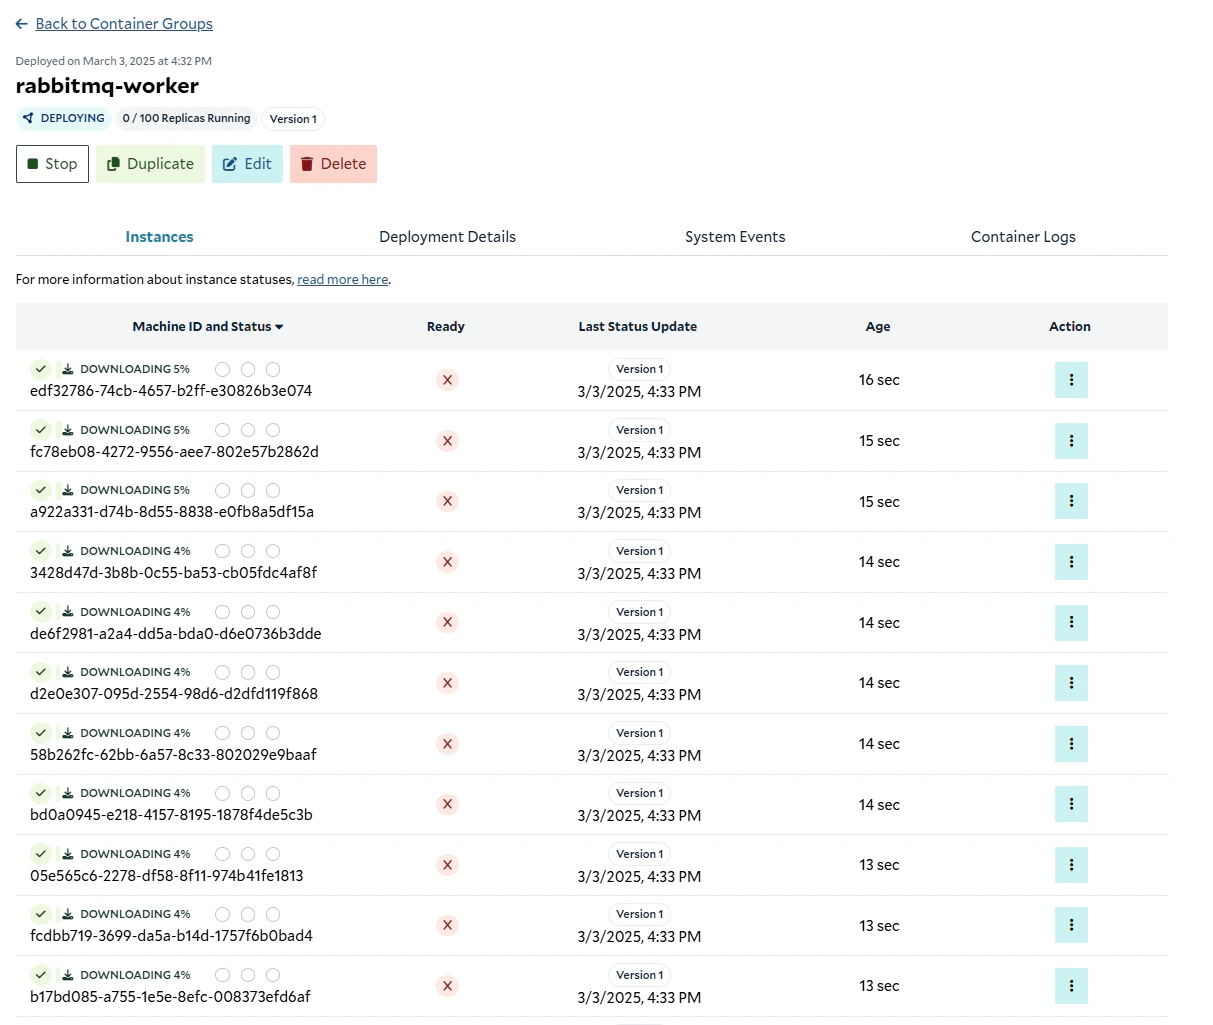
Once it’s prepared, it will start allocating replicas, and downloading the container image to those replicas.
Downloading the images to the replicas
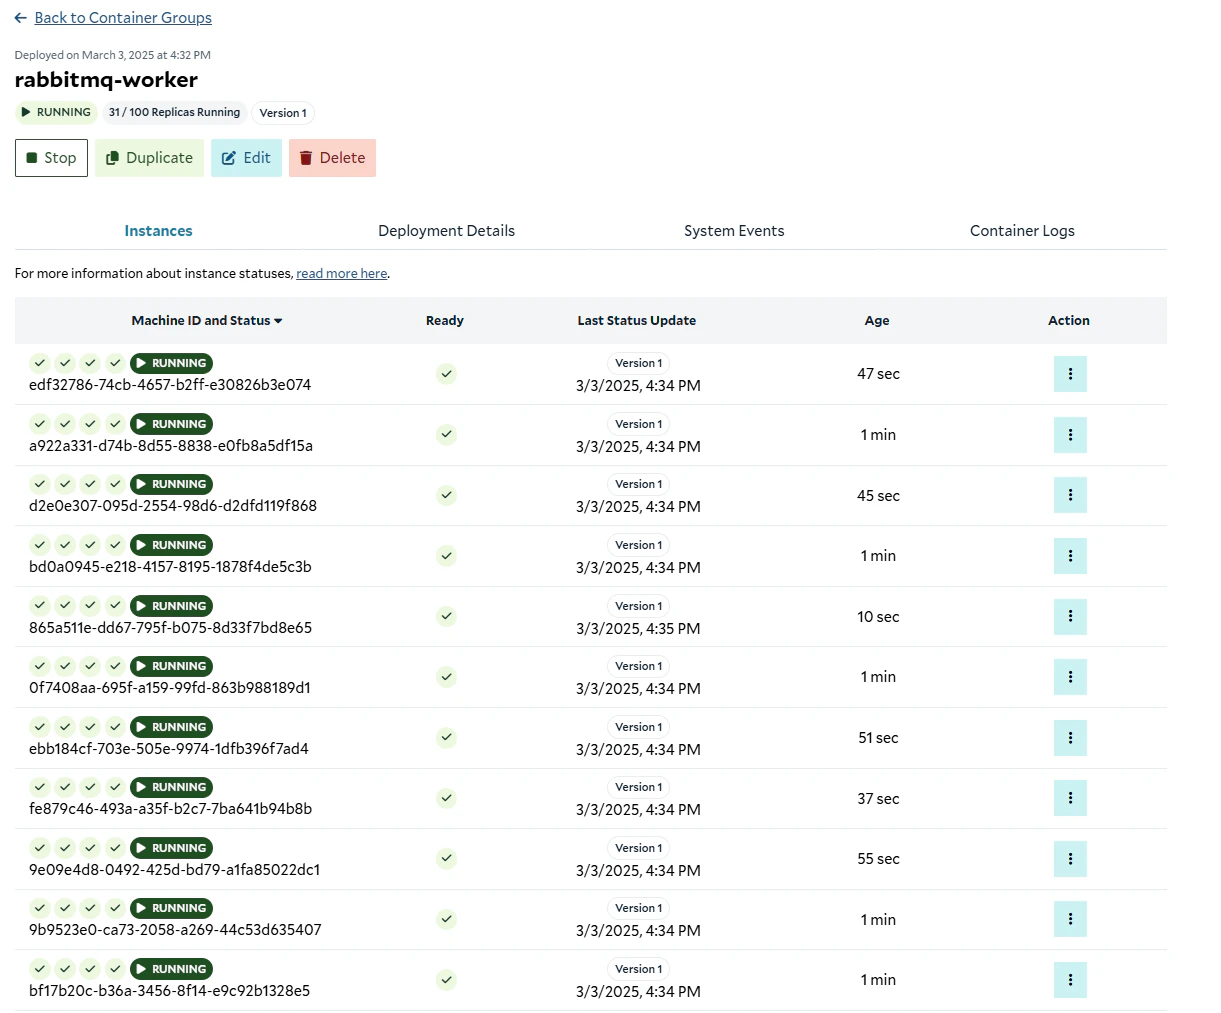
Downloading the images to the replicas

After a minute or so, we should see our instances up and running.
Instances up and running

Instances up and running

Validating That It Works

Now that our cluster is up and running, we can go to the RabbitMQ management console, and see that we have in-flight messages now.
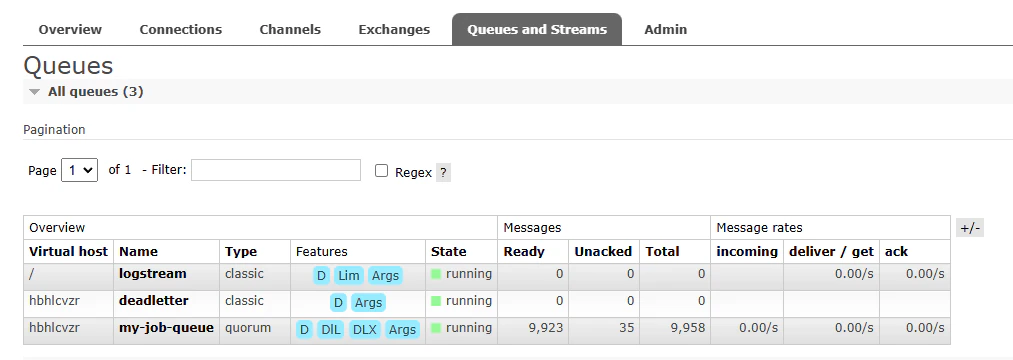
In-flight messages in the queue

In-flight messages in our queue

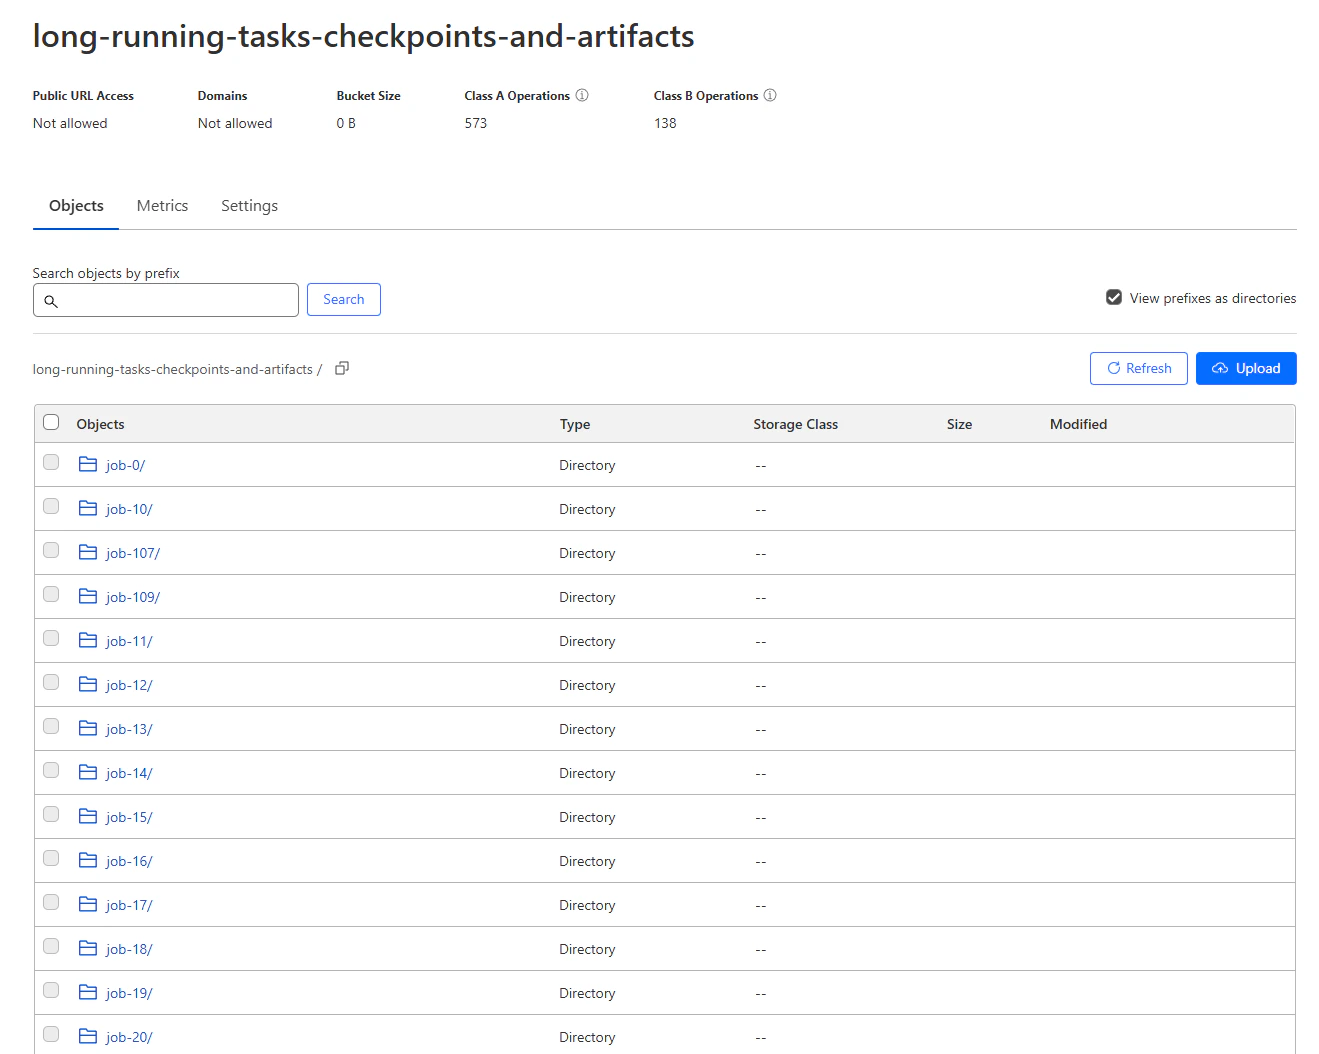
From the R2 console, we can see that our bucket is being filled with checkpoints and results.
Checkpoints and results in the R2 bucket

Checkpoints and results in the R2 bucket

Autoscaling

Now that we have our worker running, we can set up some simple autoscaling to automatically scale the number of replicas up and down based on the number of messages in the queue. There are many ways to implement autoscaling, but for simplicity, we are going to use a scheduled task that runs every 5 minutes, and sets the number of replicas to be equal to the number of messages in the queue, limited to 250 replicas (the maximum in the API). To implement this, we’re going to use Cloudflare Workers with a schedule trigger. Navigate to the Cloudflare portal, and select the “Compute (Workers)” tab from the left navigation bar. Click “Create”, and then choose the “Hello World” template. Go ahead and deploy the default, we’re going to edit it in the next step.
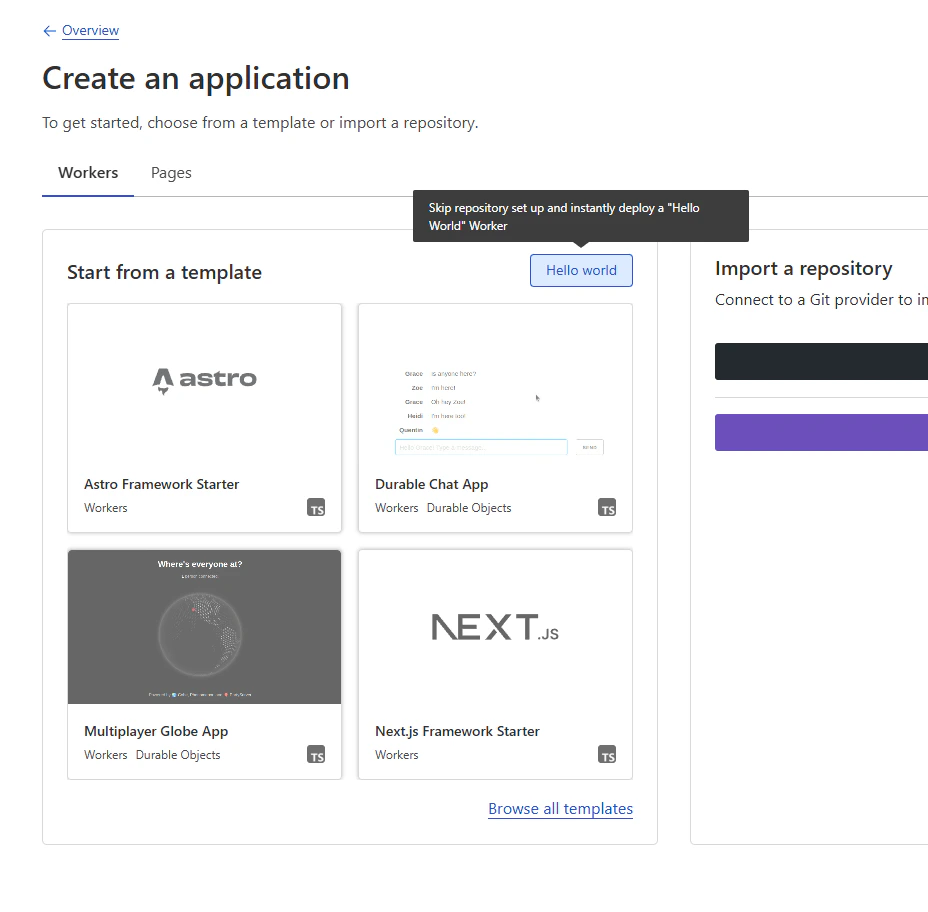
Creating a new Worker

Creating a new Worker

Now, we’re going to edit the worker code to set the number of replicas to be equal to the number of messages in the queue. First, we need some helper functions to interact with the SaladCloud API.
Next, we need a helper function to get metadata about the queue, including the number of messages it contains. This can be done via the RabbitMQ Management API.
Now, we can put it all together in a scheduled event listener. Note all of the values that we will provide via environment variables.
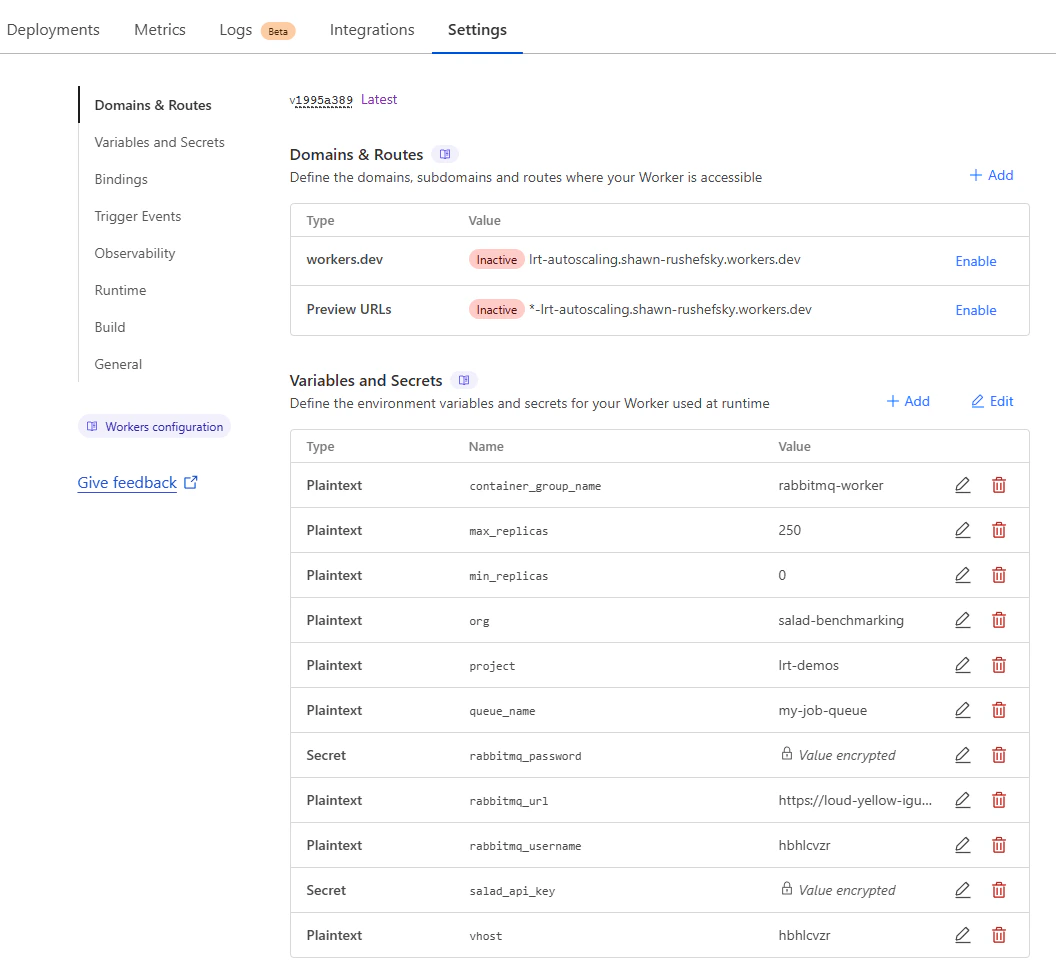
Click Deploy, and find your way to the settings tab for the worker function. Here, we are going to disable the domains and routes that point to our function, since it doesn’t even have an http handler. We will also fill in all of the environment variables that we used in our function. Make sure to use the type “Secret” for sensitive values like your rabbitmq password and your Salad API key.
Disabling the domains and routes

Disabling the domains and routes, and setting the environment variables
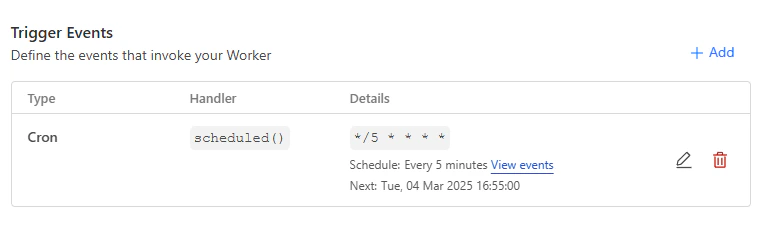
Finally, we can set a trigger for the function to run every 5 minutes.
Setting the trigger to run every 5 minutes

Setting the trigger to run every 5 minutes

Now, if we’ve done everything correctly, we should see our worker scale up and down based on the number of messages in the queue. You can live-tail the logs via the “Logs” tab in the Cloudflare Workers console, or with the wrangler cli.

Completed Example

Conclusion

In this guide, we’ve built a simple worker application that processes jobs from a RabbitMQ queue, and we’ve deployed it to SaladCloud. We’ve also implemented autoscaling for our worker using a scheduled Cloudflare worker function, so that it can automatically scale up and down based on the number of messages in the queue.