Example Code and Image
Let’s use an example to illustrate how this feature works and how to utilize it effectively. Assume we have a container image built from the following Dockerfile:Dockerfile
inference_server.py
- If the environment variable HOST is set to ’::’, the host in the URL becomes
[::1]for IPv6. - Otherwise (‘0.0.0.0’), it defaults to 127.0.0.1 for IPv4.
io_worker.py
Scenario 1: Use a Job Queue
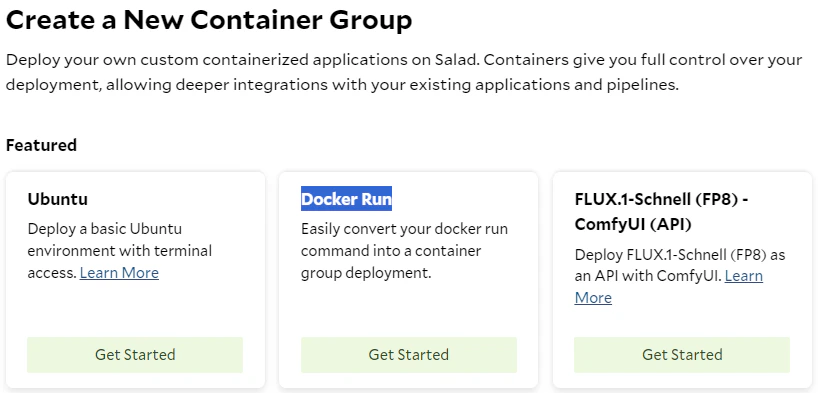
Now we can run some tests. In this scenario, you are building a batch-processing system using a group of GPU-powered container instances to handle thousands of jobs within a specified timeframe. Each instance retrieves its task inputs from a job queue, such as AWS SQS, SaladCloud Job Queue, or SaladCloud Kelpie. Each job includes instructions on whether to download the input, how to process the data, and where to upload the output. After completing the job, an instance must upload the output and return either SUCCESS or FAILURE to the job queue. While you can embed the input and output within the job and its response, for large data, it’s recommended to use cloud storage for efficient handling, and the job and its return only contain the metadata and status.Docker Run
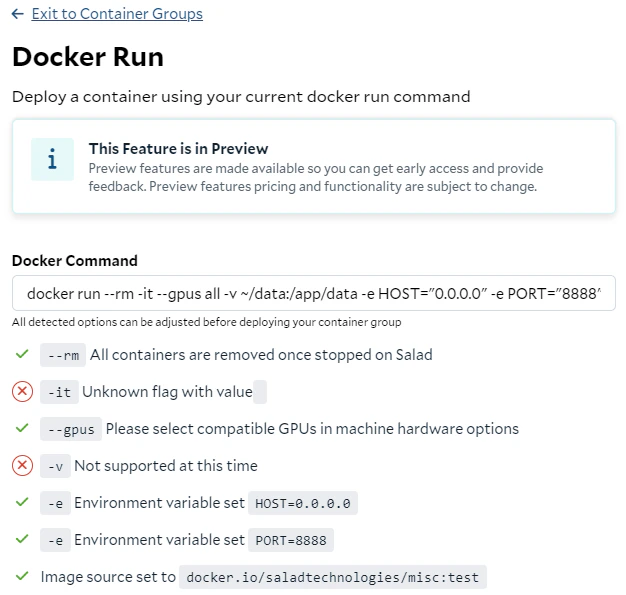
This command starts a container interactively using the image, mounts a local directory (~/data) to /app/data in the container, sets environment variables (HOST and PORT), utilizes all available GPUs, and automatically removes the container after execution.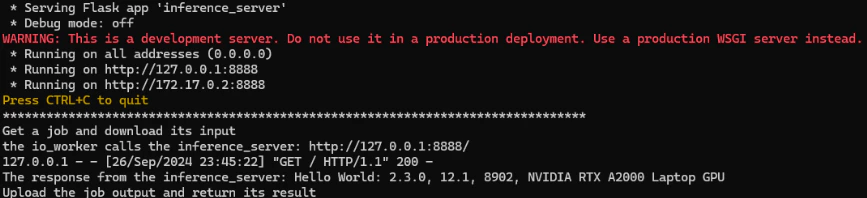
Environment Variables
The -e flag in the docker run command is used to pass information to the container, which can be directly mapped to the Environment Variables settings on SaladCloud. By utilizing this feature, you can customize system behavior and grant access to additional resources, such as cloud storage or job queues or APIs, for your containers running on SaladCloud.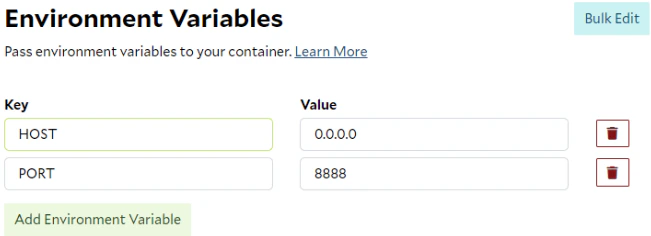
Image Source
One container group can run only one container image at this moment. Ensure the repository, image name and tag are all correct in the Image Source. If the container image is from a private repository, you will need to provide both the username and access token. These credentials will be used by SaladCloud to pull the image.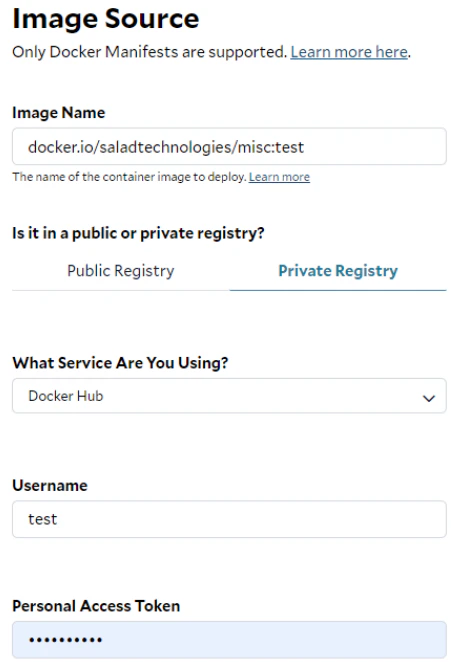
Replica Count
Your container group consists of multiple replicas or instances, with each instance running on a separate SaladCloud node. SaladCloud operates on a foundation of distributed and interruptible nodes, meaning that a node running your instance may go down at any time without prior notice. In such cases, a new node will be allocated to run the instance. There are no charges incurred during the reallocation process and until the instance is back up and running. Additionally, downloading your image and starting the instance on these SaladCloud nodes may take some time, potentially ranging from a few minutes to longer, depending on the image size and the network conditions of the nodes. Some nodes may download the image faster than others, leading to earlier startup times. So, when determining the replica count, it’s essential to consider both system capacity and reliability. Generally, we recommend using at least 3 replicas for internal testing and 5 or more for production environments. Increasing the number of replicas can significantly enhance the reliability and throughput of your applications on SaladCloud.
Machine Hardware
The —gpus all option in the command allocates all available GPUs on the host to the container, enabling GPU support for applications running inside it. SaladCloud currently supports only one GPU per container. When creating a container group, you can select multiple GPU types at a priority level (Batch/Low/Medium/High), along with the required vCPU, memory and disk space. SaladCloud will then allocate the appropriate SaladCloud nodes that match these selections to run the container group.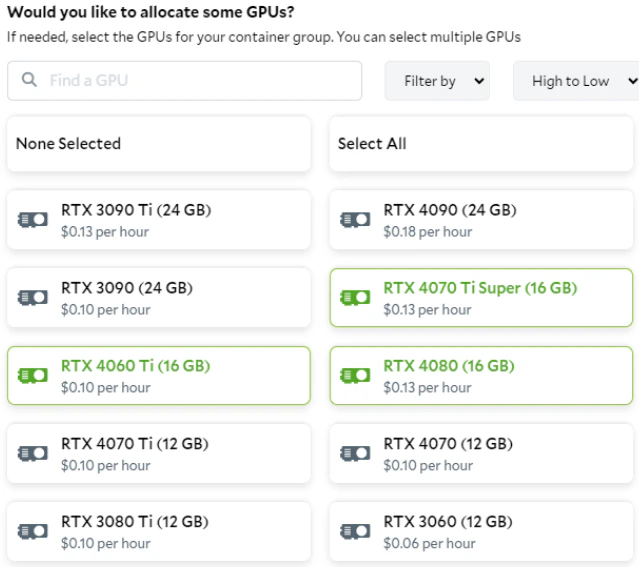
SaladCloud Job Queue
If you are using the SaladCloud Job Queue to manage the tasks for your container group, you can use SaladCloud Job Queue Worker (an executable binary) to replace io_worker.py in the example. This worker is designed to handle input/output operations and interact with your inference server. For more information about SaladCloud Job Queue, please refer to this link.Substitutes
Not all parameters in the docker run command can be directly converted to a container group deployment on SaladCloud; however, alternative solutions are available. The -it flag allows you to interact with a container through a terminal. While SaladCloud does not offer this option during container group creation, you can still interact with running instances using the interactive terminal after the group has been created to perform tests or troubleshoot issues. The -v flag is used to mount a volume by mapping a directory from the host system to the container. SaladCloud currently doesn’t support volume mounting using S3FS, FUSE or NFS. Instead, the recommended solution is to install and use the Cloud Storage SDK or CLI (such as azcopy, aws s3 or gsutil) within the containers to sync data from cloud storage.Start the Container Group
After entering the additional information on the Portal, such as the container group name and the external logging services (optional), you can start the group. Here is a screenshot of SaladCloud Portal 8 minutes after the container group was created: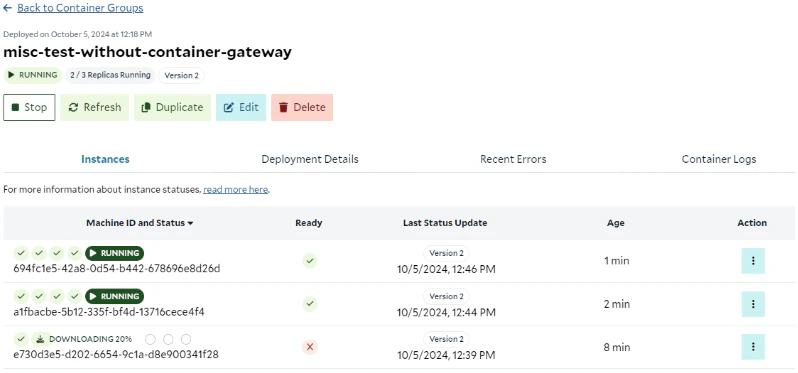
Scenario 2: With Container Gateway
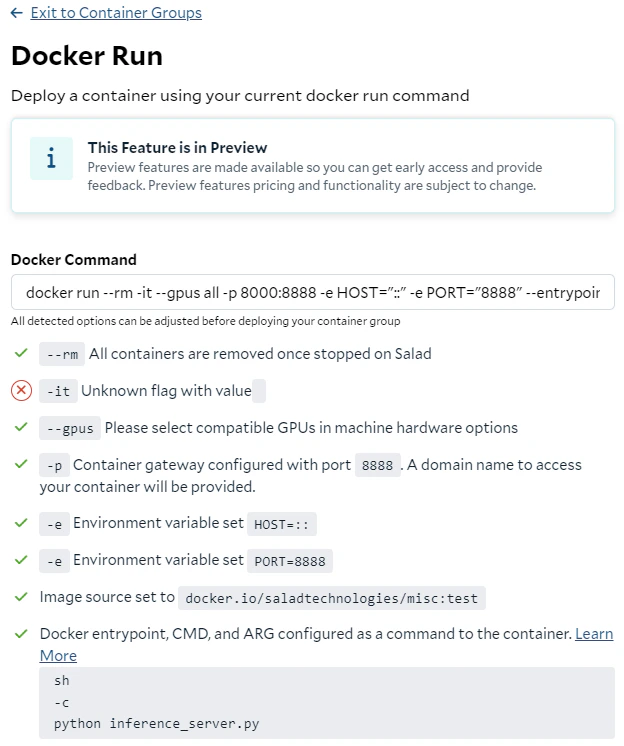
Let’s perform another test. In this scenario, you are building a real-time, on-demand inference application using a group of GPU-powered container instances, accessible through a container gateway (load balancer). Your client application, such as AI Agent or Web UI, interacts with users directly, and forwards the inference requests to the instances through the container gateway. This setup is not intended for long-running tasks. The container gateway has a timeout setting, and requests must be processed and returned by instances within 100 seconds.Docker Run
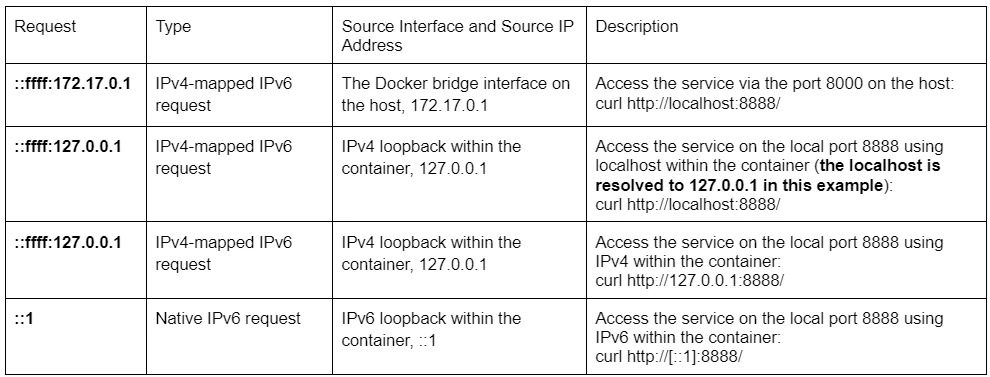
This command provides the ENTRYPOINT instruction ( ‘sh’ ) and overrides the original CMD instruction specified in the Dockerfile ( with -c ‘python inference_server.py’ ) when running the container. The CMD acts as the default parameters for the ENTRYPOINT in this case, and starts only inference_server.py, which handles both IPv4 and IPv6 requests. Additionally, The port 8888 in the container is mapped to port 8000 on the host, enabling any services running on port 8888 within the container to be accessible through port 8000 on the host machine. You can also modify the Dockerfile and rebuild the image to achieve the same goal, eliminating the need to specify the ENTRYPOINT and CMD options when running the docker run command.- Native IPv6 requests, using IPv6 directly and handled by the socket.
- IPv4-mapped IPv6 requests, coming from the IPv4 address ‘x.x.x.x’ but translated into ‘::ffff:x.x.x.x’ and handled by the same socket.

Container Gateway
The -p flag in the docker run command is used to map the port 8888 in the container to the port 8000 on the host, making the service accessible from the host. Here it is converted to the container gateway deployment within the container group.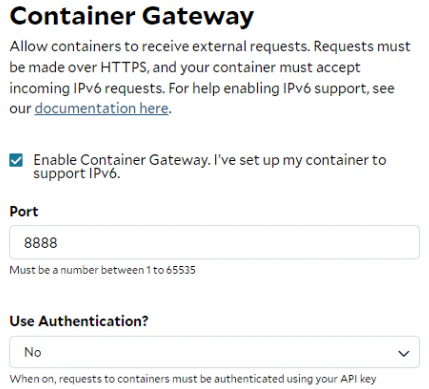

Health Probes
Health probes offer an automated mechanism to initiate specific actions based on the status of containers within a container group. You can think of a probe as a piece of code running alongside the inference server within the same container, allowing it to access the service locally or the shared file system. Readiness probes are essential when deploying a container gateway, as they ensure that requests are only forwarded to an instance when it is fully prepared—for example, when the model has been loaded and warmed up. When configuring a readiness probe on SaladCloud, you can utilize TCP, gRPC, and HTTP protocols. SaladCloud does not provide an option to explicitly select IPv4 or IPv6; it defaults to using IPv6 when the container gateway is deployed, and reverts to IPv4 otherwise. Here is an example: This HTTP probe checks the health of the inference server running inside the instance. The probe sends an HTTP GET request on port 5000 at the root path ( / ) and evaluates the response code. If a status code of 200 is returned, the probe is considered successful, and the container gateway will begin forwarding traffic to the instance. After 3 consecutive failures, the probe is marked as failed, and while the instance will remain running on the node, it will stop receiving requests from the gateway. It’s important to note that readiness probes may fluctuate between passing and failing.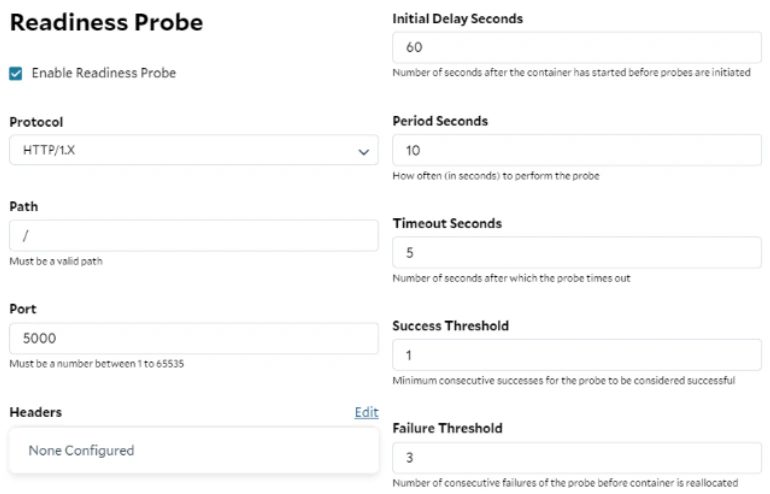
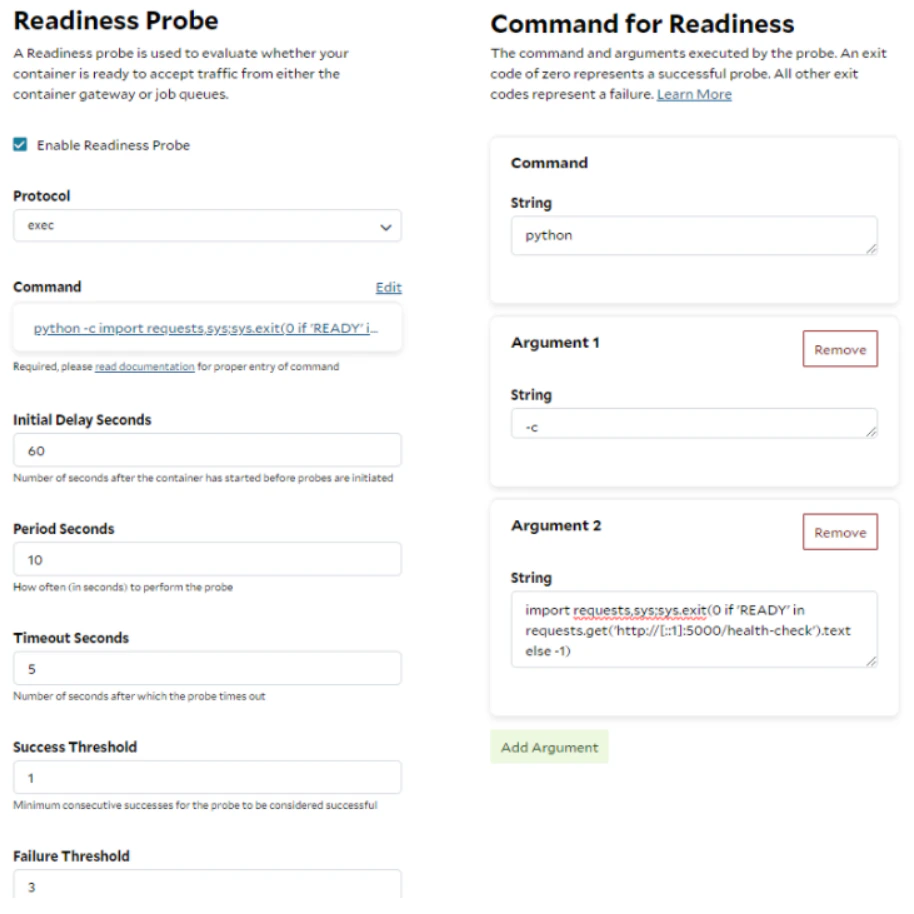
http://[::1]:5000/health-check contains ‘READY’, the Python script returns zero,
indicating a successful probe. Otherwise, the probe is deemed failed.
This probe is more advanced, as it checks not only the HTTP status code, but also the semantics of the response.
Additionally, it explicitly uses IPv6 (::1) to access the inference service locally.
- If the server listens on IPv4 only, the probe must be based on IPv4.
- If the server handles both IPv4 and IPv6 requests, the probe can use IPv4 or IPv6.
- If the server only handles IPv6 requests, the probe must be built on IPv6.
Command
The —entrypoint ‘sh’ and -c ‘python inference_server.py’ options in the command are converted to the Command deployment within the container group. This feature allows you to provide or override the original ENTRYPOINT and CMD instructions specified in the Dockerfile. With this flexibility, you don’t need to modify the Dockerfile, rebuild and push the image every time you change settings and code or run different applications.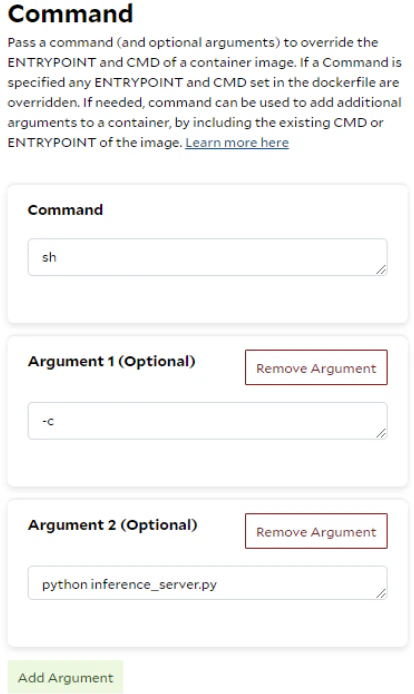
Summary
While most of a docker run command and its parameters can be directly translated into the container group deployment on SaladCloud to run a GPU-accelerated application, some aspects may need to be adjusted and replaced to fully optimize the use of SaladCloud.- SaladCloud is the powerful, highly scalable and cost-effective platform for requirements that involve tens to thousands of GPUs for large-scale and on-demand AI inference (such as image generation or LLM), utilizing a load balancer, or a batch-processing system to handle millions of jobs (transcription, molecular simulation) within a specified timeframe. However, single-instance, UI-based, or database applications are not well-suited for SaladCloud.
- Consider both system capacity and reliability when determining the replica account (3+ for testing and 5+ for production), and increasing the number of replicas can significantly enhance the reliability and throughput of your applications.
- Deploying a container group with a few instances may reduce waiting time and enhance the developer experience without incurring additional costs.
- Always update the container image name or tag whenever it changes to minimize confusion. If the image has changed since the container group was created, you will need to update the image source in the container group to run the new version even if it retains the same name and tag.
- Applications running on SaladCloud must be optimized to accommodate the distributed and interruptible nature of the platform, including varying startup times and node reallocations.
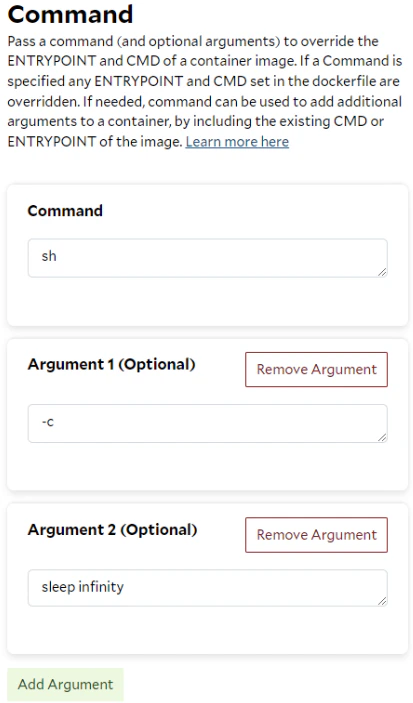
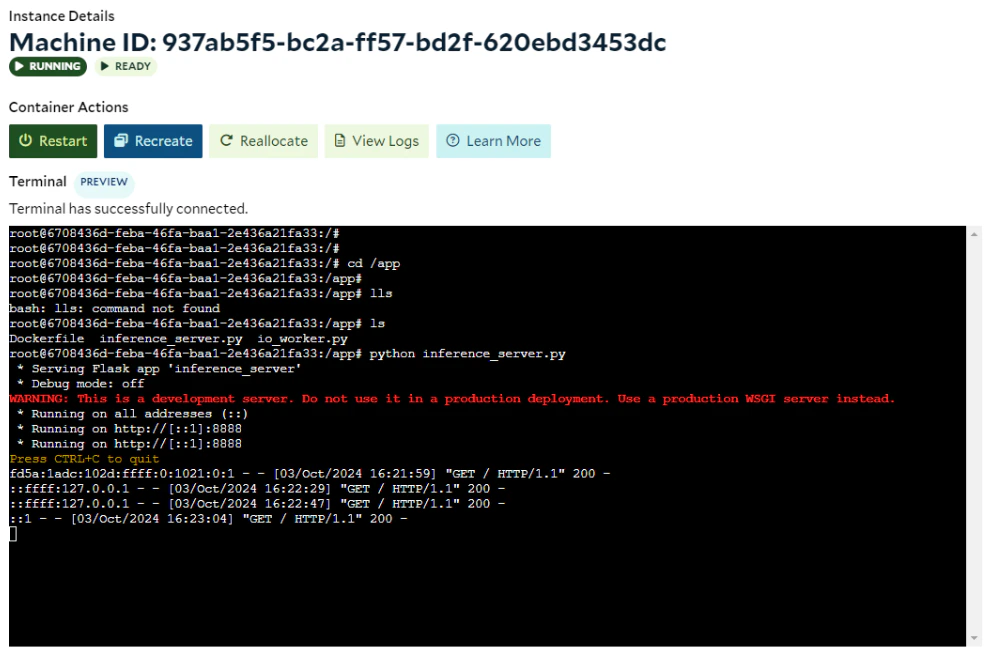
- The containers running on SaladCloud must have a continuously running process; and If the process completes, SaladCloud will automatically reallocate the instances to rerun the process.
- You can run code or troubleshoot issues interactively, using the Command settings and the interactive terminal.
- The probe and the inference server must be properly aligned for local access in terms of both IP address (IPv4 or IPv6) and port. For simplicity, configure your server to use either IPv6 or dual-stack only when the container gateway is enabled. In all other cases, use IPv4 exclusively.
- All container instances, regardless of their locations, are currently exposed by the container gateway in the U.S, which may introduce additional latency for instances in other regions. Ensure that your applications can tolerate this delay and jitter.
- Avoid using the container gateway or job queue to transfer very large data. Instead, utilize them to transmit metadata and status, while instances directly access cloud storage for uploading and downloading large data.
- SaladCloud currently doesn’t support mounting volumes using S3FS, FUSE or NFS. The recommended solution is to install and use the Cloud Storage SDK or CLI (such as azcopy, aws s3 or gsutil) within the containers to sync data from cloud storage.
- Unlike a Kubernetes Pod, which can run multiple containers (images) that share the same network and storage, a SaladCloud container group can currently run only one image. To run multiple applications, you may need to consolidate their images into one and use the ENTRYPOINT and CMD instructions in the Dockerfile to run multiple processes within that single image.
- If you run multiple applications or images using the Docker Compose commands, you will assess their suitability for SaladCloud first. Each application in the YAML file should be mapped to a dedicated container group with the container gateway. Communication between these applications or groups can only occur through the generated access domain names. Alternatively, you can consolidate these images into a single image and then deploy it using one container group.