Supported Workflows
SaladCloud offers two methods of creating and managing your deployments:Portal
The Portal is a browser-based UI at https://portal.salad.com that allows you full control over your deployments, including create, read, update, and delete functionality. The Portal also provides access to organization management, billing, and support.SaladCloud API
When you are ready for a deeper integration, the SaladCloud API also offers full control over your deployments. Occasionally, new features are made available from the API before they are visible in the Portal. You can dive directly into our API documentation here.Defining Workloads
In the Salad Container Engine lexicon, container deployments are known as Container Groups. Each Container Group represents a set of “identical” Container Instances that each run on dedicated hardware.Container Groups
A Container Group is defined as a container image, the required hardware resources, and a predetermined number of replicas to be maintained at any given time. Once a Container Group has been defined, SCE automatically creates or purges Container Instances as needed to reach the desired replica count. For enhanced reliability and smoother operation, we strongly recommend deploying with a minimum of 2 replicas. This ensures your applications remain resilient and maintain performance, even if a node becomes temporarily unavailable. Scaling beyond a single node not only increases fault tolerance but also optimizes resource allocation and load balancing across our distributed cloud infrastructure. Start with 2 or more replicas to unlock the full potential of our platform and experience seamless scaling and improved uptime for your containers. Container Groups can be created, started, stopped, or scaled via the SaladCloud API and UI, giving you direct control over your workloads before and after deployment.Container Instances
A Container Instance represents a single instantiation of a container on a dedicated host connected to the Salad network. Each time a container is deployed to a SaladCloud machine node, a new Container Instance is created with a unique id and discrete logs.Compute Environment
SaladCloud leverages hardware-native virtualization and industry-standard container runtimes to standardize the compute environment across a distributed network of heterogeneous hardware. Once a container image has been deployed, SCE instantiates replicas on a predetermined number of available physical devices as stateless processes within virtual Linux subsystems.Host Environment
All SCE container instances deploy to consumer-owned hardware running modern Windows NT operating systems (Windows 10 or later). This allows the SaladCloud desktop client to leverage Microsoft Hyper-V virtualization features, manage and monitor workloads, and boot true Linux kernels from the Windows Subsystem for Linux (WSL2).📘 Supported Containers Currently, SCE supports Linux containers on AMD64 (also commonly known as x86-64). Container image manifests must be Docker compliant (e.g. Docker image manifest v1 or v2) or OCI Compliant. ARM architecture is not supported at this time. Windows containers are not supported at this time.
Stateless Execution
Active SCE container instances are treated as stateless workloads. Whenever the virtual execution context closes (through down-scaling, batch job termination, or failure), the container image is purged from the host machine’s local memory. While running, the SaladCloud container orchestrator uses heartbeat monitoring to assess potential interruptions or other failures, and determine when and how best to dynamically fail over to another dedicated node to maximize resource availability.Open-source Dependencies
SaladCloud incorporates battle-tested and incrementally developed tooling for reliable performance and replicable results. The SaladCloud API conforms to OpenAPI specifications and generates templates in various coding languages to facilitate testing and development. When deployed from the SaladCloud API or the SaladCloud UI, SCE container instances are automatically executed in the latest stable version of the open-source containerd container runtime.Use Cases
SaladCloud’s affordable infrastructure is as versatile as your imagination. Here are just a few examples of what you can build with SCE:- use AI models to perform image generation, text to audio, image captioning, and other tasks
- proxy video-streaming requests for virtual private networks
- conduct long-running data processing queues
- execute massively parallelizable workloads
- distribute 3D rendering or VFX queues
- procedurally-generated mapping simulations
Additional Considerations
Developers interested in using SCE should be aware of these additional considerations:AMD64 Architecture
SaladCloud currently supports only AMD64 architecture for container instances. ARM architecture is not supported at this time. If you are developing on a Mac or other ARM-based system, you may need to cross-compile your application for AMD64. Docker supports multi-architecture builds, so you can build your application for both ARM and AMD64 at the same time using the--platform flag:
Cold-start Overhead
Cold-start times on SaladCloud can be longer than on traditional clouds. This is primarily due to the time it takes to download container images to the host machine. Since host machines are consumer-owned, they often have slower internet connections than data centers.Data-sensitivity Compliance
Customers in specialized industries may be legally obligated to protect sensitive data such as medical records or private financial information. While SaladCloud takes precautions to secure every workload on our network, we cannot guarantee that our solutions are considered compliant with requirements outlined by select regulatory commissions or legislative authorities (including but not limited to HIPAA and the Financial Modernization Act of 1999).Scaling Container Groups
While SCE does maintain a stable replica count within a given Container Group, SCE deployments do not currently auto-scale Container Groups based on performance. Container Groups must be scaled up or down on demand through the Portal, or by direct request via the SaladCloud API.Persistent Storage
SaladCloud does not currently support persistent storage for container instances. All data written to the container instance’s filesystem is ephemeral and will be lost when the container instance is terminated. If you need persistent storage, you can use an external storage service like Amazon S3, Google Cloud Storage, or Azure Blob Storage. We recommend a vendor that does not charge egress fees, as SaladCloud nodes are globally distributed and egress fees can add up quickly.WSL2
SaladCloud uses Windows Subsystem for Linux 2 (WSL2) to run Linux containers on Windows machines. Customers may notice that less than 100% of VRAM is available to the container. This is because WSL2 reserves a small portion of the VRAM for the Windows host machine.Performance Variability
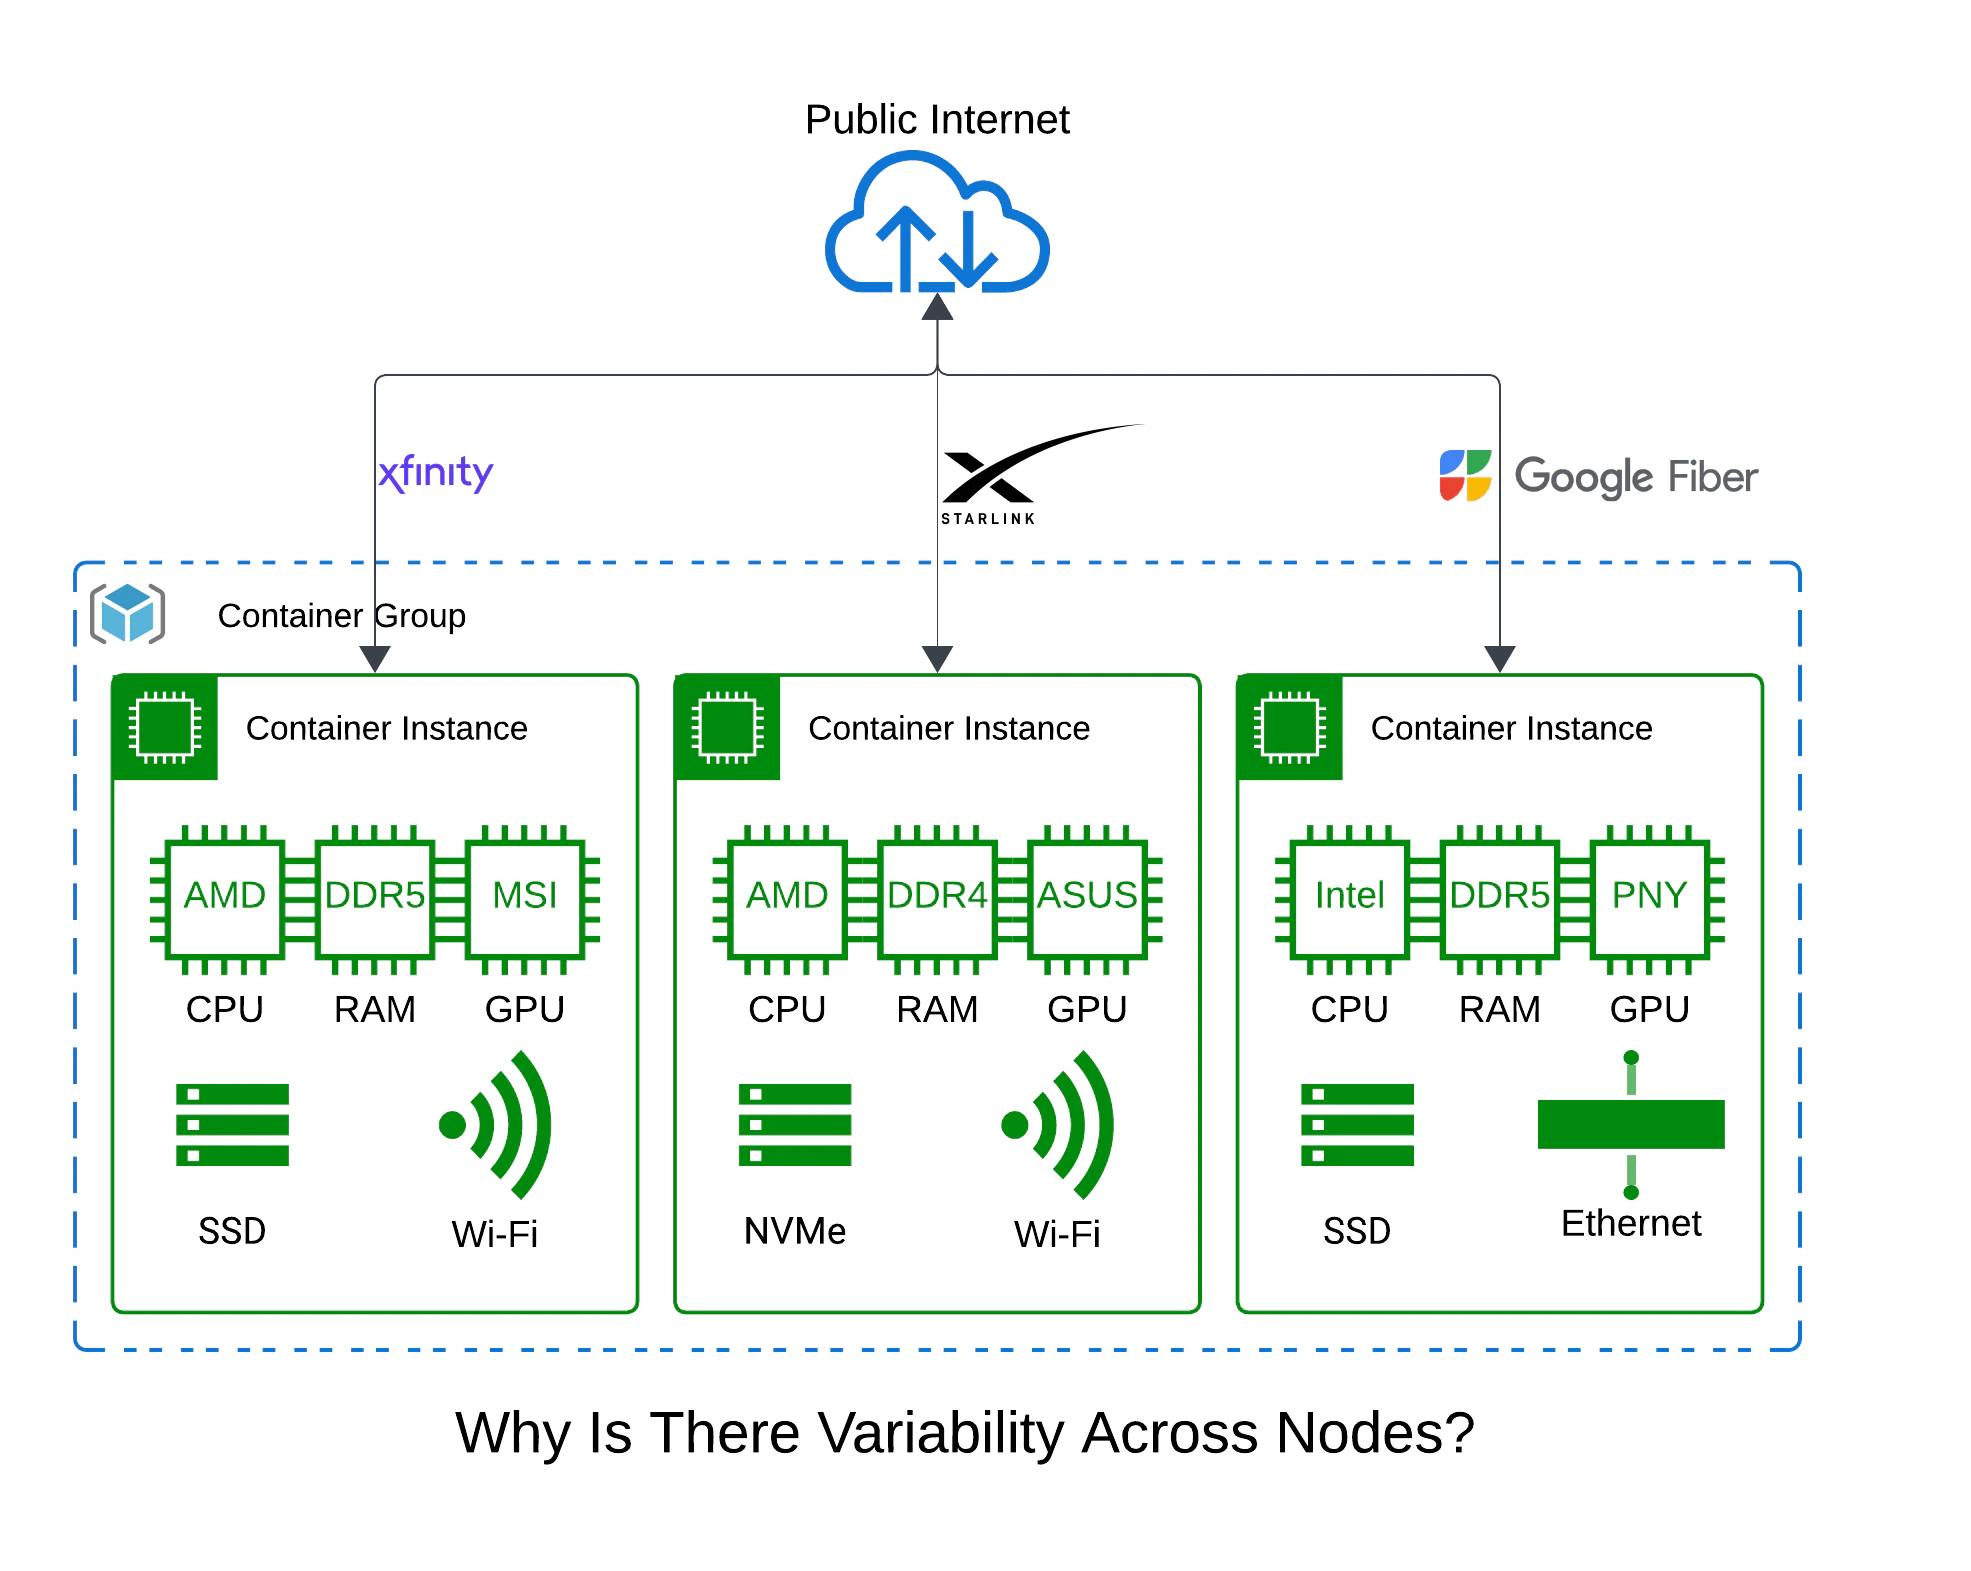
Because SaladCloud nodes are individual residential gaming PCs, there is some expected performance variability. Your container group may request 3 nodes with 2 vCPU, 12gb RAM, and an RTX 4090, but within that criteria, there can still be significant variability in network, compute, and storage performance. It is important to monitor the performance of your application over time so that you can detect anomalous behavior and reallocate under-performing nodes.