> ## Documentation Index
> Fetch the complete documentation index at: https://docs.salad.com/llms.txt
> Use this file to discover all available pages before exploring further.
# Run a Python App
*Last Updated: October 15, 2024*
The your python application up and running is as simple as packaging up the application into a Docker container. Once
you have the Docker container uploaded to a container registry, you can easily deploy that container on 1-100s of fully
customizable (# CPUs, # RAM, GPU) instances.
In this guide, we will create a simple `Hello World` python application, but these steps can be used to deploy any new
or existing application on Salad.
# Creating the Python Container
## Requirements
You would normally have the package requirements for your application in some file.
It would depend mainly on the tool you use to install those requirements.
The most common way to do it is to have a file requirements.txt with the package names and their versions, one per line.
You would of course use the same ideas you read in About FastAPI versions to set the ranges of versions.
For example, your requirements.txt could look like:
```Text requirements.txt theme={null}
fastapi>=0.68.0,<0.69.0
pydantic>=1.8.0,<2.0.0
uvicorn>=0.15.0,<0.16.0
```
And you would normally install those package dependencies with pip, for example:
```Text Bash theme={null}
pip install -r requirements.txt
```
## Create the FastAPI Code
* Create a `main.py` file with:
```python theme={null}
from typing import Union
from fastapi import FastAPI
app = FastAPI()
@app.get("/")
def read_root():
return {"Hello": "World"}
@app.get("/items/{item_id}")
def read_item(item_id: int, q: Union[str, None] = None):
return {"item_id": item_id, "q": q}
```
## Create the Dockerfile
Now in the same project directory create a file `Dockerfile` with:
```dockerfile theme={null}
# Starts with the official python base image
FROM python:3.9
# Set the current working directory to /code.
# This is where we'll put the requirements.txt file and the app directory.
WORKDIR /app
# Copy the file with the requirements to the /app directory.
# Copy any python files into the /app directory
COPY ./requirements.txt *.py ./
# Install the package dependencies in the requirements file.
RUN pip install --no-cache-dir --upgrade -r /app/requirements.txt
# Set the command to run the uvicorn server.
# CMD takes a list of strings, each of these strings is what you would type in the command line separated by spaces.
CMD ["uvicorn", "main:app", "--host", "::", "--port", "80"]
```
You should now have a directory structure like:
```
.
├── main.py
├── Dockerfile
└── requirements.txt
```
## Build the Docker Image
Now that all the files are in place, let's build the container image.
* Go to the project directory (in where your `Dockerfile` is, containing your `app` directory).
* Build your FastAPI image:
```Text Bash theme={null}
docker build -t my-image:latest .
```
## Test the Container Locally
### Run the Docker Container
Run a container based on your image on your local machine:
```Text Bash theme={null}
docker run -d --name my-container -p 80:80 my-image:latest
```
### Check the API
You should be able to check it in your Docker container's URL, for example:
* http\://localhost:80/
* http\://localhost/items/2
You will see something like:
```json theme={null}
{ "item_id": 5, "q": "some-query" }
```
# Push Container to a Registry
Now that you have a container locally, you will need to push that container image up to a container registry so it can
be deployed on SaladCloud. You can push to any of the
[supported container registries](/container-engine/explanation/infrastructure-platform/container-registries), but for
this guide we will use Docker Hub.
## Tagging the Image
In order to push the container image to Docker Hub you will first need to tag your image with your Docker username and
an unique container name. The format of the image name is `{docker-hub-username}/{image-name}:{version}`
At SaladCloud we use the `saladtechnologies` username, but you will need to use your own username.
```Text Bash theme={null}
docker tag my-image saladtechnologies/run-python:0.1
```
## Pushing the Image
Now that your container has the proper naming convention, you can push the container to Docker Hub by running the `push`
command.
```Text Bash theme={null}
docker push saladtechnologies/run-python:0.1
```
Once the image is pushed to Docker Hub you can now deploy your container on Salad!
# Deploy Container to Salad
## Creating the Container Group
Now that you have a complete (yet basic) FastAPI application running you can deploy it to SaladCloud via the Portal or
the Public API.
When you are asked to specify the "Image Source" you simply need to provide the image name you used to push the
container up to the registry.
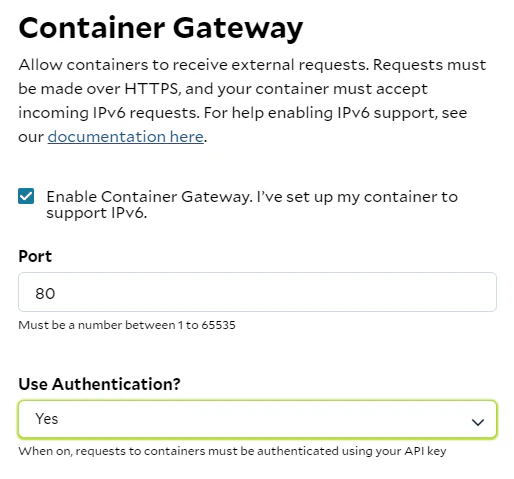
 Since the FastAPI is listening to port 80, you will need to enable the Container Gateway and configure the port when
creating a new container group.
[Deployment Guide](/container-engine/explanation/container-groups/container-groups)
Since the FastAPI is listening to port 80, you will need to enable the Container Gateway and configure the port when
creating a new container group.
[Deployment Guide](/container-engine/explanation/container-groups/container-groups)
 ## Connecting to the Application
Once the container group is up and running, you will be given a static URL that load balances all http requests across
the instances of your applications. If you enabled authentication then you will need to include your API key in the
`'Salad-Api-Key` header of your http requests.
Example Request
```
GET https://caesar-lime-465054.salad.cloud/items/2
```
Congrats! You have successfully created, containerized, deployed and connected to your first application on Salad!
## Connecting to the Application
Once the container group is up and running, you will be given a static URL that load balances all http requests across
the instances of your applications. If you enabled authentication then you will need to include your API key in the
`'Salad-Api-Key` header of your http requests.
Example Request
```
GET https://caesar-lime-465054.salad.cloud/items/2
```
Congrats! You have successfully created, containerized, deployed and connected to your first application on Salad!