> ## Documentation Index
> Fetch the complete documentation index at: https://docs.salad.com/llms.txt
> Use this file to discover all available pages before exploring further.
# Ubuntu 24.04 Development Environment Recipe
> Deploy a complete Ubuntu 24.04 environment for exploring and learning about the SaladCloud platform.
*Last Updated: July 10, 2025*
Deploy from the [SaladCloud Portal](https://portal.salad.com).
## Overview
This recipe provides a complete Ubuntu 24.04 development environment designed specifically for exploring and learning
about the SaladCloud platform. It's the perfect starting point for newcomers who want to understand how SaladCloud
works, experiment with deployments, and get hands-on experience with the platform's features.
The environment includes:
* **Ubuntu 24.04 LTS** - Latest long-term support release
* **Development Tools** - build-essential, git, curl, wget, and more
* **Python Environment** - Python 3 with pip, venv, and JupyterLab
* **Node.js** - Latest LTS version via nvm
* **VS Code Server** - Optional remote development access
* **System Utilities** - htop, nvtop, jq, zip/unzip tools
This recipe is ideal for:
* **Learning SaladCloud** - Understanding how container deployments work
* **Platform Exploration** - Testing SaladCloud features and capabilities
* **Getting Started** - First-time users who want to experiment safely
* **Educational Purposes** - Learning Linux, Python, and cloud computing concepts
* **Prototyping Ideas** - Testing concepts before building custom applications
## Access Options
Once deployed, you can access your Ubuntu environment through multiple interfaces:
### JupyterLab
Access JupyterLab at `https://your-deployment-url.salad.cloud/lab` for interactive Python development, data analysis,
and notebook creation.
### VS Code (Optional)
If you configure the VS Code tunnel settings during deployment, you can access VS Code at
`https://vscode.dev/tunnel/your-container-group-id/workspace` for full IDE functionality.
### Web Terminal
Click on any running instance in the SaladCloud Portal to access a browser-based terminal for command-line operations.
## How To Use This Recipe
### Getting Started with SaladCloud
This recipe is designed to be your first step into the SaladCloud platform. Simply deploy it with the default settings
to get a fully functional Ubuntu environment where you can:
* Explore the SaladCloud dashboard and interface
* Learn how container groups work
* Experiment with different features safely
* Practice deploying and managing applications
### VS Code Integration (Optional)
To enable VS Code server integration:
1. Follow the
[VS Code Remote Development guide](/container-engine/tutorials/development-tools/vscode-remote-development#create-a-tunnel-and-generate-access-tokens)
to create a tunnel and generate access tokens
2. During deployment, provide your `TUNNEL_ID` and `ACCESS_TOKEN` as environment variables
3. If omitted, JupyterLab and web terminal access will still be available
### Resource Configuration
This recipe is configured to run on RTX 3090 GPUs with 24GB VRAM by default, providing you with powerful hardware to
explore SaladCloud's capabilities. You can adjust the hardware requirements based on what you want to learn:
* **Basic Exploration**: 2-4 vCPUs, 8-16GB RAM, no GPU required
* **GPU Learning**: 4-8 vCPUs, 16-32GB RAM, RTX 3090 or better
* **Performance Testing**: 8+ vCPUs, 32GB+ RAM, RTX 4090 or better
### Replica Count
The recipe is configured for 1 replica, because load-balancing requests across unrelated JupyterLab instances leads to a
bad user experience.
### Persistence and Data Management
SaladCloud instances are ephemeral and can be reallocated at any time, resetting to a fresh Ubuntu image. Make sure to
persist any important data to a remote location, such as S3, Git repositories, or databases, to avoid losing work when
instances are reset.
Recommended practices:
* Commit code changes to Git repositories frequently
* Use cloud storage for data files (S3, Google Drive, etc.)
* Save important configurations and scripts to external locations
* Use environment variables for sensitive configuration
### Authentication
When deploying this recipe, we recommend **against** enabling authentication, as it can complicate accessing JupyterLab.
If you enable authentication, all requests to your development environment will need to include your SaladCloud API key
in the header `Salad-Api-Key`. See the [documentation](/container-engine/how-to-guides/gateway/sending-requests) for
more information about authentication.
### Deploy It And Wait
When you deploy the recipe, SaladCloud will find a qualified node and begin downloading the container image. The Ubuntu
image is relatively lightweight, so deployment should be faster than recipes that may include large model weights.
Eventually, you will see instances enter the running state and show a green checkmark in the "Ready" column. Once at
least 1 instance is running, you can access JupyterLab and the web terminal immediately.
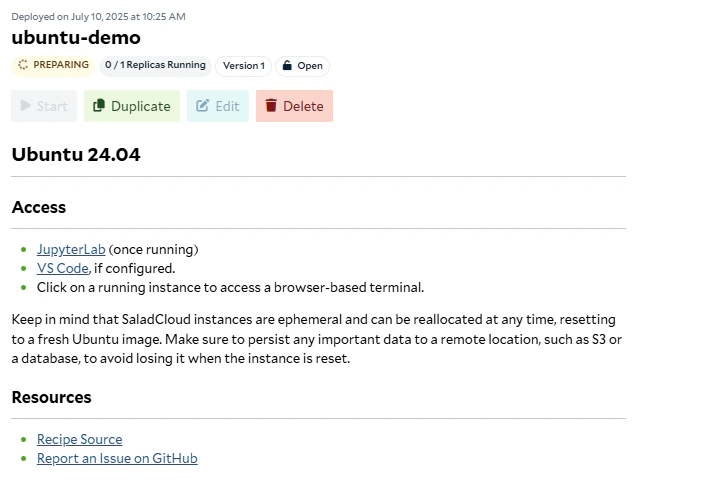 You will find helpful links and information in the readme on the container group page once deployed.
## Source Code
The complete source code for this recipe is available in the
[SaladCloud Recipes GitHub repository](https://github.com/SaladTechnologies/salad-recipes/tree/master/recipes/ubuntu).
You will find helpful links and information in the readme on the container group page once deployed.
## Source Code
The complete source code for this recipe is available in the
[SaladCloud Recipes GitHub repository](https://github.com/SaladTechnologies/salad-recipes/tree/master/recipes/ubuntu).