> ## Documentation Index
> Fetch the complete documentation index at: https://docs.salad.com/llms.txt
> Use this file to discover all available pages before exploring further.
# SQS and SaladCloud
> Managing Long-Running Tasks on SaladCloud with SQS
*Last Updated: February 25, 2025*
# Managing Long-Running Tasks on SaladCloud with SQS
Managing long running tasks, such as molecular simulations, LoRA training, and LLM finetuning, presents unique
challenges on SaladCloud, due primarily to the interruptible nature of nodes. At the core of all solutions to this
problem are a job queue, and progress checkpoints. The job queue is responsible for distributing tasks to workers, and
detecting when a worker has been interrupted. Workloads should save checkpoints of their progress and upload it to cloud
storage, so that they can be resumed from the last checkpoint in the event of an interruption. Workers should also
upload completed artifacts to cloud storage.
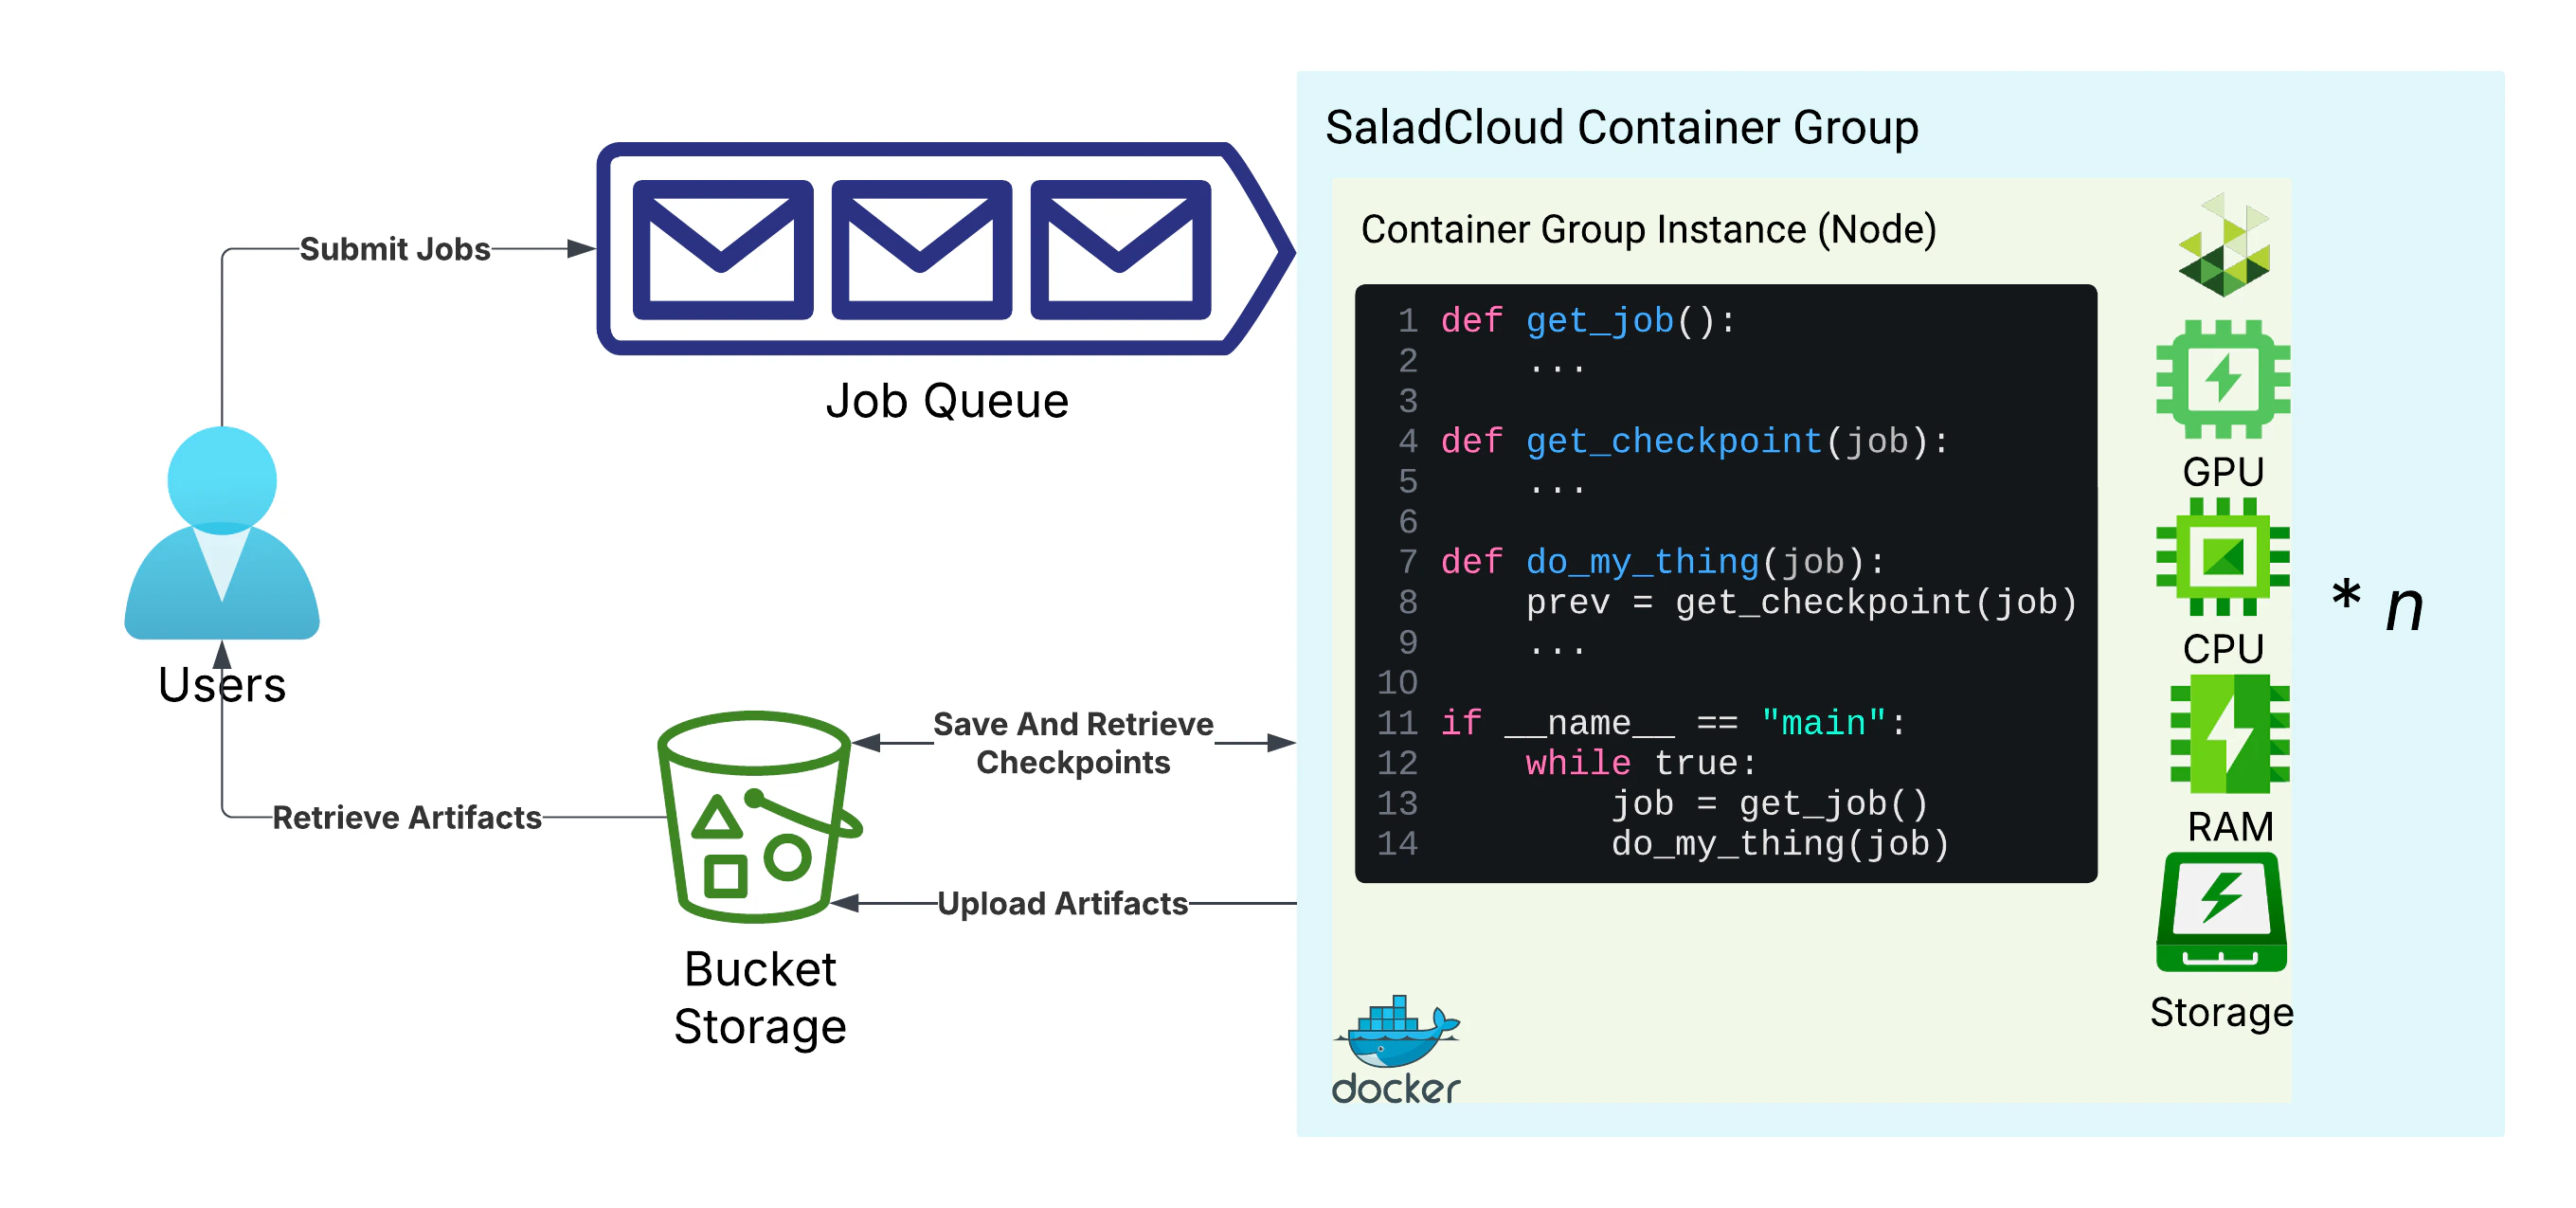 We will be using [Amazon SQS](https://aws.amazon.com/sqs/) as our job queue, and
[Cloudflare R2](https://www.cloudflare.com/developer-platform/products/r2/), an S3-compatible object storage service, as
our cloud storage. We prefer R2 to AWS S3 for many SaladCloud workloads, because R2 does not charge for egress data,
which helps reduce costs when distributed workers fetch inputs and upload results. Instrumenting your code to use
S3-compatible storage will make it easier to switch storage providers in the future if you choose to do so.
For this guide, we will build an application that slowly calculates a sum for *n* steps, sleeping for 30 seconds between
steps to simulate work. We will set up a job queue and related resources, a storage bucket, a checkpoint saving system,
and a simple auto-scaling mechanism.
You will need an AWS account, and a Cloudflare account to follow this guide.
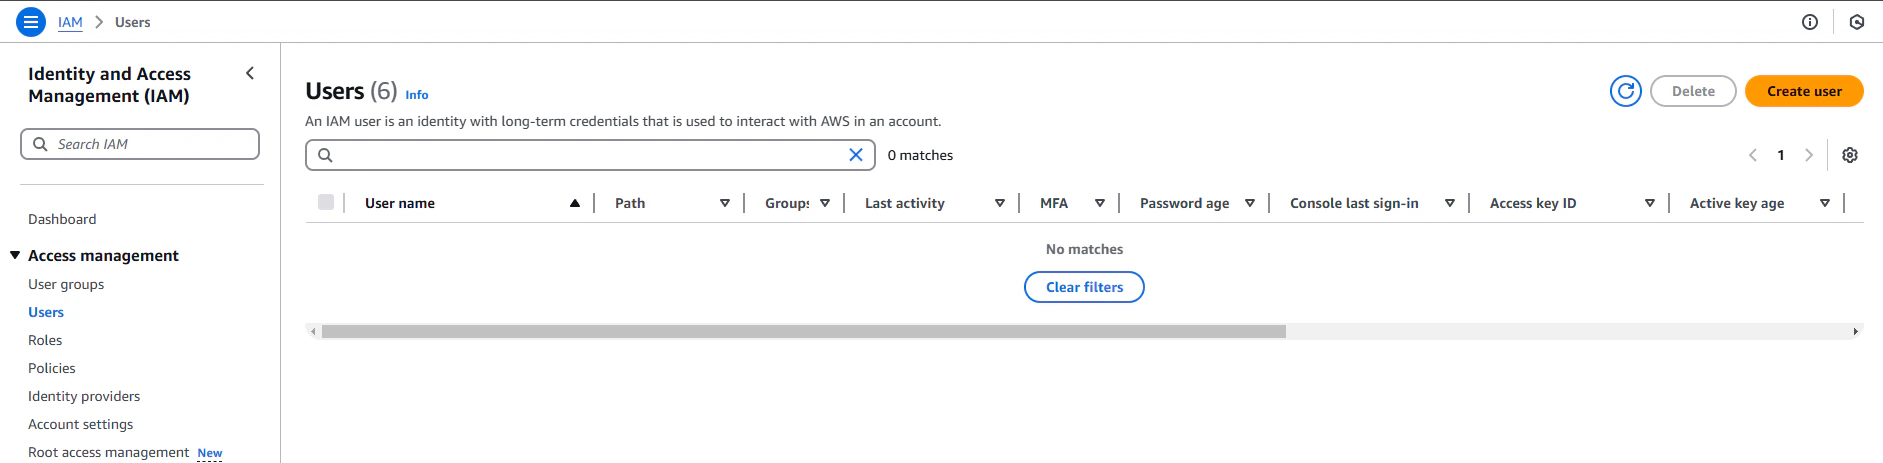
## IAM: Identity and Access Management
IAM is the AWS system for managing users, roles, and permissions. We will need to create two IAM users: one for us, the
user submitting the jobs, and one for the workers. The user submitting the jobs will need to be able to submit jobs to
the queue, and the workers will need to be able to read and delete jobs from the queue. To get started, navigate to the
[IAM console](https://console.aws.amazon.com/iam/), and select "Users" from the left-hand menu. Click "Create User".
We will be using [Amazon SQS](https://aws.amazon.com/sqs/) as our job queue, and
[Cloudflare R2](https://www.cloudflare.com/developer-platform/products/r2/), an S3-compatible object storage service, as
our cloud storage. We prefer R2 to AWS S3 for many SaladCloud workloads, because R2 does not charge for egress data,
which helps reduce costs when distributed workers fetch inputs and upload results. Instrumenting your code to use
S3-compatible storage will make it easier to switch storage providers in the future if you choose to do so.
For this guide, we will build an application that slowly calculates a sum for *n* steps, sleeping for 30 seconds between
steps to simulate work. We will set up a job queue and related resources, a storage bucket, a checkpoint saving system,
and a simple auto-scaling mechanism.
You will need an AWS account, and a Cloudflare account to follow this guide.
## IAM: Identity and Access Management
IAM is the AWS system for managing users, roles, and permissions. We will need to create two IAM users: one for us, the
user submitting the jobs, and one for the workers. The user submitting the jobs will need to be able to submit jobs to
the queue, and the workers will need to be able to read and delete jobs from the queue. To get started, navigate to the
[IAM console](https://console.aws.amazon.com/iam/), and select "Users" from the left-hand menu. Click "Create User".
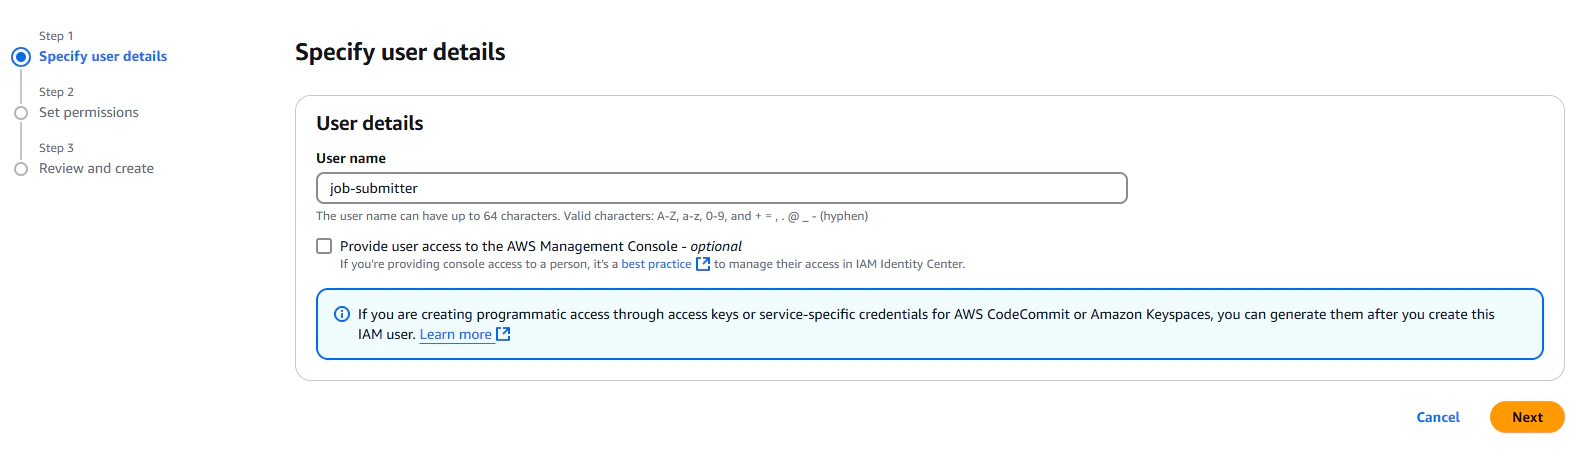
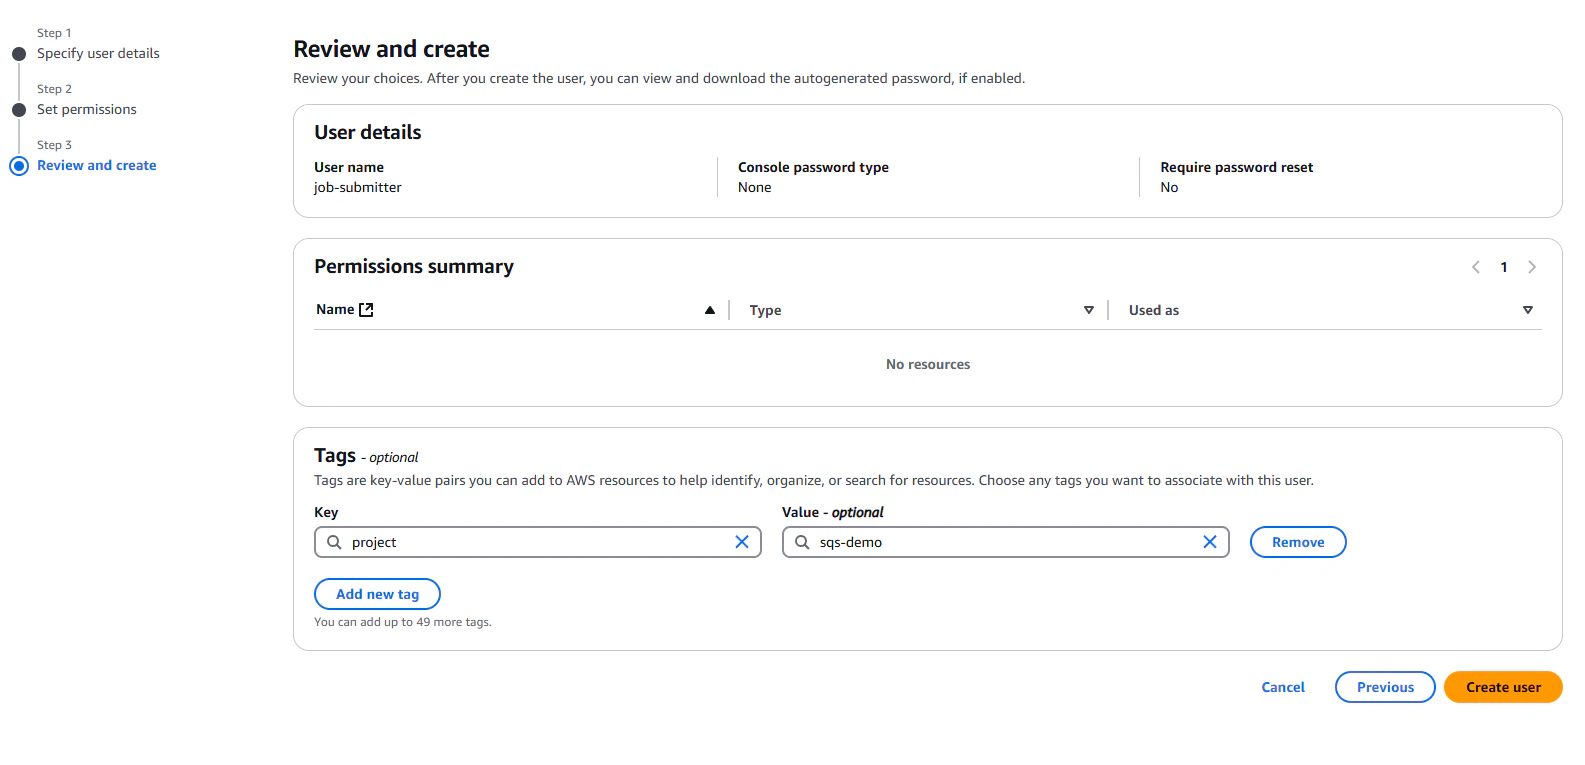
 We're going to name our user `job-submitter`. It does not need console access.
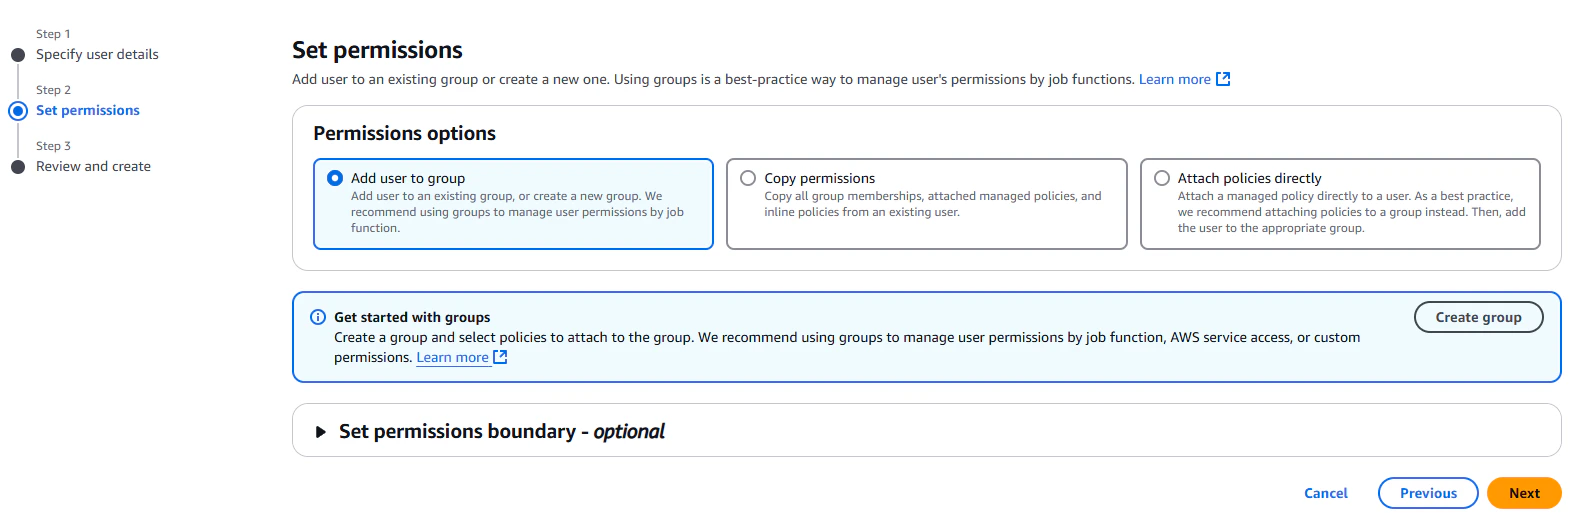
 On the next screen, we're going to grant no permissions the the user. We will be using a resource-based policy later to
grant the user access to the queue.
On the next screen, we're going to grant no permissions the the user. We will be using a resource-based policy later to
grant the user access to the queue.
 Finally, give the user any tags that will make it easier to find and organize later. We're going to give it a tag of
"project: sqs-demo".
Finally, give the user any tags that will make it easier to find and organize later. We're going to give it a tag of
"project: sqs-demo".
 Repeat that process to create a user called `job-worker`. Once you're done, leave this tab open, because we will need
the resource IDs (ARNs) of the users later.
We need to create a set of access keys for both IAM users in AWS. Navigate back to your IAM console tab, and click on
the job-worker user. Select "Create access key", and save the access keys and secret keys somewhere safe. Make sure to
keep track of which set of keys belongs to which user, since they have different permissions.
Repeat that process to create a user called `job-worker`. Once you're done, leave this tab open, because we will need
the resource IDs (ARNs) of the users later.
We need to create a set of access keys for both IAM users in AWS. Navigate back to your IAM console tab, and click on
the job-worker user. Select "Create access key", and save the access keys and secret keys somewhere safe. Make sure to
keep track of which set of keys belongs to which user, since they have different permissions.
 ## The Job Queue: SQS
Simple Queue Service, or SQS, is a fully managed serverless queue solution from AWS. It is a great choice for managing
long-running tasks (but \< 12 hours) on SaladCloud because it is highly available, scalable, and requires no ongoing
maintenance. For tasks longer than 12 hours, the job will be processed no more than 12 hours at a time by any particular
worker, and the job must be completed with 14 days of being submitted. SQS is not free, and while the pricing may seem
low, the cost can add up quickly if you are not careful. That said, if you are processing less than a few million jobs
per month, the cost should be negligible.
### Relevant Limitations
* Maximum message size of 256KB. This means if our job has much in the way of input data, we will need to store that
input data in cloud storage, and only include references to it in the job definition.
* Maximum message retention of 14 days. This means if jobs sit in the queue for longer than 14 days, they will be
automatically deleted.
* Maximum message visibility timeout of 12 hours. This means that if a worker does not delete a message from the queue
within 12 hours of receiving it, the message will be made available to other workers. For some particularly long
workloads, this presents challenges. For others, it is a non-issue.
* There is no built-in mechanism to look up what jobs are in the queue, or what jobs have finished. This means that if
you need to know the status of a job, you will need to store that information somewhere in the cloud (database, bucket
storage, etc), and update it as the job progresses.
* There is no built-in mechanism for canceling a job once submitted. If that is something you need, you would need to
build an additional mechanism for it, and have your worker check for a cancel signal periodically.
* AWS is pretty complicated if you are unfamiliar with it (and even if you are!).
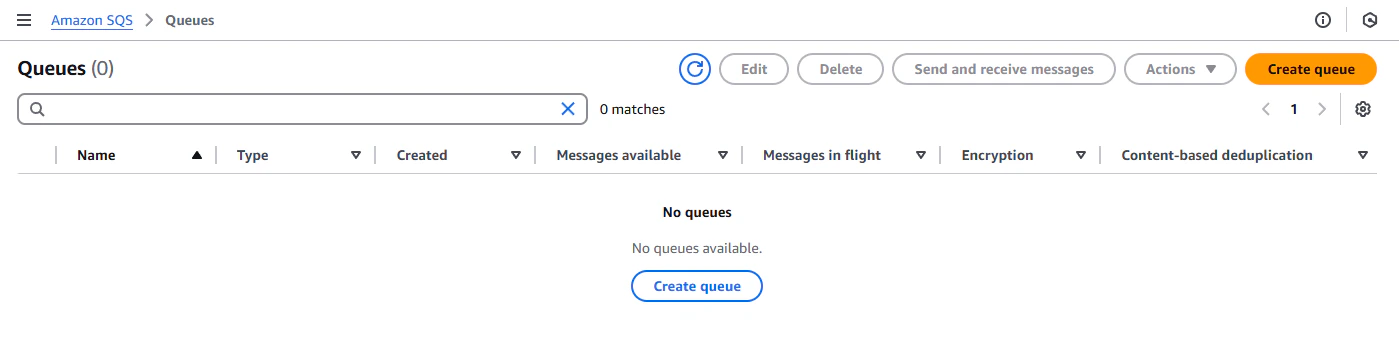
### Creating SQS Queues
To create an SQS queue, navigate to the [SQS console](https://console.aws.amazon.com/sqs/), and click "Create queue".
## The Job Queue: SQS
Simple Queue Service, or SQS, is a fully managed serverless queue solution from AWS. It is a great choice for managing
long-running tasks (but \< 12 hours) on SaladCloud because it is highly available, scalable, and requires no ongoing
maintenance. For tasks longer than 12 hours, the job will be processed no more than 12 hours at a time by any particular
worker, and the job must be completed with 14 days of being submitted. SQS is not free, and while the pricing may seem
low, the cost can add up quickly if you are not careful. That said, if you are processing less than a few million jobs
per month, the cost should be negligible.
### Relevant Limitations
* Maximum message size of 256KB. This means if our job has much in the way of input data, we will need to store that
input data in cloud storage, and only include references to it in the job definition.
* Maximum message retention of 14 days. This means if jobs sit in the queue for longer than 14 days, they will be
automatically deleted.
* Maximum message visibility timeout of 12 hours. This means that if a worker does not delete a message from the queue
within 12 hours of receiving it, the message will be made available to other workers. For some particularly long
workloads, this presents challenges. For others, it is a non-issue.
* There is no built-in mechanism to look up what jobs are in the queue, or what jobs have finished. This means that if
you need to know the status of a job, you will need to store that information somewhere in the cloud (database, bucket
storage, etc), and update it as the job progresses.
* There is no built-in mechanism for canceling a job once submitted. If that is something you need, you would need to
build an additional mechanism for it, and have your worker check for a cancel signal periodically.
* AWS is pretty complicated if you are unfamiliar with it (and even if you are!).
### Creating SQS Queues
To create an SQS queue, navigate to the [SQS console](https://console.aws.amazon.com/sqs/), and click "Create queue".
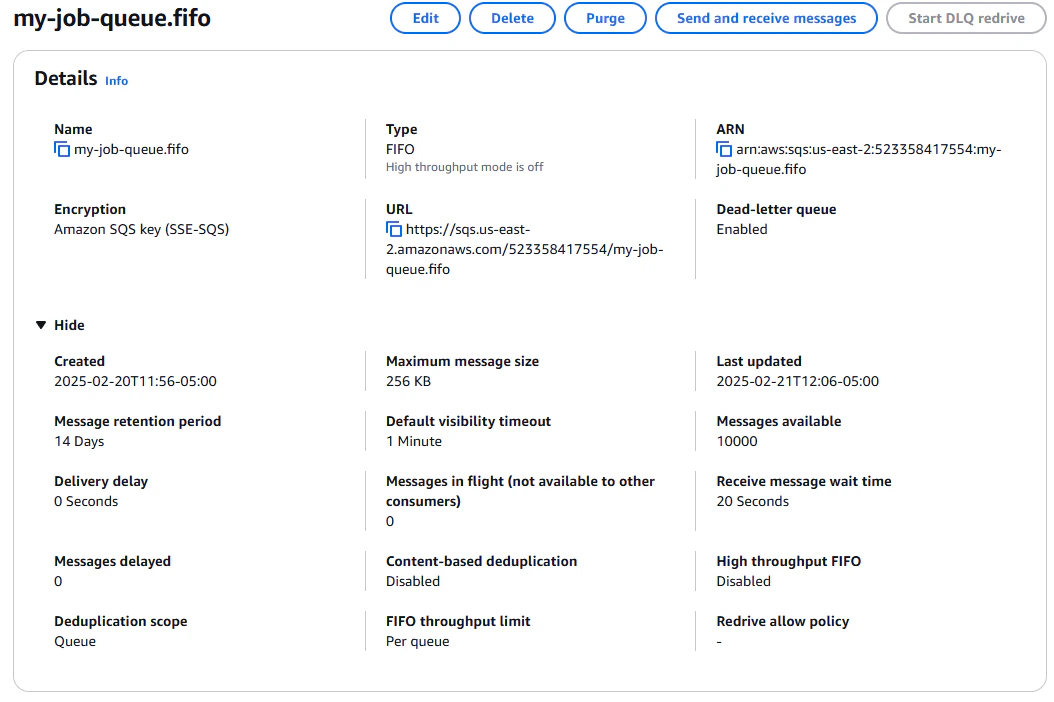
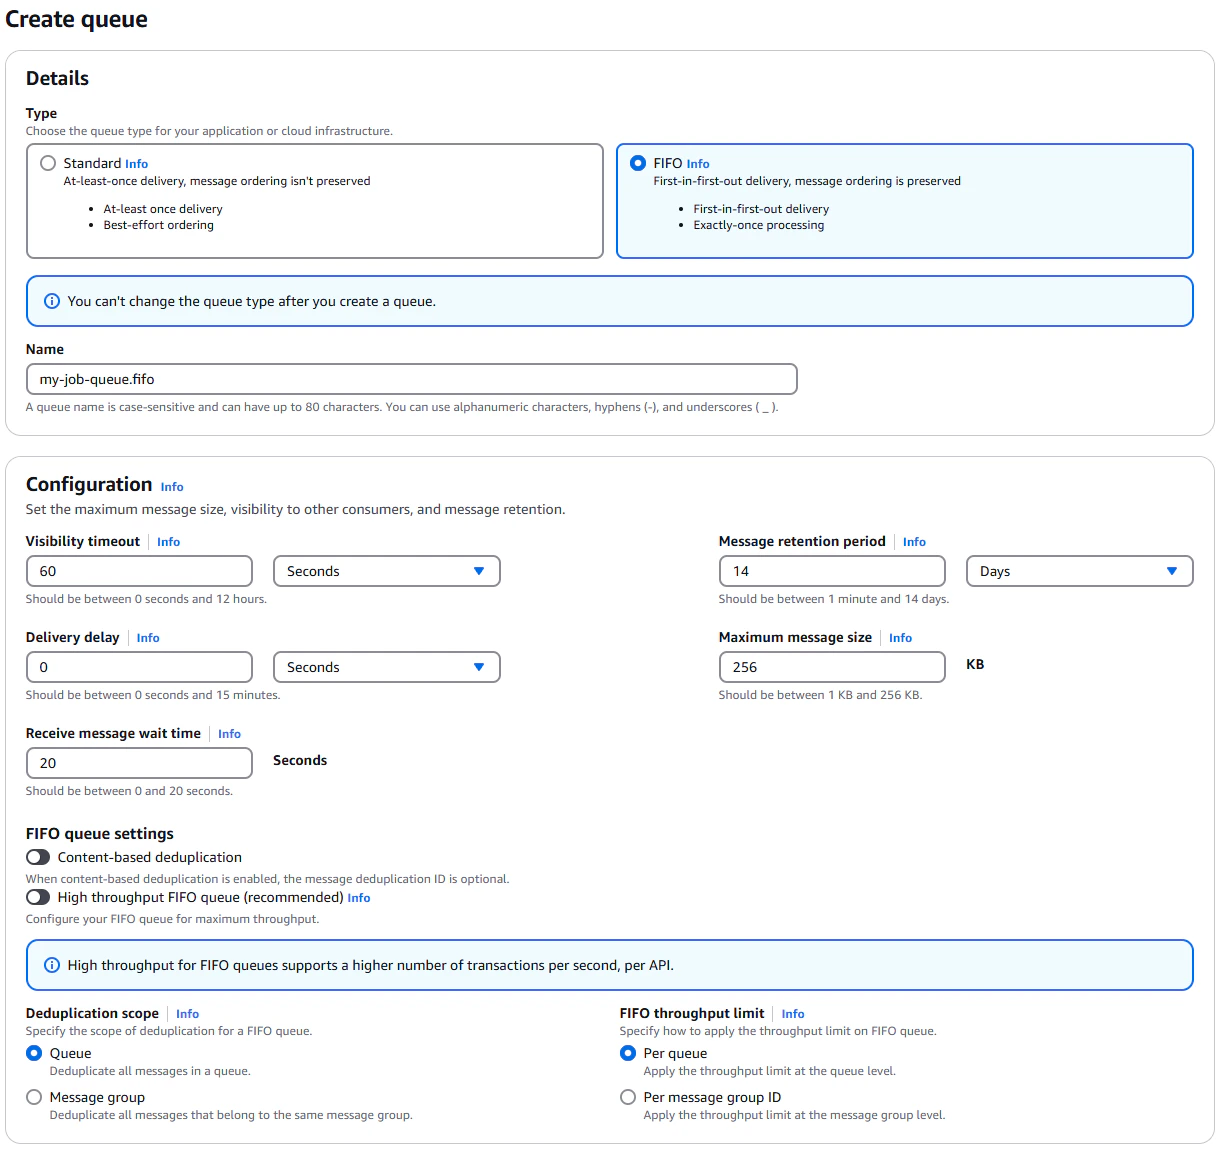 You may want to choose a better name than I have, but for the purposes of this guide, we'll call our queue
`my-job-queue.fifo`. The `.fifo` suffix indicates that this is a FIFO queue.
* FIFO queues are recommended for long-running tasks, because the cost of processing a job is often relatively high, and
FIFO queues ensure *exactly-once* processing of each job. In non-FIFO queues, throughput is higher and the cost of
jobs potentially being delivered more than once.
* Set the visibility timeout to 60 seconds. You might think, don't we want it to be way longer than that? The answer is
no, because we want the job queue to hand the job out to a new worker as soon as possible if a worker gets
interrupted. In our application, we will programmatically extend the visibility timeout while the job is running. The
60 second value then becomes the maximum amount of time a worker can be out of communication before a job is handed
out again.
* Set the message retention period to 14 days. This is the maximum value, and we want to keep jobs around as long as
possible in case we need to reprocess them, or in case our we have a scenario with dramatically more jobs than
workers.
* Set the default message delay to 0 seconds. This is the amount of time a message will sit in the queue before it is
available to be picked up by a worker. We want this to be as low as possible, because we want workers to be able to
pick up jobs as soon as they are available.
* Set maximum message size to 256KB. This is the maximum size of a message in the queue. If your job input is larger
than this, you will need to store the job inputs in cloud storage, and only include a reference to the job in the
message. An example would be dreambooth training, where many images are needed as an input to the job.
* Set the "Receive message wait time" to 20 seconds. In order to minimize the number of api requests (which are billed),
we want workers to wait up to 20 seconds on an open connection for a job to become available. In times of high
throughput, this setting doesn't really matter because workers will always have a wait time of 0 seconds. however, in
times of low job volume, this setting can lead to significant savings in billed api requests.
* Leave content-based deduplication disabled. We will be using the more lightweight `MessageDeduplicationId` field to
ensure exactly-once processing of jobs, and assigning GUIDs to jobs in our application code.
* We want the deduplication scope to be queue-wide, so that we can ensure exactly-once processing of jobs across all
workers.
* For "FIFO throughput limit", we want to set this to "Per queue". Selecting "Per message group ID" enables
high-throughput FIFO queues, which are excessive for out application. If you are processing tens of thousands of
simultaneous jobs, you may want to enable high-throughput FIFO queues, but for most applications, this is unnecessary.
More info on [limitations](https://docs.aws.amazon.com/AWSSimpleQueueService/latest/SQSDeveloperGuide/quotas-fifo.html)
and [pricing](https://aws.amazon.com/sqs/pricing/) can be found on the AWS website and in the SQS documentation.
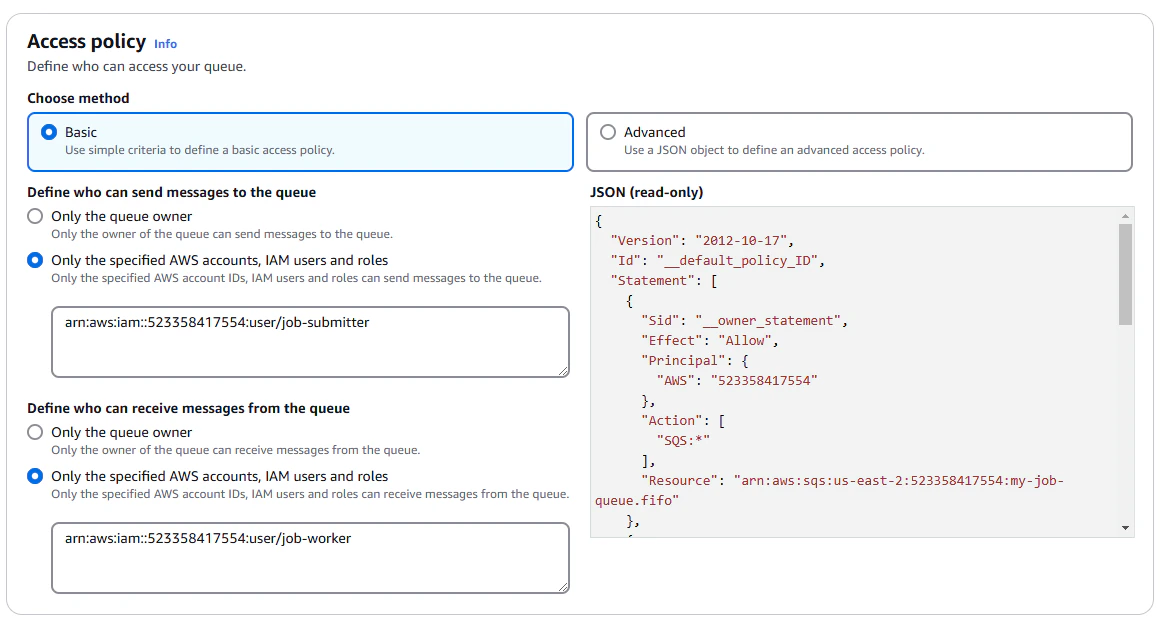
Leave encryption enabled. We will be using the default KMS key, which is managed by AWS, but you can also use your own
KMS key if you have one.
We're going to use a basic access policy, which allows the job-submitter user to send messages to the queue, and the
job-worker user to receive and delete messages from the queue.
You may want to choose a better name than I have, but for the purposes of this guide, we'll call our queue
`my-job-queue.fifo`. The `.fifo` suffix indicates that this is a FIFO queue.
* FIFO queues are recommended for long-running tasks, because the cost of processing a job is often relatively high, and
FIFO queues ensure *exactly-once* processing of each job. In non-FIFO queues, throughput is higher and the cost of
jobs potentially being delivered more than once.
* Set the visibility timeout to 60 seconds. You might think, don't we want it to be way longer than that? The answer is
no, because we want the job queue to hand the job out to a new worker as soon as possible if a worker gets
interrupted. In our application, we will programmatically extend the visibility timeout while the job is running. The
60 second value then becomes the maximum amount of time a worker can be out of communication before a job is handed
out again.
* Set the message retention period to 14 days. This is the maximum value, and we want to keep jobs around as long as
possible in case we need to reprocess them, or in case our we have a scenario with dramatically more jobs than
workers.
* Set the default message delay to 0 seconds. This is the amount of time a message will sit in the queue before it is
available to be picked up by a worker. We want this to be as low as possible, because we want workers to be able to
pick up jobs as soon as they are available.
* Set maximum message size to 256KB. This is the maximum size of a message in the queue. If your job input is larger
than this, you will need to store the job inputs in cloud storage, and only include a reference to the job in the
message. An example would be dreambooth training, where many images are needed as an input to the job.
* Set the "Receive message wait time" to 20 seconds. In order to minimize the number of api requests (which are billed),
we want workers to wait up to 20 seconds on an open connection for a job to become available. In times of high
throughput, this setting doesn't really matter because workers will always have a wait time of 0 seconds. however, in
times of low job volume, this setting can lead to significant savings in billed api requests.
* Leave content-based deduplication disabled. We will be using the more lightweight `MessageDeduplicationId` field to
ensure exactly-once processing of jobs, and assigning GUIDs to jobs in our application code.
* We want the deduplication scope to be queue-wide, so that we can ensure exactly-once processing of jobs across all
workers.
* For "FIFO throughput limit", we want to set this to "Per queue". Selecting "Per message group ID" enables
high-throughput FIFO queues, which are excessive for out application. If you are processing tens of thousands of
simultaneous jobs, you may want to enable high-throughput FIFO queues, but for most applications, this is unnecessary.
More info on [limitations](https://docs.aws.amazon.com/AWSSimpleQueueService/latest/SQSDeveloperGuide/quotas-fifo.html)
and [pricing](https://aws.amazon.com/sqs/pricing/) can be found on the AWS website and in the SQS documentation.
Leave encryption enabled. We will be using the default KMS key, which is managed by AWS, but you can also use your own
KMS key if you have one.
We're going to use a basic access policy, which allows the job-submitter user to send messages to the queue, and the
job-worker user to receive and delete messages from the queue.
 For now, we're not going to enable "Redrive allow policy,"" or "Dead-letter queue", because we haven't created our dead
letter queue yet. Once we have, we will come back and enable this feature.
For now, we're not going to enable "Redrive allow policy,"" or "Dead-letter queue", because we haven't created our dead
letter queue yet. Once we have, we will come back and enable this feature.
 Again, I'm going to tag the queue with "project: sqs-demo". Being religious about tagging resources will save you a lot
of time and headache later.
Now we're going to create our dead-letter queue. Navigate back to the SQS console, and click "Create queue". We're going
to use mostly the same settings as before, but we're going to name this queue `my-job-queue-dlq.fifo`, and set its
permissions to allow `job-worker` to *send* messages to it. For this one, we will enable "Redrive allow policy", and
allow our first queue as the source queue.
Again, I'm going to tag the queue with "project: sqs-demo". Being religious about tagging resources will save you a lot
of time and headache later.
Now we're going to create our dead-letter queue. Navigate back to the SQS console, and click "Create queue". We're going
to use mostly the same settings as before, but we're going to name this queue `my-job-queue-dlq.fifo`, and set its
permissions to allow `job-worker` to *send* messages to it. For this one, we will enable "Redrive allow policy", and
allow our first queue as the source queue.
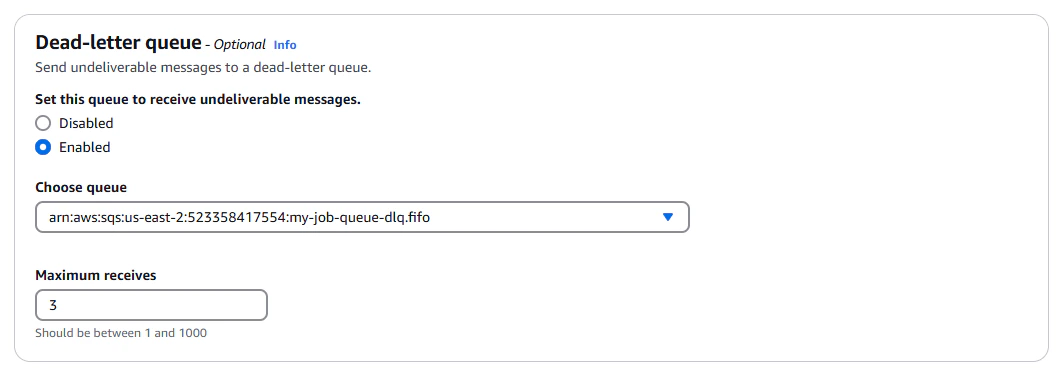
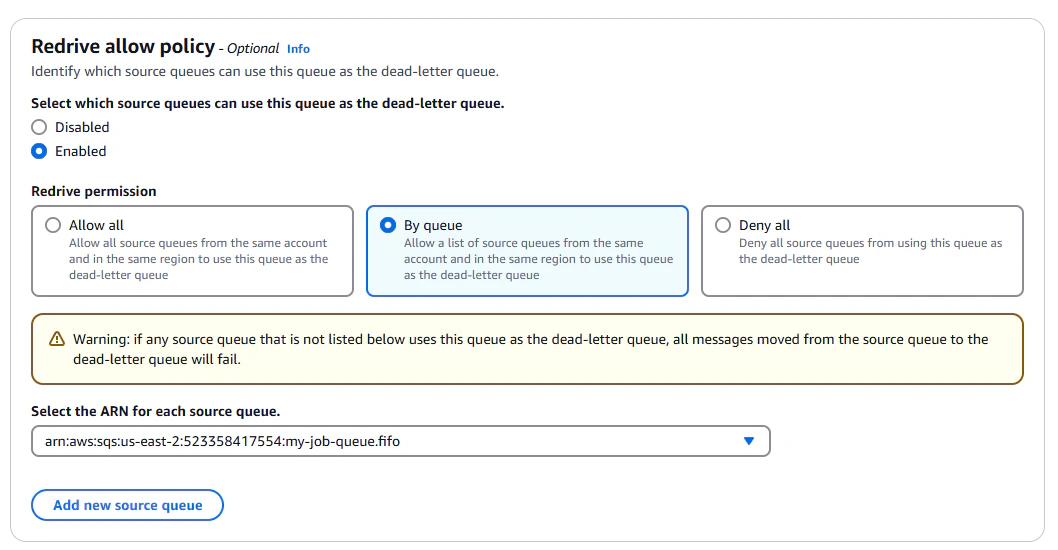 Once this dead-letter queue is created, we can go back and edit our original queue, and enable the dead-letter queue.
We'll choose our dead-letter queue as the destination, and set the maximum receive count to 3. This means that if a job
is received 3 times without being deleted, it will be moved to the dead-letter queue.
Once this dead-letter queue is created, we can go back and edit our original queue, and enable the dead-letter queue.
We'll choose our dead-letter queue as the destination, and set the maximum receive count to 3. This means that if a job
is received 3 times without being deleted, it will be moved to the dead-letter queue.
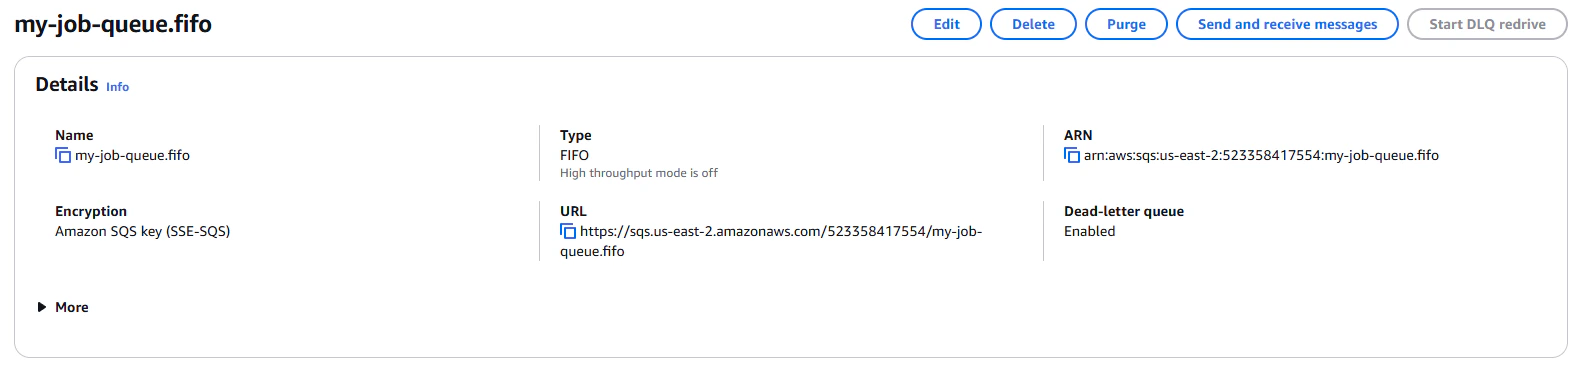
 For our application to use these queues, we will need the Queue URL, available on the queue's details page.
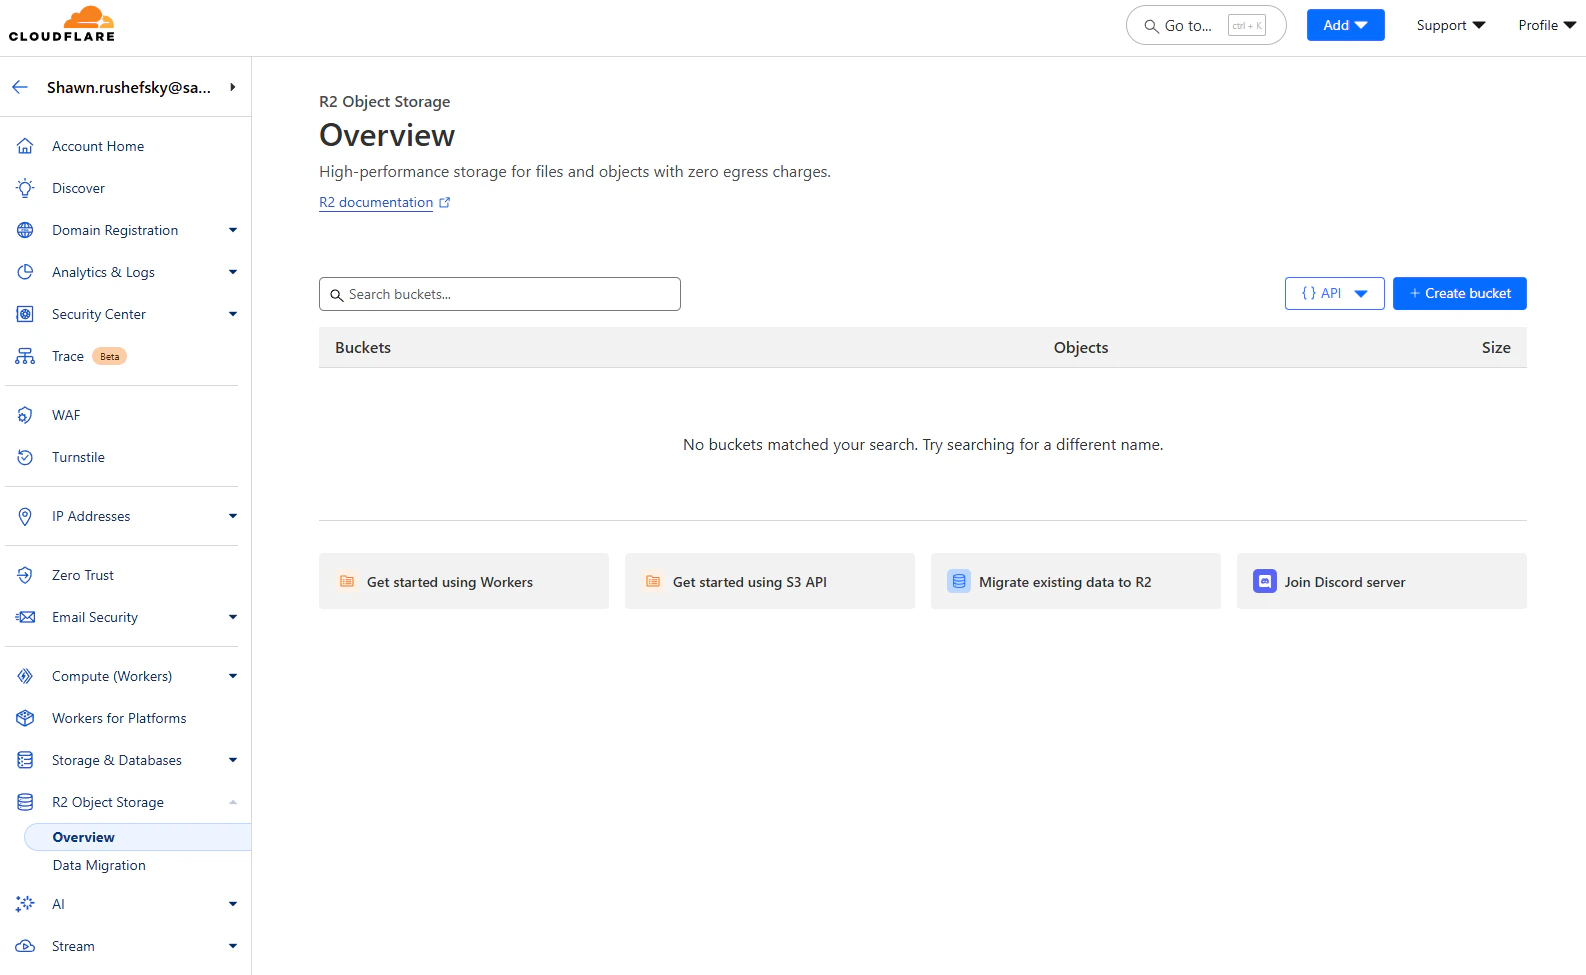
 ## Cloud Storage: R2
R2 is a cloud storage service from Cloudflare that is compatible with the S3 API. It is a great choice for SaladCloud
workloads because it does not charge egress fees, which helps reduce costs when distributed workers fetch inputs and
upload results.
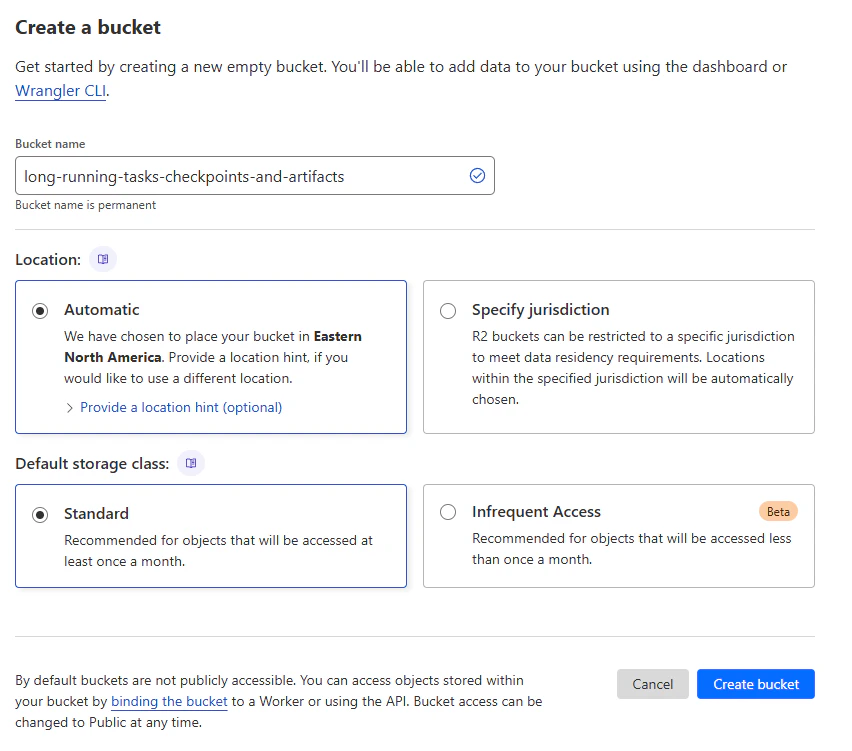
From the [R2 console](https://dash.cloudflare.com/), navigate to "R2 Object Storage", and click "Create Bucket".
## Cloud Storage: R2
R2 is a cloud storage service from Cloudflare that is compatible with the S3 API. It is a great choice for SaladCloud
workloads because it does not charge egress fees, which helps reduce costs when distributed workers fetch inputs and
upload results.
From the [R2 console](https://dash.cloudflare.com/), navigate to "R2 Object Storage", and click "Create Bucket".
 Give your bucket a meaningful name, and select an appropriate location. We are going to use the standard storage class,
and automatic location.
Give your bucket a meaningful name, and select an appropriate location. We are going to use the standard storage class,
and automatic location.
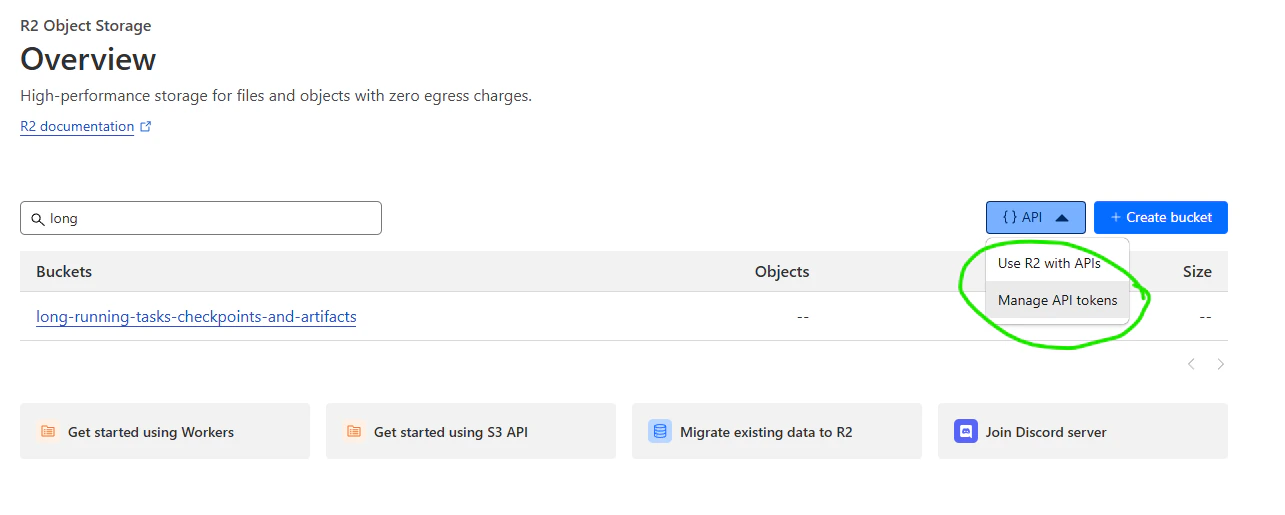
 Once your bucket is created, you will need to create an access key and secret key. Select "Manage API tokens" from the
"\{ } API" menu, and click "Create Token".
Once your bucket is created, you will need to create an access key and secret key. Select "Manage API tokens" from the
"\{ } API" menu, and click "Create Token".
 Create a token with "Object Read & Write" permissions, and only grant it access to the bucket we've just created. Since
secret rotation is outside the scope of this guide, we're going to use the "forever" TTL. However, it is best practice
to user shorter-lived secrets and to have easy automatic mechanisms in place to rotate secrets as needed.
Once created you will be given an access key and secret key. Save these somewhere safe, as you will not be able to
retrieve them again. The application code will get these keys from environment variables, so you will need to set them
in your environment. Also on that page will be the S3 endpoint URL for your bucket. Save this as well, as it will be
needed in the application code.
## Instrumenting Our Application
We're going to use the `boto3` library to interact with both SQS and R2. You can install it with `pip install boto3`.
First, we need to set up our environment variables. All of the following environment variables will be needed by the
application code.
There are several ways to do this, but what I've done for my development environment is create a file called
`worker.env` in the root of my project, and add the following lines:
```shell theme={null}
R2_AWS_ACCESS_KEY_ID=your-access-key-id
R2_AWS_SECRET_ACCESS_KEY=your-secret-access-key
R2_S3_ENDPOINT_URL=your-s3-endpoint-url
R2_BUCKET_NAME=your-bucket-name
SQS_AWS_ACCESS_KEY_ID=your-access-key-id
SQS_AWS_SECRET_ACCESS_KEY=your-secret-access-key
SQS_AWS_REGION=your-region
SQS_QUEUE_URL=your-queue-url
SQS_DLQ_URL=your-dlq-url
```
Then, to source this into my environment when I run my code, I run the following command:
```shell theme={null}
export $(grep -v '^#' worker.env | xargs -d '\n')
```
Make sure `*.env` is in your .gitignore. You don't want to commit your secrets to your repository.
Now, create a file called `clients.py`, and add the following code:
```python theme={null}
import boto3
import os
# Get the environment variables
r2_aws_region = "auto"
r2_aws_access_key_id = os.getenv('R2_AWS_ACCESS_KEY_ID')
r2_aws_secret_access_key = os.getenv('R2_AWS_SECRET_ACCESS_KEY')
r2_s3_endpoint_url = os.getenv('R2_S3_ENDPOINT_URL')
r2_bucket_name = os.getenv('R2_BUCKET_NAME')
sqs_aws_access_key_id = os.getenv('SQS_AWS_ACCESS_KEY_ID')
sqs_aws_secret_access_key = os.getenv('SQS_AWS_SECRET_ACCESS_KEY')
sqs_aws_region = os.getenv('SQS_AWS_REGION')
sqs_queue_url = os.getenv('SQS_QUEUE_URL')
sqs_dlq_url = os.getenv('SQS_DLQ_URL')
# Create the clients
sqs = boto3.client('sqs',
aws_access_key_id=sqs_aws_access_key_id,
aws_secret_access_key=sqs_aws_secret_access_key,
region_name=sqs_aws_region)
s3 = boto3.client('s3',
aws_access_key_id=r2_aws_access_key_id,
aws_secret_access_key=r2_aws_secret_access_key,
region_name=r2_aws_region,
endpoint_url=r2_s3_endpoint_url)
```
Now, we create our main application file, `main.py`, where we need to define functions for retrieving a job, for
extending the visibility timeout of a job, and for deleting a job. We also need to define a function for saving a
checkpoint to cloud storage, and for loading a checkpoint from cloud storage.
We're going to need to import some things from our client file.
```python theme={null}
from clients import sqs, s3, sqs_queue_url, sqs_dlq_url, r2_bucket_name
```
Now, we define a `get_job` function:
```python theme={null}
import json
visibility_timeout = 60
def get_job():
'''
Get the job from the SQS queue
Returns:
- job: dict, the job to be processed
- receipt_handle: str, the receipt handle of the message
If there are no messages in the queue, return None, None
'''
response = sqs.receive_message(
QueueUrl=sqs_queue_url,
AttributeNames=['All'],
MaxNumberOfMessages=1,
MessageAttributeNames=['All'],
VisibilityTimeout=visibility_timeout,
WaitTimeSeconds=20
)
if 'Messages' in response:
message = response['Messages'][0]
receipt_handle = message['ReceiptHandle']
job = json.loads(message['Body'])
return job, receipt_handle
else:
return None, None
```
Now, we define a `heartbeat_job` function, that will extend the visibility timeout on a cadence, and can be interrupted
from a different thread. This function also needs to be able to stop the main job if the receipt handle is invalid,
which means the job has been acknowledged (finished), or the message has been given to another worker.
```python theme={null}
import time
import threading
def heartbeat_job(receipt_handle: str, heartbeat_stop_signal: threading.Event, job_stop_signal: threading.Event):
'''
Send a heartbeat to the SQS queue to keep the job alive
Parameters:
- receipt_handle: str, the receipt handle of the message
- heartbeat_stop_signal: threading.Event, a signal to stop the heartbeat
- job_stop_signal: threading.Event, a signal to stop the main job
'''
while not heartbeat_stop_signal.is_set():
try:
sqs.change_message_visibility(
QueueUrl=sqs_queue_url,
ReceiptHandle=receipt_handle,
VisibilityTimeout=visibility_timeout
)
time.sleep(visibility_timeout / 2)
except boto3.SQS.Client.exceptions.ReceiptHandleIsInvalid:
# If the receipt handle is invalid, it means the job has been
# acknowledged, or the message has been given to another worker.
# In this case, we can stop the heartbeat, and interrupt the
# main job.
job_stop_signal.set()
break
```
Now, we need functions to release the job to be retried, and to acknowledge the job, completed or failed.
```python theme={null}
def release_job(receipt_handle: str):
'''
Release the job back to the SQS queue
Parameters:
- receipt_handle: str, the receipt handle of the message
'''
try:
sqs.change_message_visibility(
QueueUrl=sqs_queue_url,
ReceiptHandle=receipt_handle,
VisibilityTimeout=0
)
except boto3.SQS.Client.exceptions.ReceiptHandleIsInvalid:
# If the receipt handle is invalid, it means the job has been
# acknowledged, or the message has been given to another worker.
# In this case, we can ignore the error, because we were trying to
# release the job anyway.
pass
def acknowledge_job(receipt_handle: str):
'''
Acknowledge the job and delete it from the SQS queue
Parameters:
- receipt_handle: str, the receipt handle of the message
'''
sqs.delete_message(
QueueUrl=sqs_queue_url,
ReceiptHandle=receipt_handle
)
def fail_job(job, receipt_handle: str):
'''
Move the job to the dead-letter queue
Parameters:
- receipt_handle: str, the receipt handle of the message
'''
# First remove job from the queue
acknowledge_job(receipt_handle)
# Then send it to the DLQ
sqs.send_message(
QueueUrl=sqs_dlq_url,
MessageBody=json.dumps(job)
)
```
We also want a function to download the checkpoint from cloud storage, and a function to upload the checkpoint to cloud
storage. In this simplified example, we're going to use a small JSON file for the checkpoint, but the principle is the
same no matter what the actual checkpoint is.
```python theme={null}
def download_checkpoint(job_id: str):
'''
Download the checkpoint from S3
Parameters:
- job_id: str, the job ID
Returns:
- checkpoint: dict, the checkpoint
'''
try:
response = s3.get_object(
Bucket=r2_bucket_name,
Key=f'{job_id}/checkpoint.json'
)
except boto3.exceptions.S3.NoSuchKey:
return None
checkpoint = json.loads(response['Body'].read())
return checkpoint
def upload_checkpoint(job_id: str, checkpoint: dict):
'''
Upload the checkpoint to S3
Parameters:
- job_id: str, the job ID
- checkpoint: dict, the checkpoint
'''
s3.put_object(
Bucket=r2_bucket_name,
Key=f'{job_id}/checkpoint.json',
Body=json.dumps(checkpoint)
)
```
We may also need a function to validate the job before engaging in the main work. This function should return `True` if
the job is valid, and `False` if the job is invalid. In our case, we're going to assume that any job with a `job_id` and
`steps` is valid, but your usecase is likely far more complex than that.
```python theme={null}
def validate_job(job: dict):
# This is a very simple function for our very simple application.
# You should replace this with your actual validation logic.
return 'job_id' in job and 'steps' in job
```
Now, we need a function for "doing the work", which in our case is just slowly calculating a sum. For you this may be AI
training jobs or molecular simulations.
```python theme={null}
def do_the_actual_work(job: dict, checkpoint: dict, stop_signal: threading.Event) -> int | None:
'''
Do the actual work for the job. This function will simulate work by
sleeping for 30 seconds and incrementing the step and sum in the
checkpoint.
Parameters:
- job: dict, the job
- checkpoint: dict, the checkpoint
- stop_signal: threading.Event, a signal to stop the work
'''
while checkpoint['step'] < job['steps'] and not stop_signal.is_set():
# Simulate work
time.sleep(30)
# If the job was interrupted, we don't want to upload the
# checkpoint, because it may conflict with the next worker.
if not stop_signal.is_set():
# Update the checkpoint.
checkpoint['step'] += 1
checkpoint['sum'] += checkpoint['step']
upload_checkpoint(job['job_id'], checkpoint)
if not stop_signal.is_set():
return checkpoint['sum']
else:
return None
```
Once our work has completed, we'll need a function to upload the results to cloud storage.
```python theme={null}
def upload_result(job_id: str, result: int):
'''
Upload the result to S3
Parameters:
- job_id: str, the job ID
- result: int, the result
'''
s3.put_object(
Bucket=r2_bucket_name,
Key=f'{job_id}/result.txt',
Body=str(result)
)
```
Now, we need to put it all together in a function called `process_job`.
```python theme={null}
def process_job(job: dict, receipt_handle: str) -> None:
# Now that we have the job, we need to start a separate thread that
# heartbeats for it. This will keep the job alive in the SQS queue.
# Separate threads are critical here, because our main work is likely
# blocking, and we don't want to block the heartbeat.
heartbeat_stop_signal = threading.Event()
job_stop_signal = threading.Event()
heartbeat_thread = threading.Thread(
target=heartbeat_job, args=(
receipt_handle, heartbeat_stop_signal, job_stop_signal))
heartbeat_thread.start()
# If there's a checkpoint, we want to use it, but if not, we need to
# initialize our state.
checkpoint = download_checkpoint(job['job_id'])
if checkpoint is None:
checkpoint = {'step': 0, 'sum': 0}
# Some jobs may have a validation step. For instance, dreambooth training may have a step
# that verifies if all inputs have faces. If the validation fails, we should stop the job
# and not retry it, but instead move it to the DLQ. In this situation, we can
# be confident that the job will never succeed.
if not validate_job(job):
heartbeat_stop_signal.set()
fail_job(job, receipt_handle)
heartbeat_thread.join()
return
# Now we can do the actual work
try:
result = do_the_actual_work(job, checkpoint)
if result is None:
# This means the job was interrupted, so we need to release it
# back to the queue.
heartbeat_stop_signal.set()
heartbeat_thread.join()
release_job(receipt_handle)
return
# The job isn't really done until the result is uploaded.
upload_result(job['job_id'], result)
# Once the result is uploaded, we can acknowledge the job and stop
# the heartbeat.
acknowledge_job(receipt_handle)
heartbeat_stop_signal.set()
heartbeat_thread.join()
except Exception as e:
# If there's an error, we need to release the job back to the queue
# so it can be retried.
heartbeat_stop_signal.set()
heartbeat_thread.join()
release_job(receipt_handle)
return
```
Finally, we need to create a loop that will run forever, processing jobs as they come in.
```python theme={null}
if __name__ == '__main__':
while True:
job, receipt_handle = get_job()
if job is not None:
process_job(job, receipt_handle)
else:
time.sleep(10)
```
### Completed Example
```python theme={null}
from clients import sqs, r2, sqs_queue_url, sqs_dlq_url, r2_bucket_name
import json
import time
import threading
import boto3
visibility_timeout = 60
def get_job() -> tuple:
'''
Get the job from the SQS queue
Returns:
- job: dict, the job to be processed
- receipt_handle: str, the receipt handle of the message
If there are no messages in the queue, return None, None
'''
response = sqs.receive_message(
QueueUrl=sqs_queue_url,
AttributeNames=['All'],
MaxNumberOfMessages=1,
MessageAttributeNames=['All'],
VisibilityTimeout=visibility_timeout,
WaitTimeSeconds=20
)
if 'Messages' in response:
message = response['Messages'][0]
receipt_handle = message['ReceiptHandle']
job = json.loads(message['Body'])
return job, receipt_handle
else:
return None, None
def heartbeat_job(receipt_handle: str, heartbeat_stop_signal: threading.Event, job_stop_signal: threading.Event) -> None:
'''
Send a heartbeat to the SQS queue to keep the job alive
Parameters:
- receipt_handle: str, the receipt handle of the message
- heartbeat_stop_signal: threading.Event, a signal to stop the heartbeat
- job_stop_signal: threading.Event, a signal to stop the main job
'''
while not heartbeat_stop_signal.is_set():
try:
sqs.change_message_visibility(
QueueUrl=sqs_queue_url,
ReceiptHandle=receipt_handle,
VisibilityTimeout=visibility_timeout
)
time.sleep(visibility_timeout / 2)
except boto3.SQS.Client.exceptions.ReceiptHandleIsInvalid:
# If the receipt handle is invalid, it means the job has been
# acknowledged, or the message has been given to another worker.
# In this case, we can stop the heartbeat, and interrupt the
# main job.
job_stop_signal.set()
break
def release_job(receipt_handle: str) -> None:
'''
Release the job back to the SQS queue
Parameters:
- receipt_handle: str, the receipt handle of the message
'''
try:
sqs.change_message_visibility(
QueueUrl=sqs_queue_url,
ReceiptHandle=receipt_handle,
VisibilityTimeout=0
)
except boto3.SQS.Client.exceptions.ReceiptHandleIsInvalid:
# If the receipt handle is invalid, it means the job has been
# acknowledged, or the message has been given to another worker.
# In this case, we can ignore the error, because we were trying to
# release the job anyway.
pass
def acknowledge_job(receipt_handle: str) -> None:
'''
Acknowledge the job and delete it from the SQS queue
Parameters:
- receipt_handle: str, the receipt handle of the message
'''
sqs.delete_message(
QueueUrl=sqs_queue_url,
ReceiptHandle=receipt_handle
)
def fail_job(job, receipt_handle: str) -> None:
'''
Move the job to the dead-letter queue
Parameters:
- receipt_handle: str, the receipt handle of the message
'''
# First remove job from the queue
acknowledge_job(receipt_handle)
# Then send it to the DLQ
sqs.send_message(
QueueUrl=sqs_dlq_url,
MessageBody=json.dumps(job)
)
def download_checkpoint(job_id: str) -> dict:
'''
Download the checkpoint from S3
Parameters:
- job_id: str, the job ID
Returns:
- checkpoint: dict, the checkpoint
'''
try:
response = r2.get_object(
Bucket=r2_bucket_name,
Key=f'{job_id}/checkpoint.json'
)
except boto3.exceptions.S3.NoSuchKey:
return None
checkpoint = json.loads(response['Body'].read())
return checkpoint
def upload_checkpoint(job_id: str, checkpoint: dict) -> None:
'''
Upload the checkpoint to S3
Parameters:
- job_id: str, the job ID
- checkpoint: dict, the checkpoint
'''
r2.put_object(
Bucket=r2_bucket_name,
Key=f'{job_id}/checkpoint.json',
Body=json.dumps(checkpoint)
)
def validate_job(job: dict) -> bool:
'''
Validate the job
Parameters:
- job: dict, the job
Returns:
- bool, whether the job is valid
'''
# This is a very simple function for our very simple application.
# You should replace this with your actual validation logic.
return 'job_id' in job and 'steps' in job
def do_the_actual_work(job: dict, checkpoint: dict, stop_signal: threading.Event) -> int | None:
'''
Do the actual work for the job. This function will simulate work by
sleeping for 30 seconds and incrementing the step and sum in the
checkpoint.
Parameters:
- job: dict, the job
- checkpoint: dict, the checkpoint
- stop_signal: threading.Event, a signal to stop the work
'''
while checkpoint['step'] < job['steps'] and not stop_signal.is_set():
# Simulate work
time.sleep(30)
# If the job was interrupted, we don't want to upload the
# checkpoint, because it may conflict with the next worker.
if not stop_signal.is_set():
# Update the checkpoint.
checkpoint['step'] += 1
checkpoint['sum'] += checkpoint['step']
upload_checkpoint(job['job_id'], checkpoint)
if not stop_signal.is_set():
return checkpoint['sum']
else:
return None
def upload_result(job_id: str, result: int) -> None:
'''
Upload the result to S3
Parameters:
- job_id: str, the job ID
- result: int, the result
'''
r2.put_object(
Bucket=r2_bucket_name,
Key=f'{job_id}/result.txt',
Body=str(result)
)
def process_job(job: dict, receipt_handle: str) -> None:
# Now that we have the job, we need to start a separate thread that
# heartbeats for it. This will keep the job alive in the SQS queue.
# Separate threads are critical here, because our main work is likely
# blocking, and we don't want to block the heartbeat.
heartbeat_stop_signal = threading.Event()
job_stop_signal = threading.Event()
heartbeat_thread = threading.Thread(
target=heartbeat_job, args=(
receipt_handle, heartbeat_stop_signal, job_stop_signal))
heartbeat_thread.start()
# If there's a checkpoint, we want to use it, but if not, we need to
# initialize our state.
checkpoint = download_checkpoint(job['job_id'])
if checkpoint is None:
checkpoint = {'step': 0, 'sum': 0}
# Some jobs may have a validation step. For instance, dreambooth training may have a step
# that verifies if all inputs have faces. If the validation fails, we should stop the job
# and not retry it, but instead move it to the DLQ. In this situation, we can
# be confident that the job will never succeed.
if not validate_job(job):
heartbeat_stop_signal.set()
fail_job(job, receipt_handle)
heartbeat_thread.join()
return
# Now we can do the actual work
try:
result = do_the_actual_work(job, checkpoint)
if result is None:
# This means the job was interrupted, so we need to release it
# back to the queue.
heartbeat_stop_signal.set()
heartbeat_thread.join()
release_job(receipt_handle)
return
# The job isn't really done until the result is uploaded.
upload_result(job['job_id'], result)
# Once the result is uploaded, we can acknowledge the job and stop
# the heartbeat.
acknowledge_job(receipt_handle)
heartbeat_stop_signal.set()
heartbeat_thread.join()
except Exception as e:
# If there's an error, we need to release the job back to the queue
# so it can be retried.
heartbeat_stop_signal.set()
heartbeat_thread.join()
release_job(receipt_handle)
return
if __name__ == '__main__':
while True:
job, receipt_handle = get_job()
if job is not None:
process_job(job, receipt_handle)
else:
time.sleep(10)
```
Now that we have our worker application ready to go, we can run it with `python main.py`. It will run forever, polling
the queue for jobs, and processing them as they come in.
## Submitting Jobs to the Queue
Next, we need a way to submit jobs to the queue. We're going to use the `boto3` library for this as well, but we'll be
using the AWS keys for the `job-submitter` user. I've saved mine in a file called `submitter.env`, and I'm going to
source them into my environment with the following command:
```shell theme={null}
export $(grep -v '^#' submitter.env | xargs -d '\n')
```
I've named my submitter script `submit-jobs.py`.
The first part should look familiar, getting config from the environment, and initializing our SQS client.
```python theme={null}
import boto3
import os
# Get the environment variables
sqs_aws_access_key_id = os.getenv('SQS_AWS_ACCESS_KEY_ID')
sqs_aws_secret_access_key = os.getenv('SQS_AWS_SECRET_ACCESS_KEY')
sqs_aws_region = os.getenv('SQS_AWS_REGION')
sqs_queue_url = os.getenv('SQS_QUEUE_URL')
# Create the client
sqs = boto3.client('sqs',
aws_access_key_id=sqs_aws_access_key_id,
aws_secret_access_key=sqs_aws_secret_access_key,
region_name=sqs_aws_region)
```
For this, let's assume we have ten thousand jobs we want to submit, each taking 5 hours to complete. We're going to use
`send_message_batch` to maximize throughput, and we're going to assign a `MessageDeduplicationId` to each job to ensure
exactly-once processing.
```python theme={null}
from uuid import uuid4
import json
def submit_one_batch(jobs: list) -> None:
'''
Submit a batch of jobs to the SQS queue
Parameters:
- jobs: list, the list of jobs
'''
if len(jobs) == 0:
return
if len(jobs) > 10:
raise ValueError('You can submit at most 10 jobs at a time')
def job_to_entry(job):
if 'job_id' not in job:
job["job_id"] = str(uuid4())
job["steps"] = int(job["steps"])
return {
'Id': job["job_id"],
'MessageDeduplicationId': job["job_id"],
'MessageGroupId': job["job_id"],
'MessageBody': json.dumps(job)
}
entries = [job_to_entry(job) for job in jobs]
response = sqs.send_message_batch(
QueueUrl=sqs_queue_url,
Entries=entries
)
if 'Failed' in response:
print(response)
raise Exception(f'Failed to submit jobs: {response["Failed"]}')
else:
print(f'Submitted {len(jobs)} jobs')
```
This first function we've defined will submit one single batch, up to the SQS-imposed limit of 10 messages at a time.
Now we need a function that can take an arbitrarily large set of jobs and submit them all successfully.
```python theme={null}
from typing import Iterable
def submit_jobs(jobs: Iterable) -> None:
'''
Submit an arbitrary number of jobs to the queue
Parameters:
- jobs: Iterable, the iterable of jobs
'''
batch = []
for job in jobs:
batch.append(job)
if len(batch) == 10:
submit_one_batch(batch)
batch = []
if batch:
submit_one_batch(batch)
```
Now, suppose we have a csv with our 10,000 jobs, and we want to submit them all. Our CSV (data.csv) looks like this,
with 10,000 rows.
```csv theme={null}
job_id,steps
job-0,600
job-1,600
job-2,600
job-3,600
```
Now, in our job submitter script, we can read this CSV and submit all the jobs, lazily reading the csv so as not to run
out of memory. We wouldn't anyways with this tiny example, but it's a good habit to get into.
```python theme={null}
import csv
if __name__ == '__main__':
with open("data.csv") as f:
reader = csv.DictReader(f)
submit_jobs(reader)
```
### Completed Example
```python theme={null}
import boto3
import os
from uuid import uuid4
import json
from typing import Iterable
import csv
# Get the environment variables
sqs_aws_access_key_id = os.getenv('SQS_AWS_ACCESS_KEY_ID')
sqs_aws_secret_access_key = os.getenv('SQS_AWS_SECRET_ACCESS_KEY')
sqs_aws_region = os.getenv('SQS_AWS_REGION')
sqs_queue_url = os.getenv('SQS_QUEUE_URL')
# Create the client
sqs = boto3.client('sqs',
aws_access_key_id=sqs_aws_access_key_id,
aws_secret_access_key=sqs_aws_secret_access_key,
region_name=sqs_aws_region)
def submit_one_batch(jobs: list) -> None:
'''
Submit a batch of jobs to the SQS queue
Parameters:
- jobs: list, the list of jobs
'''
if len(jobs) == 0:
return
if len(jobs) > 10:
raise ValueError('You can submit at most 10 jobs at a time')
def job_to_entry(job):
if 'job_id' not in job:
job["job_id"] = str(uuid4())
job["steps"] = int(job["steps"])
return {
'Id': job["job_id"],
'MessageDeduplicationId': job["job_id"],
'MessageGroupId': job["job_id"],
'MessageBody': json.dumps(job)
}
entries = [job_to_entry(job) for job in jobs]
response = sqs.send_message_batch(
QueueUrl=sqs_queue_url,
Entries=entries
)
if 'Failed' in response:
print(response)
raise Exception(f'Failed to submit jobs: {response["Failed"]}')
else:
print(f'Submitted {len(jobs)} jobs')
def submit_jobs(jobs: Iterable) -> None:
'''
Submit an arbitrary number of jobs to the queue
Parameters:
- jobs: Iterable, the iterable of jobs
'''
batch = []
for job in jobs:
batch.append(job)
if len(batch) == 10:
submit_one_batch(batch)
batch = []
if batch:
submit_one_batch(batch)
if __name__ == '__main__':
with open("data.csv") as f:
reader = csv.DictReader(f)
submit_jobs(reader)
```
### Running the Job Submitter
Run the job submitter with `python submit-jobs.py`. It will read the csv file and submit all the jobs to the queue.
Once that has run, we can see in the SQS console that our queue has 10000 messages.
Create a token with "Object Read & Write" permissions, and only grant it access to the bucket we've just created. Since
secret rotation is outside the scope of this guide, we're going to use the "forever" TTL. However, it is best practice
to user shorter-lived secrets and to have easy automatic mechanisms in place to rotate secrets as needed.
Once created you will be given an access key and secret key. Save these somewhere safe, as you will not be able to
retrieve them again. The application code will get these keys from environment variables, so you will need to set them
in your environment. Also on that page will be the S3 endpoint URL for your bucket. Save this as well, as it will be
needed in the application code.
## Instrumenting Our Application
We're going to use the `boto3` library to interact with both SQS and R2. You can install it with `pip install boto3`.
First, we need to set up our environment variables. All of the following environment variables will be needed by the
application code.
There are several ways to do this, but what I've done for my development environment is create a file called
`worker.env` in the root of my project, and add the following lines:
```shell theme={null}
R2_AWS_ACCESS_KEY_ID=your-access-key-id
R2_AWS_SECRET_ACCESS_KEY=your-secret-access-key
R2_S3_ENDPOINT_URL=your-s3-endpoint-url
R2_BUCKET_NAME=your-bucket-name
SQS_AWS_ACCESS_KEY_ID=your-access-key-id
SQS_AWS_SECRET_ACCESS_KEY=your-secret-access-key
SQS_AWS_REGION=your-region
SQS_QUEUE_URL=your-queue-url
SQS_DLQ_URL=your-dlq-url
```
Then, to source this into my environment when I run my code, I run the following command:
```shell theme={null}
export $(grep -v '^#' worker.env | xargs -d '\n')
```
Make sure `*.env` is in your .gitignore. You don't want to commit your secrets to your repository.
Now, create a file called `clients.py`, and add the following code:
```python theme={null}
import boto3
import os
# Get the environment variables
r2_aws_region = "auto"
r2_aws_access_key_id = os.getenv('R2_AWS_ACCESS_KEY_ID')
r2_aws_secret_access_key = os.getenv('R2_AWS_SECRET_ACCESS_KEY')
r2_s3_endpoint_url = os.getenv('R2_S3_ENDPOINT_URL')
r2_bucket_name = os.getenv('R2_BUCKET_NAME')
sqs_aws_access_key_id = os.getenv('SQS_AWS_ACCESS_KEY_ID')
sqs_aws_secret_access_key = os.getenv('SQS_AWS_SECRET_ACCESS_KEY')
sqs_aws_region = os.getenv('SQS_AWS_REGION')
sqs_queue_url = os.getenv('SQS_QUEUE_URL')
sqs_dlq_url = os.getenv('SQS_DLQ_URL')
# Create the clients
sqs = boto3.client('sqs',
aws_access_key_id=sqs_aws_access_key_id,
aws_secret_access_key=sqs_aws_secret_access_key,
region_name=sqs_aws_region)
s3 = boto3.client('s3',
aws_access_key_id=r2_aws_access_key_id,
aws_secret_access_key=r2_aws_secret_access_key,
region_name=r2_aws_region,
endpoint_url=r2_s3_endpoint_url)
```
Now, we create our main application file, `main.py`, where we need to define functions for retrieving a job, for
extending the visibility timeout of a job, and for deleting a job. We also need to define a function for saving a
checkpoint to cloud storage, and for loading a checkpoint from cloud storage.
We're going to need to import some things from our client file.
```python theme={null}
from clients import sqs, s3, sqs_queue_url, sqs_dlq_url, r2_bucket_name
```
Now, we define a `get_job` function:
```python theme={null}
import json
visibility_timeout = 60
def get_job():
'''
Get the job from the SQS queue
Returns:
- job: dict, the job to be processed
- receipt_handle: str, the receipt handle of the message
If there are no messages in the queue, return None, None
'''
response = sqs.receive_message(
QueueUrl=sqs_queue_url,
AttributeNames=['All'],
MaxNumberOfMessages=1,
MessageAttributeNames=['All'],
VisibilityTimeout=visibility_timeout,
WaitTimeSeconds=20
)
if 'Messages' in response:
message = response['Messages'][0]
receipt_handle = message['ReceiptHandle']
job = json.loads(message['Body'])
return job, receipt_handle
else:
return None, None
```
Now, we define a `heartbeat_job` function, that will extend the visibility timeout on a cadence, and can be interrupted
from a different thread. This function also needs to be able to stop the main job if the receipt handle is invalid,
which means the job has been acknowledged (finished), or the message has been given to another worker.
```python theme={null}
import time
import threading
def heartbeat_job(receipt_handle: str, heartbeat_stop_signal: threading.Event, job_stop_signal: threading.Event):
'''
Send a heartbeat to the SQS queue to keep the job alive
Parameters:
- receipt_handle: str, the receipt handle of the message
- heartbeat_stop_signal: threading.Event, a signal to stop the heartbeat
- job_stop_signal: threading.Event, a signal to stop the main job
'''
while not heartbeat_stop_signal.is_set():
try:
sqs.change_message_visibility(
QueueUrl=sqs_queue_url,
ReceiptHandle=receipt_handle,
VisibilityTimeout=visibility_timeout
)
time.sleep(visibility_timeout / 2)
except boto3.SQS.Client.exceptions.ReceiptHandleIsInvalid:
# If the receipt handle is invalid, it means the job has been
# acknowledged, or the message has been given to another worker.
# In this case, we can stop the heartbeat, and interrupt the
# main job.
job_stop_signal.set()
break
```
Now, we need functions to release the job to be retried, and to acknowledge the job, completed or failed.
```python theme={null}
def release_job(receipt_handle: str):
'''
Release the job back to the SQS queue
Parameters:
- receipt_handle: str, the receipt handle of the message
'''
try:
sqs.change_message_visibility(
QueueUrl=sqs_queue_url,
ReceiptHandle=receipt_handle,
VisibilityTimeout=0
)
except boto3.SQS.Client.exceptions.ReceiptHandleIsInvalid:
# If the receipt handle is invalid, it means the job has been
# acknowledged, or the message has been given to another worker.
# In this case, we can ignore the error, because we were trying to
# release the job anyway.
pass
def acknowledge_job(receipt_handle: str):
'''
Acknowledge the job and delete it from the SQS queue
Parameters:
- receipt_handle: str, the receipt handle of the message
'''
sqs.delete_message(
QueueUrl=sqs_queue_url,
ReceiptHandle=receipt_handle
)
def fail_job(job, receipt_handle: str):
'''
Move the job to the dead-letter queue
Parameters:
- receipt_handle: str, the receipt handle of the message
'''
# First remove job from the queue
acknowledge_job(receipt_handle)
# Then send it to the DLQ
sqs.send_message(
QueueUrl=sqs_dlq_url,
MessageBody=json.dumps(job)
)
```
We also want a function to download the checkpoint from cloud storage, and a function to upload the checkpoint to cloud
storage. In this simplified example, we're going to use a small JSON file for the checkpoint, but the principle is the
same no matter what the actual checkpoint is.
```python theme={null}
def download_checkpoint(job_id: str):
'''
Download the checkpoint from S3
Parameters:
- job_id: str, the job ID
Returns:
- checkpoint: dict, the checkpoint
'''
try:
response = s3.get_object(
Bucket=r2_bucket_name,
Key=f'{job_id}/checkpoint.json'
)
except boto3.exceptions.S3.NoSuchKey:
return None
checkpoint = json.loads(response['Body'].read())
return checkpoint
def upload_checkpoint(job_id: str, checkpoint: dict):
'''
Upload the checkpoint to S3
Parameters:
- job_id: str, the job ID
- checkpoint: dict, the checkpoint
'''
s3.put_object(
Bucket=r2_bucket_name,
Key=f'{job_id}/checkpoint.json',
Body=json.dumps(checkpoint)
)
```
We may also need a function to validate the job before engaging in the main work. This function should return `True` if
the job is valid, and `False` if the job is invalid. In our case, we're going to assume that any job with a `job_id` and
`steps` is valid, but your usecase is likely far more complex than that.
```python theme={null}
def validate_job(job: dict):
# This is a very simple function for our very simple application.
# You should replace this with your actual validation logic.
return 'job_id' in job and 'steps' in job
```
Now, we need a function for "doing the work", which in our case is just slowly calculating a sum. For you this may be AI
training jobs or molecular simulations.
```python theme={null}
def do_the_actual_work(job: dict, checkpoint: dict, stop_signal: threading.Event) -> int | None:
'''
Do the actual work for the job. This function will simulate work by
sleeping for 30 seconds and incrementing the step and sum in the
checkpoint.
Parameters:
- job: dict, the job
- checkpoint: dict, the checkpoint
- stop_signal: threading.Event, a signal to stop the work
'''
while checkpoint['step'] < job['steps'] and not stop_signal.is_set():
# Simulate work
time.sleep(30)
# If the job was interrupted, we don't want to upload the
# checkpoint, because it may conflict with the next worker.
if not stop_signal.is_set():
# Update the checkpoint.
checkpoint['step'] += 1
checkpoint['sum'] += checkpoint['step']
upload_checkpoint(job['job_id'], checkpoint)
if not stop_signal.is_set():
return checkpoint['sum']
else:
return None
```
Once our work has completed, we'll need a function to upload the results to cloud storage.
```python theme={null}
def upload_result(job_id: str, result: int):
'''
Upload the result to S3
Parameters:
- job_id: str, the job ID
- result: int, the result
'''
s3.put_object(
Bucket=r2_bucket_name,
Key=f'{job_id}/result.txt',
Body=str(result)
)
```
Now, we need to put it all together in a function called `process_job`.
```python theme={null}
def process_job(job: dict, receipt_handle: str) -> None:
# Now that we have the job, we need to start a separate thread that
# heartbeats for it. This will keep the job alive in the SQS queue.
# Separate threads are critical here, because our main work is likely
# blocking, and we don't want to block the heartbeat.
heartbeat_stop_signal = threading.Event()
job_stop_signal = threading.Event()
heartbeat_thread = threading.Thread(
target=heartbeat_job, args=(
receipt_handle, heartbeat_stop_signal, job_stop_signal))
heartbeat_thread.start()
# If there's a checkpoint, we want to use it, but if not, we need to
# initialize our state.
checkpoint = download_checkpoint(job['job_id'])
if checkpoint is None:
checkpoint = {'step': 0, 'sum': 0}
# Some jobs may have a validation step. For instance, dreambooth training may have a step
# that verifies if all inputs have faces. If the validation fails, we should stop the job
# and not retry it, but instead move it to the DLQ. In this situation, we can
# be confident that the job will never succeed.
if not validate_job(job):
heartbeat_stop_signal.set()
fail_job(job, receipt_handle)
heartbeat_thread.join()
return
# Now we can do the actual work
try:
result = do_the_actual_work(job, checkpoint)
if result is None:
# This means the job was interrupted, so we need to release it
# back to the queue.
heartbeat_stop_signal.set()
heartbeat_thread.join()
release_job(receipt_handle)
return
# The job isn't really done until the result is uploaded.
upload_result(job['job_id'], result)
# Once the result is uploaded, we can acknowledge the job and stop
# the heartbeat.
acknowledge_job(receipt_handle)
heartbeat_stop_signal.set()
heartbeat_thread.join()
except Exception as e:
# If there's an error, we need to release the job back to the queue
# so it can be retried.
heartbeat_stop_signal.set()
heartbeat_thread.join()
release_job(receipt_handle)
return
```
Finally, we need to create a loop that will run forever, processing jobs as they come in.
```python theme={null}
if __name__ == '__main__':
while True:
job, receipt_handle = get_job()
if job is not None:
process_job(job, receipt_handle)
else:
time.sleep(10)
```
### Completed Example
```python theme={null}
from clients import sqs, r2, sqs_queue_url, sqs_dlq_url, r2_bucket_name
import json
import time
import threading
import boto3
visibility_timeout = 60
def get_job() -> tuple:
'''
Get the job from the SQS queue
Returns:
- job: dict, the job to be processed
- receipt_handle: str, the receipt handle of the message
If there are no messages in the queue, return None, None
'''
response = sqs.receive_message(
QueueUrl=sqs_queue_url,
AttributeNames=['All'],
MaxNumberOfMessages=1,
MessageAttributeNames=['All'],
VisibilityTimeout=visibility_timeout,
WaitTimeSeconds=20
)
if 'Messages' in response:
message = response['Messages'][0]
receipt_handle = message['ReceiptHandle']
job = json.loads(message['Body'])
return job, receipt_handle
else:
return None, None
def heartbeat_job(receipt_handle: str, heartbeat_stop_signal: threading.Event, job_stop_signal: threading.Event) -> None:
'''
Send a heartbeat to the SQS queue to keep the job alive
Parameters:
- receipt_handle: str, the receipt handle of the message
- heartbeat_stop_signal: threading.Event, a signal to stop the heartbeat
- job_stop_signal: threading.Event, a signal to stop the main job
'''
while not heartbeat_stop_signal.is_set():
try:
sqs.change_message_visibility(
QueueUrl=sqs_queue_url,
ReceiptHandle=receipt_handle,
VisibilityTimeout=visibility_timeout
)
time.sleep(visibility_timeout / 2)
except boto3.SQS.Client.exceptions.ReceiptHandleIsInvalid:
# If the receipt handle is invalid, it means the job has been
# acknowledged, or the message has been given to another worker.
# In this case, we can stop the heartbeat, and interrupt the
# main job.
job_stop_signal.set()
break
def release_job(receipt_handle: str) -> None:
'''
Release the job back to the SQS queue
Parameters:
- receipt_handle: str, the receipt handle of the message
'''
try:
sqs.change_message_visibility(
QueueUrl=sqs_queue_url,
ReceiptHandle=receipt_handle,
VisibilityTimeout=0
)
except boto3.SQS.Client.exceptions.ReceiptHandleIsInvalid:
# If the receipt handle is invalid, it means the job has been
# acknowledged, or the message has been given to another worker.
# In this case, we can ignore the error, because we were trying to
# release the job anyway.
pass
def acknowledge_job(receipt_handle: str) -> None:
'''
Acknowledge the job and delete it from the SQS queue
Parameters:
- receipt_handle: str, the receipt handle of the message
'''
sqs.delete_message(
QueueUrl=sqs_queue_url,
ReceiptHandle=receipt_handle
)
def fail_job(job, receipt_handle: str) -> None:
'''
Move the job to the dead-letter queue
Parameters:
- receipt_handle: str, the receipt handle of the message
'''
# First remove job from the queue
acknowledge_job(receipt_handle)
# Then send it to the DLQ
sqs.send_message(
QueueUrl=sqs_dlq_url,
MessageBody=json.dumps(job)
)
def download_checkpoint(job_id: str) -> dict:
'''
Download the checkpoint from S3
Parameters:
- job_id: str, the job ID
Returns:
- checkpoint: dict, the checkpoint
'''
try:
response = r2.get_object(
Bucket=r2_bucket_name,
Key=f'{job_id}/checkpoint.json'
)
except boto3.exceptions.S3.NoSuchKey:
return None
checkpoint = json.loads(response['Body'].read())
return checkpoint
def upload_checkpoint(job_id: str, checkpoint: dict) -> None:
'''
Upload the checkpoint to S3
Parameters:
- job_id: str, the job ID
- checkpoint: dict, the checkpoint
'''
r2.put_object(
Bucket=r2_bucket_name,
Key=f'{job_id}/checkpoint.json',
Body=json.dumps(checkpoint)
)
def validate_job(job: dict) -> bool:
'''
Validate the job
Parameters:
- job: dict, the job
Returns:
- bool, whether the job is valid
'''
# This is a very simple function for our very simple application.
# You should replace this with your actual validation logic.
return 'job_id' in job and 'steps' in job
def do_the_actual_work(job: dict, checkpoint: dict, stop_signal: threading.Event) -> int | None:
'''
Do the actual work for the job. This function will simulate work by
sleeping for 30 seconds and incrementing the step and sum in the
checkpoint.
Parameters:
- job: dict, the job
- checkpoint: dict, the checkpoint
- stop_signal: threading.Event, a signal to stop the work
'''
while checkpoint['step'] < job['steps'] and not stop_signal.is_set():
# Simulate work
time.sleep(30)
# If the job was interrupted, we don't want to upload the
# checkpoint, because it may conflict with the next worker.
if not stop_signal.is_set():
# Update the checkpoint.
checkpoint['step'] += 1
checkpoint['sum'] += checkpoint['step']
upload_checkpoint(job['job_id'], checkpoint)
if not stop_signal.is_set():
return checkpoint['sum']
else:
return None
def upload_result(job_id: str, result: int) -> None:
'''
Upload the result to S3
Parameters:
- job_id: str, the job ID
- result: int, the result
'''
r2.put_object(
Bucket=r2_bucket_name,
Key=f'{job_id}/result.txt',
Body=str(result)
)
def process_job(job: dict, receipt_handle: str) -> None:
# Now that we have the job, we need to start a separate thread that
# heartbeats for it. This will keep the job alive in the SQS queue.
# Separate threads are critical here, because our main work is likely
# blocking, and we don't want to block the heartbeat.
heartbeat_stop_signal = threading.Event()
job_stop_signal = threading.Event()
heartbeat_thread = threading.Thread(
target=heartbeat_job, args=(
receipt_handle, heartbeat_stop_signal, job_stop_signal))
heartbeat_thread.start()
# If there's a checkpoint, we want to use it, but if not, we need to
# initialize our state.
checkpoint = download_checkpoint(job['job_id'])
if checkpoint is None:
checkpoint = {'step': 0, 'sum': 0}
# Some jobs may have a validation step. For instance, dreambooth training may have a step
# that verifies if all inputs have faces. If the validation fails, we should stop the job
# and not retry it, but instead move it to the DLQ. In this situation, we can
# be confident that the job will never succeed.
if not validate_job(job):
heartbeat_stop_signal.set()
fail_job(job, receipt_handle)
heartbeat_thread.join()
return
# Now we can do the actual work
try:
result = do_the_actual_work(job, checkpoint)
if result is None:
# This means the job was interrupted, so we need to release it
# back to the queue.
heartbeat_stop_signal.set()
heartbeat_thread.join()
release_job(receipt_handle)
return
# The job isn't really done until the result is uploaded.
upload_result(job['job_id'], result)
# Once the result is uploaded, we can acknowledge the job and stop
# the heartbeat.
acknowledge_job(receipt_handle)
heartbeat_stop_signal.set()
heartbeat_thread.join()
except Exception as e:
# If there's an error, we need to release the job back to the queue
# so it can be retried.
heartbeat_stop_signal.set()
heartbeat_thread.join()
release_job(receipt_handle)
return
if __name__ == '__main__':
while True:
job, receipt_handle = get_job()
if job is not None:
process_job(job, receipt_handle)
else:
time.sleep(10)
```
Now that we have our worker application ready to go, we can run it with `python main.py`. It will run forever, polling
the queue for jobs, and processing them as they come in.
## Submitting Jobs to the Queue
Next, we need a way to submit jobs to the queue. We're going to use the `boto3` library for this as well, but we'll be
using the AWS keys for the `job-submitter` user. I've saved mine in a file called `submitter.env`, and I'm going to
source them into my environment with the following command:
```shell theme={null}
export $(grep -v '^#' submitter.env | xargs -d '\n')
```
I've named my submitter script `submit-jobs.py`.
The first part should look familiar, getting config from the environment, and initializing our SQS client.
```python theme={null}
import boto3
import os
# Get the environment variables
sqs_aws_access_key_id = os.getenv('SQS_AWS_ACCESS_KEY_ID')
sqs_aws_secret_access_key = os.getenv('SQS_AWS_SECRET_ACCESS_KEY')
sqs_aws_region = os.getenv('SQS_AWS_REGION')
sqs_queue_url = os.getenv('SQS_QUEUE_URL')
# Create the client
sqs = boto3.client('sqs',
aws_access_key_id=sqs_aws_access_key_id,
aws_secret_access_key=sqs_aws_secret_access_key,
region_name=sqs_aws_region)
```
For this, let's assume we have ten thousand jobs we want to submit, each taking 5 hours to complete. We're going to use
`send_message_batch` to maximize throughput, and we're going to assign a `MessageDeduplicationId` to each job to ensure
exactly-once processing.
```python theme={null}
from uuid import uuid4
import json
def submit_one_batch(jobs: list) -> None:
'''
Submit a batch of jobs to the SQS queue
Parameters:
- jobs: list, the list of jobs
'''
if len(jobs) == 0:
return
if len(jobs) > 10:
raise ValueError('You can submit at most 10 jobs at a time')
def job_to_entry(job):
if 'job_id' not in job:
job["job_id"] = str(uuid4())
job["steps"] = int(job["steps"])
return {
'Id': job["job_id"],
'MessageDeduplicationId': job["job_id"],
'MessageGroupId': job["job_id"],
'MessageBody': json.dumps(job)
}
entries = [job_to_entry(job) for job in jobs]
response = sqs.send_message_batch(
QueueUrl=sqs_queue_url,
Entries=entries
)
if 'Failed' in response:
print(response)
raise Exception(f'Failed to submit jobs: {response["Failed"]}')
else:
print(f'Submitted {len(jobs)} jobs')
```
This first function we've defined will submit one single batch, up to the SQS-imposed limit of 10 messages at a time.
Now we need a function that can take an arbitrarily large set of jobs and submit them all successfully.
```python theme={null}
from typing import Iterable
def submit_jobs(jobs: Iterable) -> None:
'''
Submit an arbitrary number of jobs to the queue
Parameters:
- jobs: Iterable, the iterable of jobs
'''
batch = []
for job in jobs:
batch.append(job)
if len(batch) == 10:
submit_one_batch(batch)
batch = []
if batch:
submit_one_batch(batch)
```
Now, suppose we have a csv with our 10,000 jobs, and we want to submit them all. Our CSV (data.csv) looks like this,
with 10,000 rows.
```csv theme={null}
job_id,steps
job-0,600
job-1,600
job-2,600
job-3,600
```
Now, in our job submitter script, we can read this CSV and submit all the jobs, lazily reading the csv so as not to run
out of memory. We wouldn't anyways with this tiny example, but it's a good habit to get into.
```python theme={null}
import csv
if __name__ == '__main__':
with open("data.csv") as f:
reader = csv.DictReader(f)
submit_jobs(reader)
```
### Completed Example
```python theme={null}
import boto3
import os
from uuid import uuid4
import json
from typing import Iterable
import csv
# Get the environment variables
sqs_aws_access_key_id = os.getenv('SQS_AWS_ACCESS_KEY_ID')
sqs_aws_secret_access_key = os.getenv('SQS_AWS_SECRET_ACCESS_KEY')
sqs_aws_region = os.getenv('SQS_AWS_REGION')
sqs_queue_url = os.getenv('SQS_QUEUE_URL')
# Create the client
sqs = boto3.client('sqs',
aws_access_key_id=sqs_aws_access_key_id,
aws_secret_access_key=sqs_aws_secret_access_key,
region_name=sqs_aws_region)
def submit_one_batch(jobs: list) -> None:
'''
Submit a batch of jobs to the SQS queue
Parameters:
- jobs: list, the list of jobs
'''
if len(jobs) == 0:
return
if len(jobs) > 10:
raise ValueError('You can submit at most 10 jobs at a time')
def job_to_entry(job):
if 'job_id' not in job:
job["job_id"] = str(uuid4())
job["steps"] = int(job["steps"])
return {
'Id': job["job_id"],
'MessageDeduplicationId': job["job_id"],
'MessageGroupId': job["job_id"],
'MessageBody': json.dumps(job)
}
entries = [job_to_entry(job) for job in jobs]
response = sqs.send_message_batch(
QueueUrl=sqs_queue_url,
Entries=entries
)
if 'Failed' in response:
print(response)
raise Exception(f'Failed to submit jobs: {response["Failed"]}')
else:
print(f'Submitted {len(jobs)} jobs')
def submit_jobs(jobs: Iterable) -> None:
'''
Submit an arbitrary number of jobs to the queue
Parameters:
- jobs: Iterable, the iterable of jobs
'''
batch = []
for job in jobs:
batch.append(job)
if len(batch) == 10:
submit_one_batch(batch)
batch = []
if batch:
submit_one_batch(batch)
if __name__ == '__main__':
with open("data.csv") as f:
reader = csv.DictReader(f)
submit_jobs(reader)
```
### Running the Job Submitter
Run the job submitter with `python submit-jobs.py`. It will read the csv file and submit all the jobs to the queue.
Once that has run, we can see in the SQS console that our queue has 10000 messages.
 ## Containerize the Worker Application
Now that we have our worker application and our job submitter, we can package our worker in a docker container, and run
it on a SaladCloud Container Group.
First, let's make sure our dependencies are documented in `requirements.txt`.
```shell theme={null}
boto3
```
Now, create a new file called `Dockerfile`. Our application is simple, so a basic python base image should be fine.
```dockerfile theme={null}
FROM python:3.10.12-slim-buster
WORKDIR /app
COPY requirements.txt .
RUN pip install -r requirements.txt
COPY clients.py .
COPY main.py .
CMD ["python", "main.py"]
```
Now, build the docker image, and use a tag that makes sense for you.
```shell theme={null}
docker build -t saladtechnologies/lrt-worker-examples:sqs .
```
Now, we can test it locally to make sure it works, before we deploy it to SaladCloud.
```shell theme={null}
docker run -it --rm --env-file worker.env saladtechnologies/lrt-worker-examples:sqs
```
You should see it start up and begin processing a job. Once this is working, you can go ahead and terminate the
container with `Ctrl+C`.
Now, we can push the image to Docker Hub.
```shell theme={null}
docker push saladtechnologies/lrt-worker-examples:sqs
```
## Deploying the Worker to SaladCloud
To deploy our worker to SaladCloud, we need to create a new Container Group. This can be done via the API, SDKs, or the
Portal. We're going to use the Portal.
We're going to create a new Container Group, and we're going to use the image we just pushed to Docker Hub. We're going
to request 100 replicas (the max via the portal), and we're going to set all of our environment variables from
`worker.env`.
## Containerize the Worker Application
Now that we have our worker application and our job submitter, we can package our worker in a docker container, and run
it on a SaladCloud Container Group.
First, let's make sure our dependencies are documented in `requirements.txt`.
```shell theme={null}
boto3
```
Now, create a new file called `Dockerfile`. Our application is simple, so a basic python base image should be fine.
```dockerfile theme={null}
FROM python:3.10.12-slim-buster
WORKDIR /app
COPY requirements.txt .
RUN pip install -r requirements.txt
COPY clients.py .
COPY main.py .
CMD ["python", "main.py"]
```
Now, build the docker image, and use a tag that makes sense for you.
```shell theme={null}
docker build -t saladtechnologies/lrt-worker-examples:sqs .
```
Now, we can test it locally to make sure it works, before we deploy it to SaladCloud.
```shell theme={null}
docker run -it --rm --env-file worker.env saladtechnologies/lrt-worker-examples:sqs
```
You should see it start up and begin processing a job. Once this is working, you can go ahead and terminate the
container with `Ctrl+C`.
Now, we can push the image to Docker Hub.
```shell theme={null}
docker push saladtechnologies/lrt-worker-examples:sqs
```
## Deploying the Worker to SaladCloud
To deploy our worker to SaladCloud, we need to create a new Container Group. This can be done via the API, SDKs, or the
Portal. We're going to use the Portal.
We're going to create a new Container Group, and we're going to use the image we just pushed to Docker Hub. We're going
to request 100 replicas (the max via the portal), and we're going to set all of our environment variables from
`worker.env`.
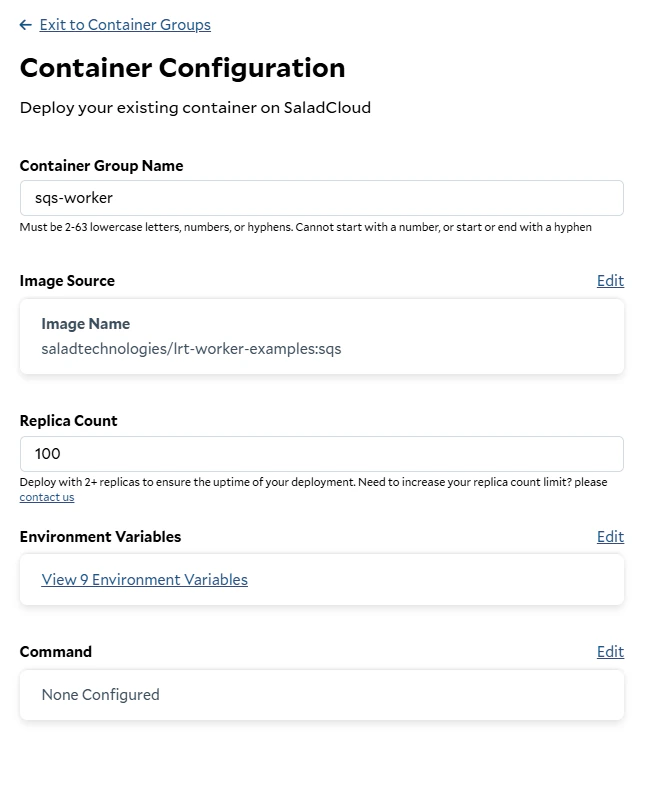 Our application is extremely simple, so we're going to only request 1 vCPU, 1 GB of RAM, and no GPU. Your hardware
requirements are likely significantly higher than this.
Our application is extremely simple, so we're going to only request 1 vCPU, 1 GB of RAM, and no GPU. Your hardware
requirements are likely significantly higher than this.
 All CPU-only jobs are prioritized as "Batch" (the lowest tier), and we don't need any additional storage for this
particular application.
All CPU-only jobs are prioritized as "Batch" (the lowest tier), and we don't need any additional storage for this
particular application.
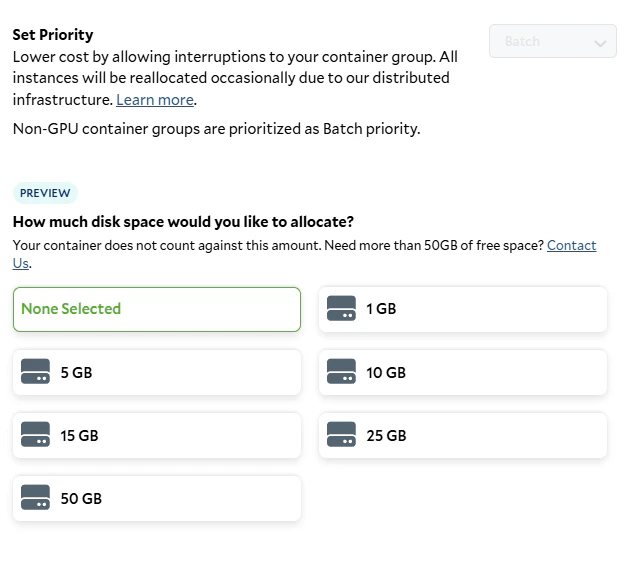 We do not need the container gateway, as our application pulls its work from a queue. We also do not need health probes,
as those are primarily for services accessed via Container Gateway. Go ahead and hit deploy, and you'll be taken to the
container group page, where you can see its status.
First, it will prepare by pulling the container image into our high-performance cache.
We do not need the container gateway, as our application pulls its work from a queue. We also do not need health probes,
as those are primarily for services accessed via Container Gateway. Go ahead and hit deploy, and you'll be taken to the
container group page, where you can see its status.
First, it will prepare by pulling the container image into our high-performance cache.
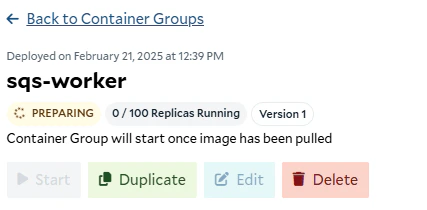 Once it's prepared, it will start allocating replicas, and downloading the container image to those replicas.
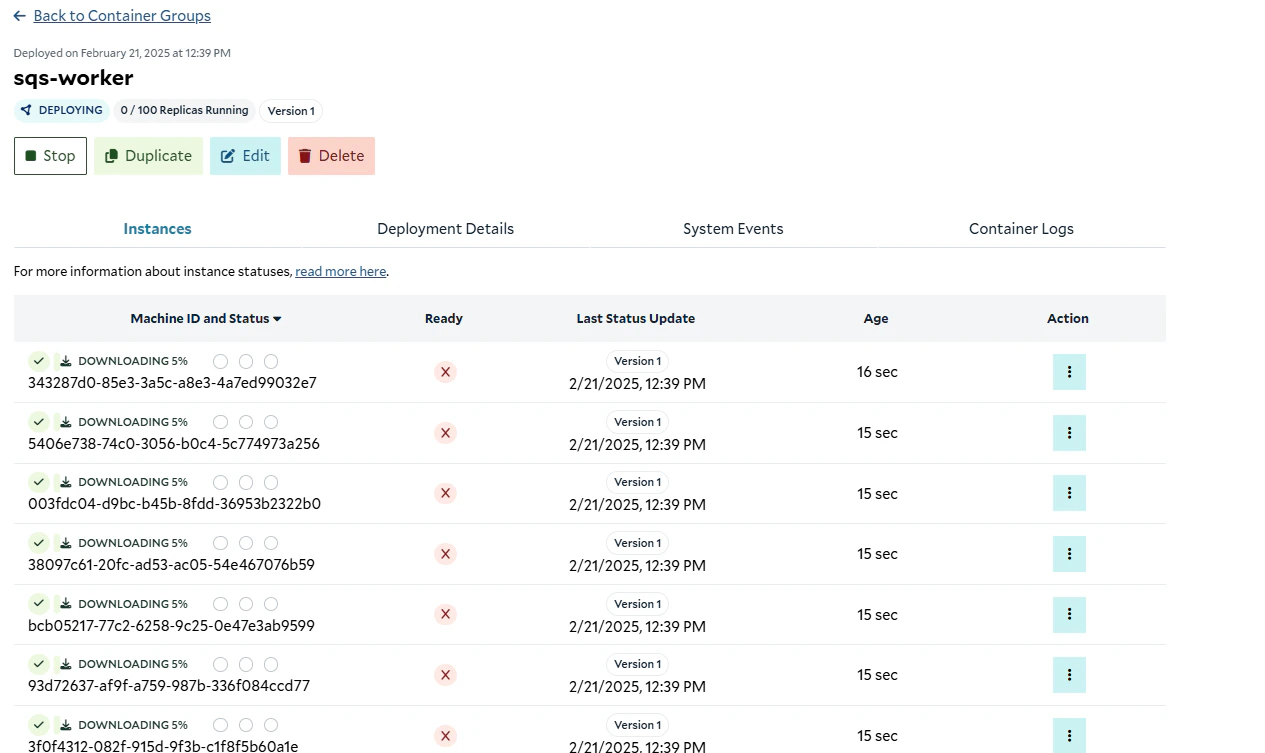 After a minute or so, we should see our instances up and running.
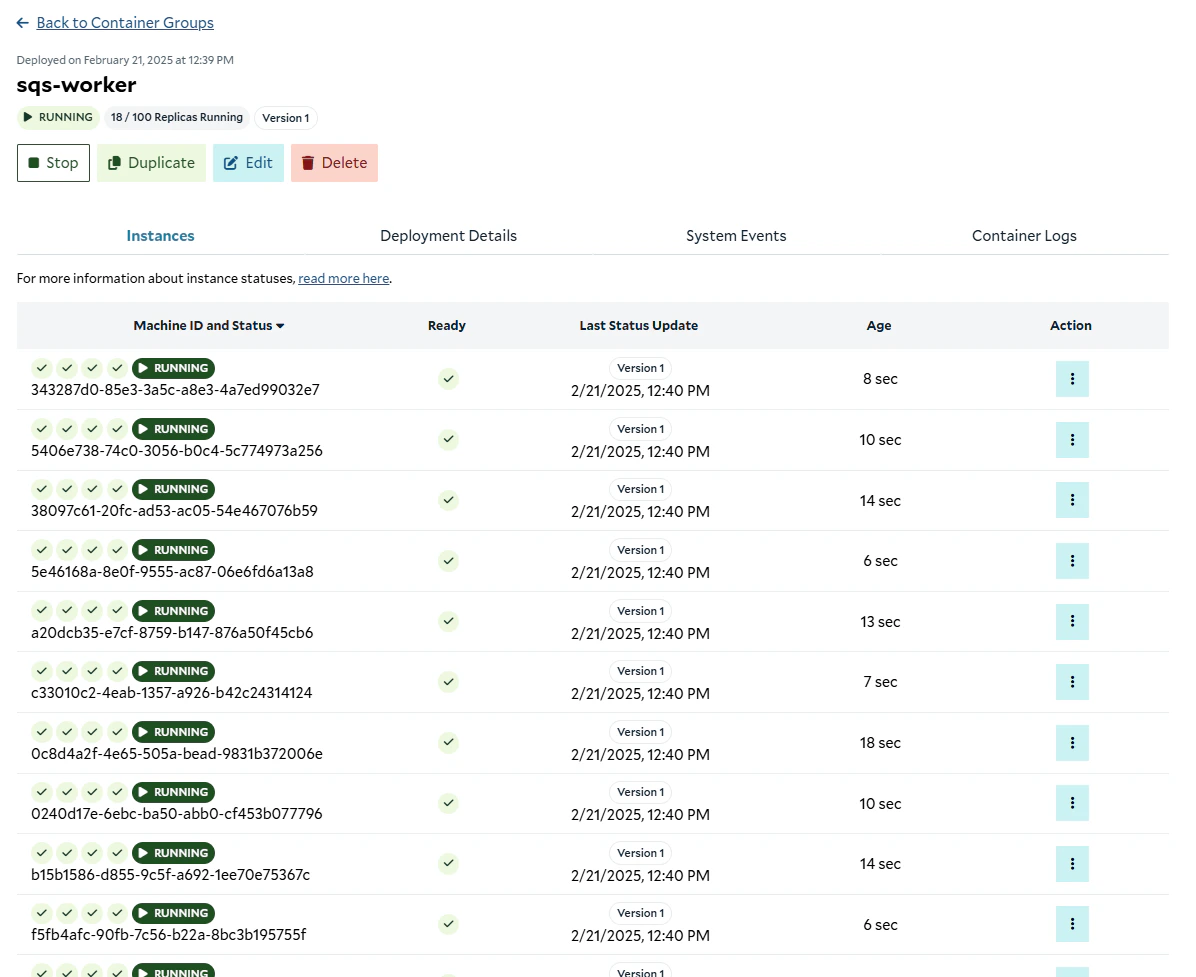 ## Validating That It Works
Now that our cluster is up and running, we can go to the SQS console, and see that we have in-flight messages now.
## Validating That It Works
Now that our cluster is up and running, we can go to the SQS console, and see that we have in-flight messages now.
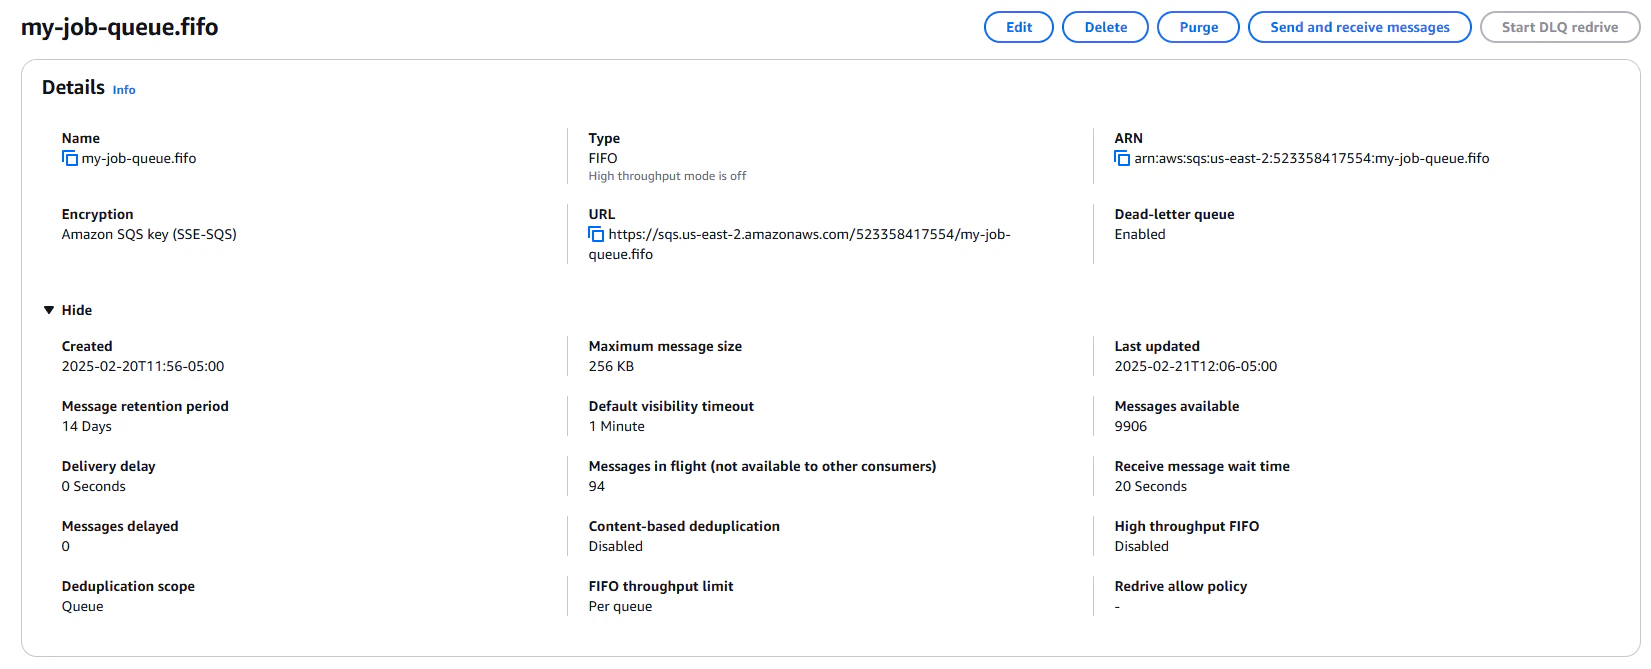 From the R2 console, we can see that our bucket is being filled with checkpoints and results.
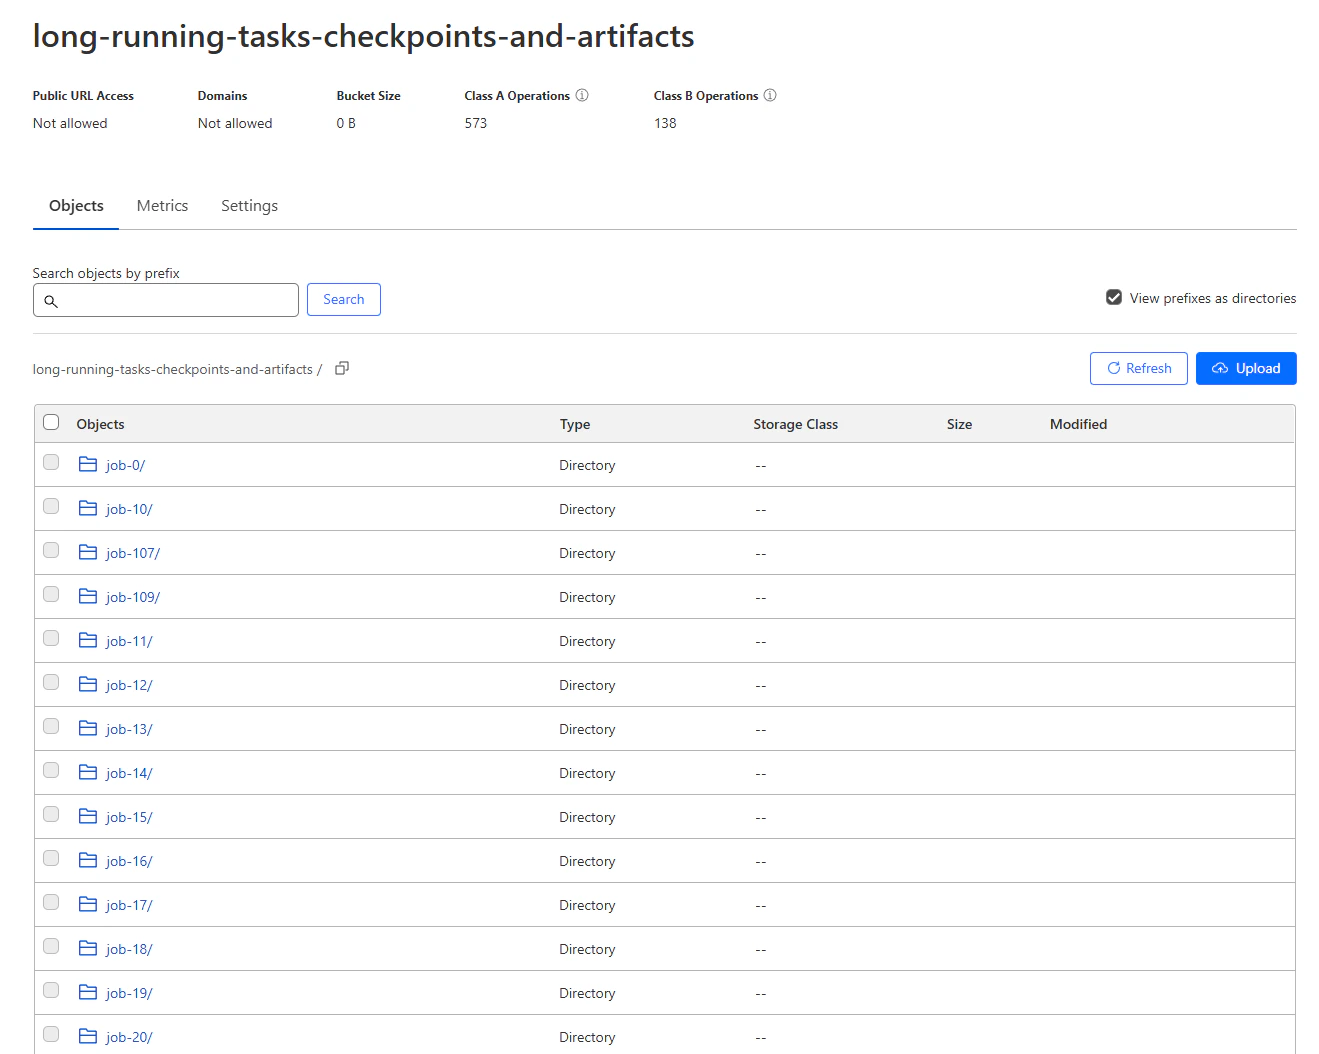 ## Autoscaling
Now that we have our worker running, we can set up some simple autoscaling to automatically scale the number of replicas
up and down based on the number of messages in the queue.
There are many ways to implement autoscaling, but for simplicity, we are going to use a scheduled task that runs every 5
minutes, and sets the number of replicas to be equal to the number of messages in the queue, limited to 250 replicas
(the maximum in the API). To implement this, we're going to use AWS Lambda, a serverless compute service that can run
code in response to events. Cloudflare Workers can also be used to implement this, along with most other serverless
compute platforms.
Navigate to the Lambda console, and create a new function.
## Autoscaling
Now that we have our worker running, we can set up some simple autoscaling to automatically scale the number of replicas
up and down based on the number of messages in the queue.
There are many ways to implement autoscaling, but for simplicity, we are going to use a scheduled task that runs every 5
minutes, and sets the number of replicas to be equal to the number of messages in the queue, limited to 250 replicas
(the maximum in the API). To implement this, we're going to use AWS Lambda, a serverless compute service that can run
code in response to events. Cloudflare Workers can also be used to implement this, along with most other serverless
compute platforms.
Navigate to the Lambda console, and create a new function.
 We're going to use Python 3.13, and we'll run it with `arm64`, because it is cheaper, and we aren't doing anything
architecture-specific. We can leave the default permissions for now.
We're going to use Python 3.13, and we'll run it with `arm64`, because it is cheaper, and we aren't doing anything
architecture-specific. We can leave the default permissions for now.
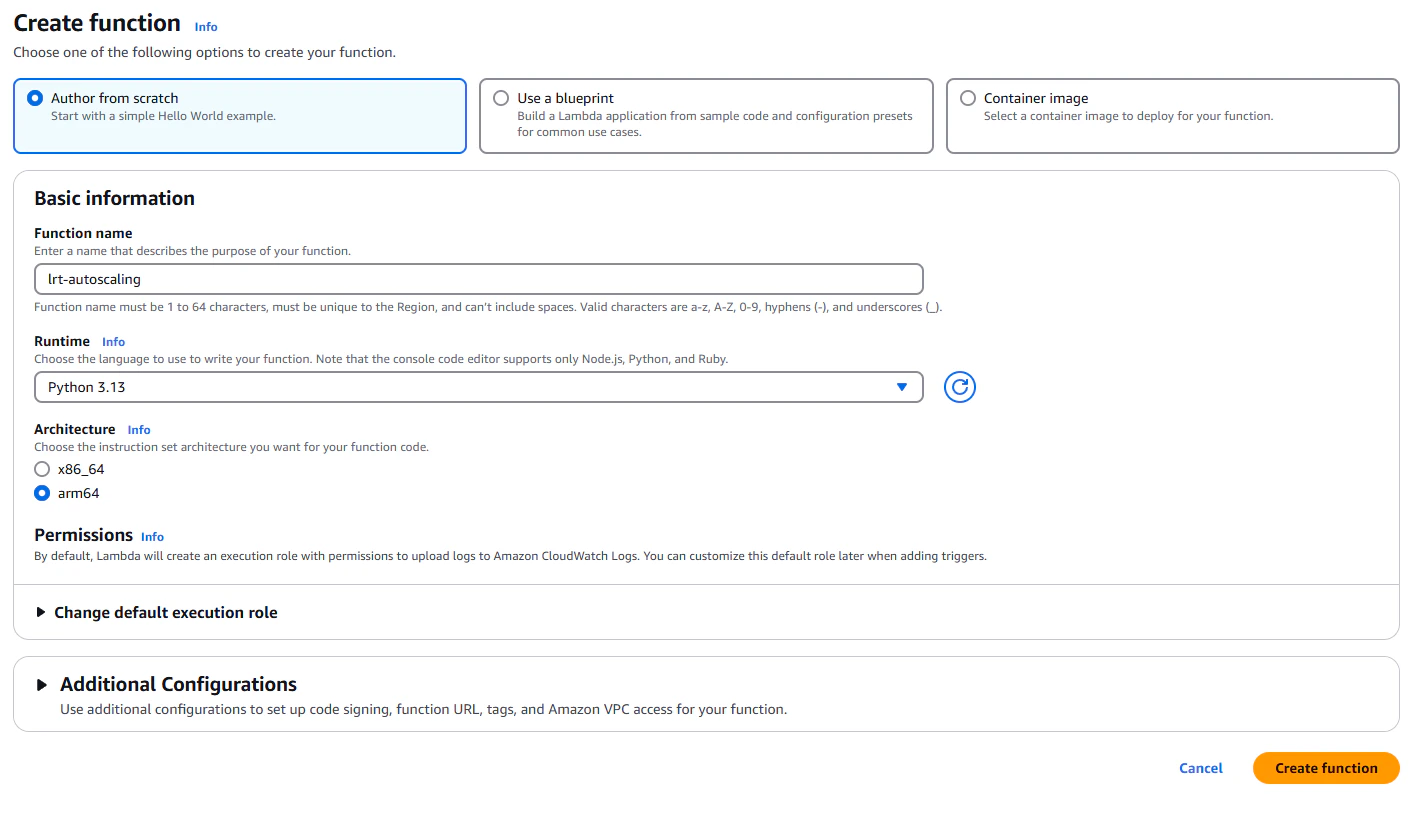 Once your function has been created, you'll land on the function overview page.
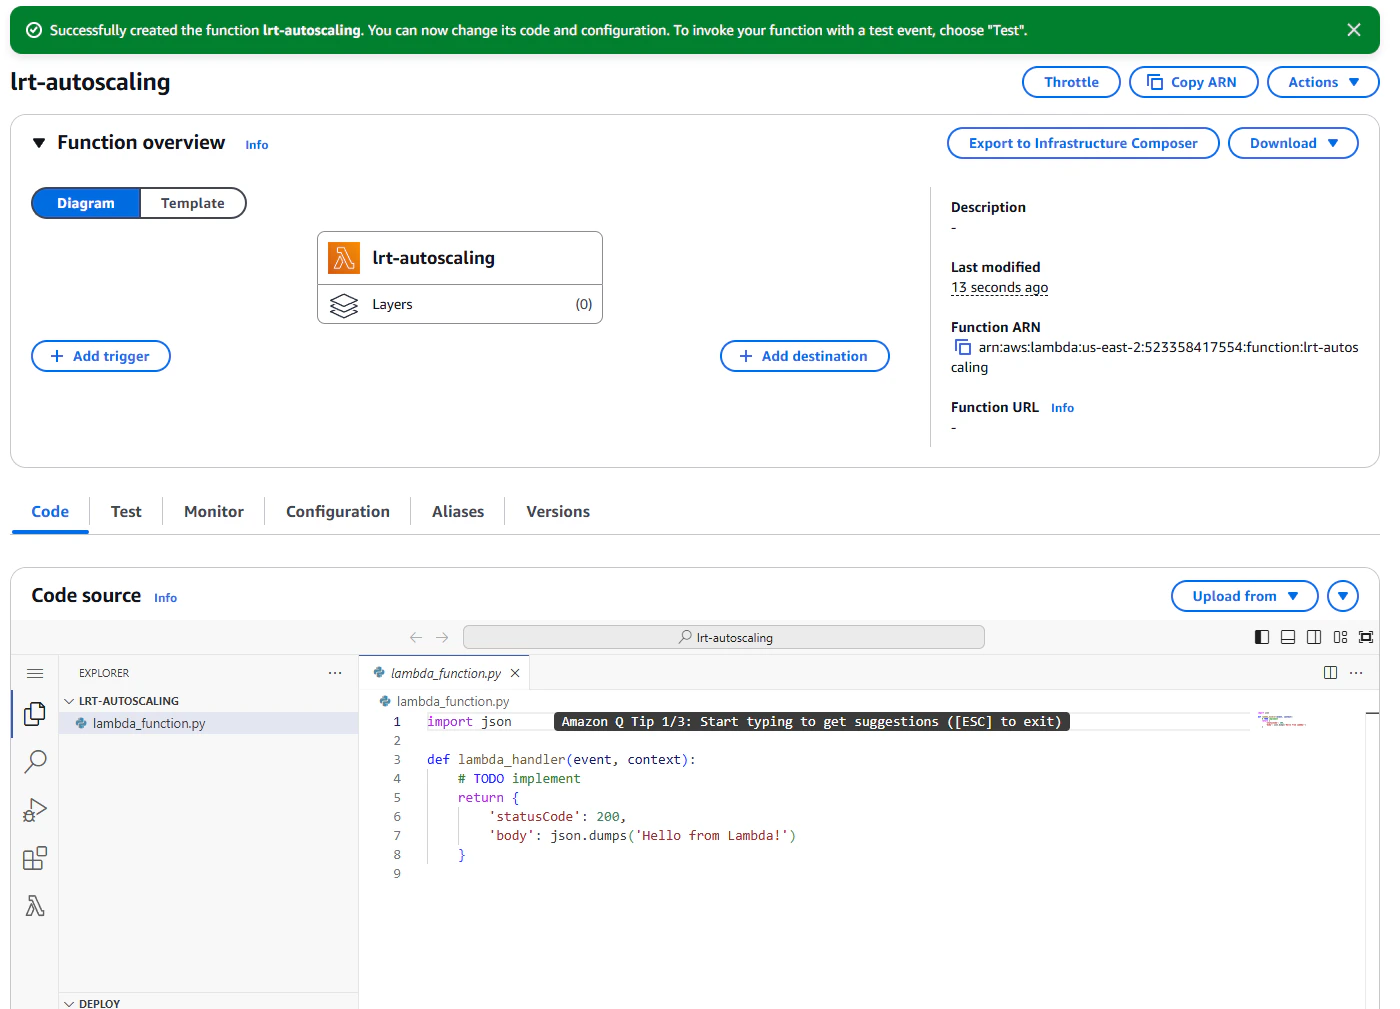 Next, we need to give this lambda the correct permissions to interact with our SQS queue.
First, we need to get the ARN for the *execution role* of the function, not the ARN of the function itself.
Next, we need to give this lambda the correct permissions to interact with our SQS queue.
First, we need to get the ARN for the *execution role* of the function, not the ARN of the function itself.
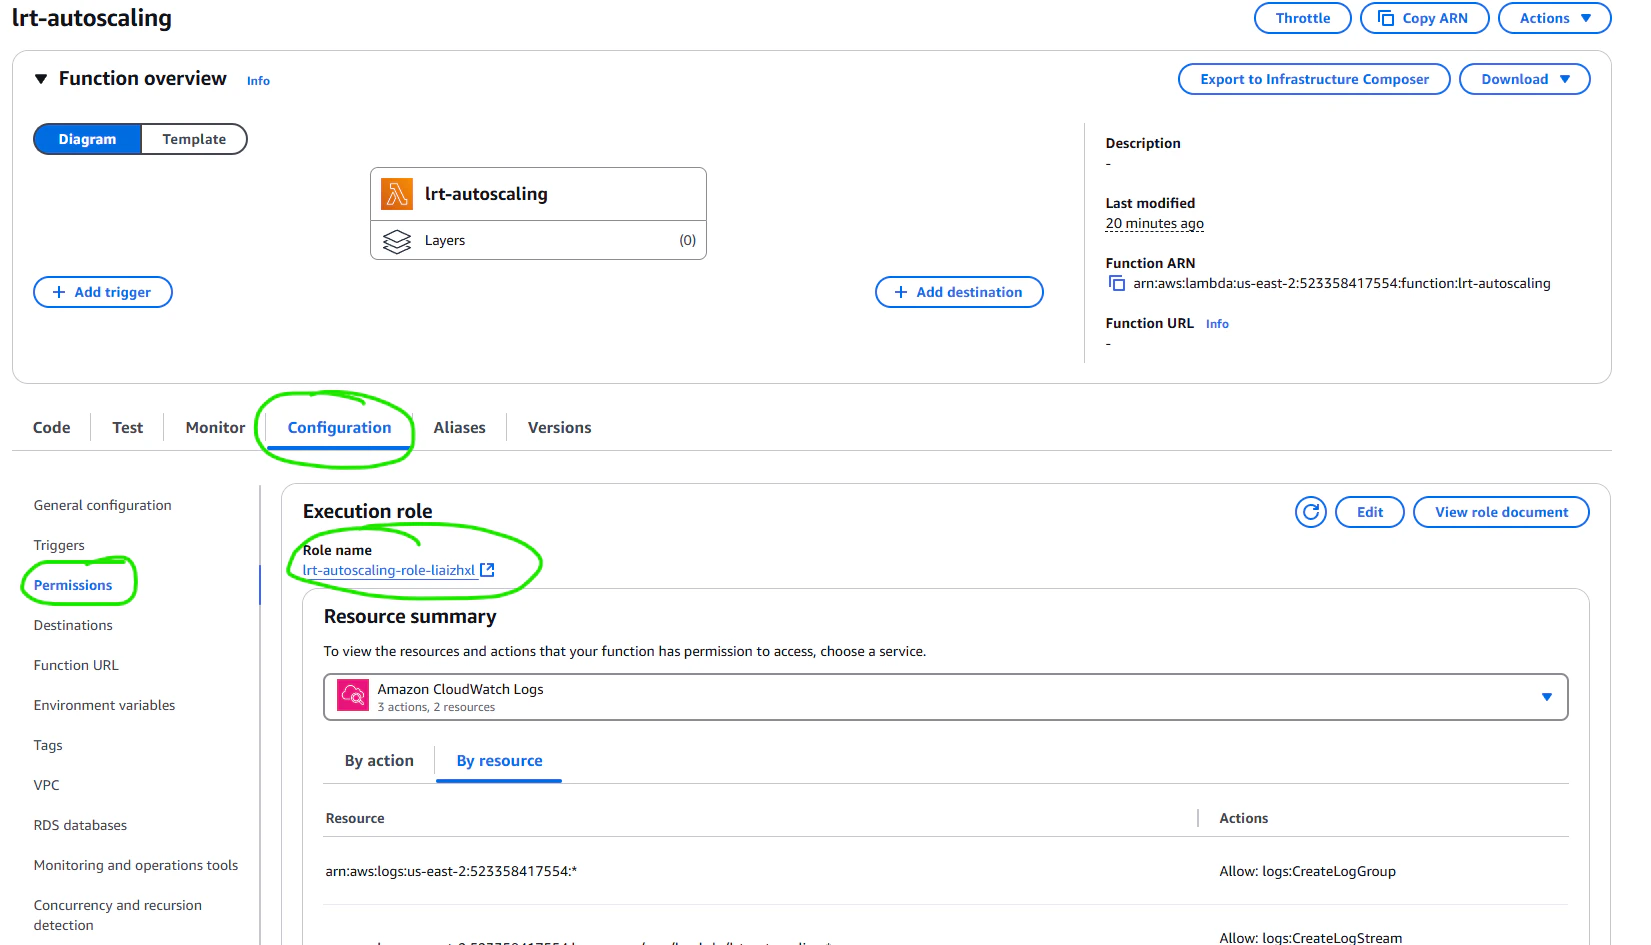 Clicking that link will take you the IAM console page for that role, where you can then copy the ARN.
 We're going to do this by editing the policy created by the queue. Back in the SQS console, on the details page for our
queue, navigate to the "Queue Policies" tab.
We're going to do this by editing the policy created by the queue. Back in the SQS console, on the details page for our
queue, navigate to the "Queue Policies" tab.
 Add this additional statement to the Access policy, replacing the ARN with the ARN of the execution role of the lambda
```json theme={null}
{
"Sid": "AutoscalerAccess",
"Action": ["sqs:GetQueueAttributes"],
"Effect": "Allow",
"Resource": "arn:aws:sqs:us-east-2:523358417554:my-job-queue.fifo",
"Principal": {
"AWS": ["arn:aws:iam::523358417554:role/service-role/lrt-autoscaling-role-some-unique-ending"]
}
}
```
Save the queue policy, and now the lambda has the permissions it needs to get the current number of messages from the
queue.
Now, we need to write the code for the lambda. We're going to use the `boto3` library to interact with the SQS queue,
which in included by default in the lambda environment.
We will be setting our configuration for this lambda in environment variables. You can find this under configuration on
the lambda console page for our function. Alsol in configuration, we want to increase our function timeout to 10s, since
we have to make multiple serial requests to external services.
```python theme={null}
import boto3
import os
# Our job queue
queue_url = os.environ['queue_url']
# Scaling Configuration
max_replicas = int(os.environ['max_replicas'])
min_replicas = int(os.environ['min_replicas'])
# Salad Info
org = os.environ['salad_org']
project = os.environ['salad_project']
container_group_name = os.environ['salad_container_group_name']
salad_api_key = os.environ['salad_api_key']
salad_base_url = "https://api.salad.com/api/public"
```
We also are going to write a simple helper function for making http requests. We don't need everything offered by
requests, just some basic functionality.
```python theme={null}
import urllib
import http.client
import ssl
import json
def send_request(
method: str,
url: str,
headers: Dict[str, str],
body: Optional[Union[Dict[str, Any], str]] = None,
timeout: int = 30,
verify_ssl: bool = True
) -> Dict[str, Any]:
"""
Send an HTTP request with precise control over headers case.
Args:
method: HTTP method (GET, POST, PUT, DELETE, etc.)
url: The URL to send the request to
headers: Dictionary of headers with exact case to preserve
body: Optional request body (dict will be converted to JSON)
timeout: Request timeout in seconds
verify_ssl: Whether to verify SSL certificates
Returns:
Dictionary containing:
- status_code: HTTP status code
- headers: Response headers
- body: Response body (parsed as JSON if possible)
- raw: Raw response body as string
"""
# Parse the URL to get components
parsed_url = urllib.parse.urlparse(url)
host = parsed_url.netloc
path = parsed_url.path
if parsed_url.query:
path += f"?{parsed_url.query}"
# Set up SSL context if needed
context = None
if parsed_url.scheme == 'https':
context = ssl.create_default_context()
if not verify_ssl:
context.check_hostname = False
context.verify_mode = ssl.CERT_NONE
# Prepare the body data if needed
data = None
if body is not None:
if isinstance(body, dict):
data = json.dumps(body).encode('utf-8')
elif isinstance(body, str):
data = body.encode('utf-8')
else:
data = str(body).encode('utf-8')
try:
# Choose the appropriate connection type
if parsed_url.scheme == 'https':
conn = http.client.HTTPSConnection(
host=host,
timeout=timeout,
context=context
)
else:
conn = http.client.HTTPConnection(
host=host,
timeout=timeout
)
# Send the request with unmodified headers
conn.request(
method=method.upper(),
url=path,
body=data,
headers=headers # Headers case is preserved exactly as provided
)
# Get the response
response = conn.getresponse()
status_code = response.status
response_headers = dict(response.getheaders())
response_body = response.read().decode('utf-8')
# Try to parse the response as JSON
try:
parsed_body = json.loads(response_body)
except json.JSONDecodeError:
parsed_body = None
return {
"status_code": status_code,
"headers": response_headers,
"body": parsed_body,
"raw": response_body
}
except http.client.HTTPException as e:
return {
"status_code": None,
"headers": {},
"body": None,
"raw": None,
"error": f"HTTP Error: {str(e)}"
}
except ssl.SSLError as e:
return {
"status_code": None,
"headers": {},
"body": None,
"raw": None,
"error": f"SSL Error: {str(e)}"
}
except Exception as e:
return {
"status_code": None,
"headers": {},
"body": None,
"raw": None,
"error": str(e)
}
finally:
# Always close the connection
if 'conn' in locals():
conn.close()
```
Next, we're going to define some helper function for using the 4 API methods we need to interact with SaladCloud.
```python theme={null}
def get_container_group():
response = send_request(
method="GET",
url=f"{salad_base_url}/organizations/{org}/projects/{project}/containers/{container_group_name}",
headers={
"Salad-Api-Key": salad_api_key
}
)
return response["body"]
def start_container_group():
send_request(
method="POST",
url=f"{salad_base_url}/organizations/{org}/projects/{project}/containers/{container_group_name}/start",
headers={
"Content-Type": "application/json",
"Salad-Api-Key": salad_api_key
}
)
def stop_container_group():
send_request(
method="POST",
url=f"{salad_base_url}/organizations/{org}/projects/{project}/containers/{container_group_name}/stop",
headers={
"Content-Type": "application/json",
"Salad-Api-Key": salad_api_key
}
)
def set_replicas(replicas: int):
send_request(
method="PATCH",
url=f"{salad_base_url}/organizations/{org}/projects/{project}/containers/{container_group_name}",
body=json.dumps({
"replicas": replicas
}),
headers={
"Content-Type": "application/merge-patch+json",
"Salad-Api-Key": salad_api_key
}
)
```
Finally, we can stitch it all together in the lambda handler.
```python theme={null}
def lambda_handler(event, context):
sqs = boto3.client('sqs')
# We need to know how much work is waiting and how much is in flight
attributes = sqs.get_queue_attributes(
QueueUrl=queue_url,
AttributeNames=['ApproximateNumberOfMessages',
'ApproximateNumberOfMessagesNotVisible']
)
num_waiting_messages = int(
attributes['Attributes']['ApproximateNumberOfMessages'])
num_messages_in_flight = int(
attributes['Attributes']['ApproximateNumberOfMessagesNotVisible'])
# This is our ideal number of replicas
total_messages = num_waiting_messages + num_messages_in_flight
# We need to constrain this number by our min and max.
desired_replicas = min(max(min_replicas, total_messages), max_replicas)
container_group = get_container_group()
current_replicas = container_group["replicas"]
print(
f"Current replicas: {current_replicas}, Desired replicas: {desired_replicas}")
# always one of pending, running, stopped, failed, deploying
current_state = container_group["current_state"]["status"]
print(f"Current state: {current_state}")
if current_state == "stopped" and desired_replicas > 0:
start_container_group()
if current_state == "running" and desired_replicas == 0:
stop_container_group()
if desired_replicas != current_replicas:
set_replicas(desired_replicas)
return {
'statusCode': 200
}
```
Now, deploy and test your lambda. You can use the default test event, as our lambda does not use any information from
the event itself.
Add this additional statement to the Access policy, replacing the ARN with the ARN of the execution role of the lambda
```json theme={null}
{
"Sid": "AutoscalerAccess",
"Action": ["sqs:GetQueueAttributes"],
"Effect": "Allow",
"Resource": "arn:aws:sqs:us-east-2:523358417554:my-job-queue.fifo",
"Principal": {
"AWS": ["arn:aws:iam::523358417554:role/service-role/lrt-autoscaling-role-some-unique-ending"]
}
}
```
Save the queue policy, and now the lambda has the permissions it needs to get the current number of messages from the
queue.
Now, we need to write the code for the lambda. We're going to use the `boto3` library to interact with the SQS queue,
which in included by default in the lambda environment.
We will be setting our configuration for this lambda in environment variables. You can find this under configuration on
the lambda console page for our function. Alsol in configuration, we want to increase our function timeout to 10s, since
we have to make multiple serial requests to external services.
```python theme={null}
import boto3
import os
# Our job queue
queue_url = os.environ['queue_url']
# Scaling Configuration
max_replicas = int(os.environ['max_replicas'])
min_replicas = int(os.environ['min_replicas'])
# Salad Info
org = os.environ['salad_org']
project = os.environ['salad_project']
container_group_name = os.environ['salad_container_group_name']
salad_api_key = os.environ['salad_api_key']
salad_base_url = "https://api.salad.com/api/public"
```
We also are going to write a simple helper function for making http requests. We don't need everything offered by
requests, just some basic functionality.
```python theme={null}
import urllib
import http.client
import ssl
import json
def send_request(
method: str,
url: str,
headers: Dict[str, str],
body: Optional[Union[Dict[str, Any], str]] = None,
timeout: int = 30,
verify_ssl: bool = True
) -> Dict[str, Any]:
"""
Send an HTTP request with precise control over headers case.
Args:
method: HTTP method (GET, POST, PUT, DELETE, etc.)
url: The URL to send the request to
headers: Dictionary of headers with exact case to preserve
body: Optional request body (dict will be converted to JSON)
timeout: Request timeout in seconds
verify_ssl: Whether to verify SSL certificates
Returns:
Dictionary containing:
- status_code: HTTP status code
- headers: Response headers
- body: Response body (parsed as JSON if possible)
- raw: Raw response body as string
"""
# Parse the URL to get components
parsed_url = urllib.parse.urlparse(url)
host = parsed_url.netloc
path = parsed_url.path
if parsed_url.query:
path += f"?{parsed_url.query}"
# Set up SSL context if needed
context = None
if parsed_url.scheme == 'https':
context = ssl.create_default_context()
if not verify_ssl:
context.check_hostname = False
context.verify_mode = ssl.CERT_NONE
# Prepare the body data if needed
data = None
if body is not None:
if isinstance(body, dict):
data = json.dumps(body).encode('utf-8')
elif isinstance(body, str):
data = body.encode('utf-8')
else:
data = str(body).encode('utf-8')
try:
# Choose the appropriate connection type
if parsed_url.scheme == 'https':
conn = http.client.HTTPSConnection(
host=host,
timeout=timeout,
context=context
)
else:
conn = http.client.HTTPConnection(
host=host,
timeout=timeout
)
# Send the request with unmodified headers
conn.request(
method=method.upper(),
url=path,
body=data,
headers=headers # Headers case is preserved exactly as provided
)
# Get the response
response = conn.getresponse()
status_code = response.status
response_headers = dict(response.getheaders())
response_body = response.read().decode('utf-8')
# Try to parse the response as JSON
try:
parsed_body = json.loads(response_body)
except json.JSONDecodeError:
parsed_body = None
return {
"status_code": status_code,
"headers": response_headers,
"body": parsed_body,
"raw": response_body
}
except http.client.HTTPException as e:
return {
"status_code": None,
"headers": {},
"body": None,
"raw": None,
"error": f"HTTP Error: {str(e)}"
}
except ssl.SSLError as e:
return {
"status_code": None,
"headers": {},
"body": None,
"raw": None,
"error": f"SSL Error: {str(e)}"
}
except Exception as e:
return {
"status_code": None,
"headers": {},
"body": None,
"raw": None,
"error": str(e)
}
finally:
# Always close the connection
if 'conn' in locals():
conn.close()
```
Next, we're going to define some helper function for using the 4 API methods we need to interact with SaladCloud.
```python theme={null}
def get_container_group():
response = send_request(
method="GET",
url=f"{salad_base_url}/organizations/{org}/projects/{project}/containers/{container_group_name}",
headers={
"Salad-Api-Key": salad_api_key
}
)
return response["body"]
def start_container_group():
send_request(
method="POST",
url=f"{salad_base_url}/organizations/{org}/projects/{project}/containers/{container_group_name}/start",
headers={
"Content-Type": "application/json",
"Salad-Api-Key": salad_api_key
}
)
def stop_container_group():
send_request(
method="POST",
url=f"{salad_base_url}/organizations/{org}/projects/{project}/containers/{container_group_name}/stop",
headers={
"Content-Type": "application/json",
"Salad-Api-Key": salad_api_key
}
)
def set_replicas(replicas: int):
send_request(
method="PATCH",
url=f"{salad_base_url}/organizations/{org}/projects/{project}/containers/{container_group_name}",
body=json.dumps({
"replicas": replicas
}),
headers={
"Content-Type": "application/merge-patch+json",
"Salad-Api-Key": salad_api_key
}
)
```
Finally, we can stitch it all together in the lambda handler.
```python theme={null}
def lambda_handler(event, context):
sqs = boto3.client('sqs')
# We need to know how much work is waiting and how much is in flight
attributes = sqs.get_queue_attributes(
QueueUrl=queue_url,
AttributeNames=['ApproximateNumberOfMessages',
'ApproximateNumberOfMessagesNotVisible']
)
num_waiting_messages = int(
attributes['Attributes']['ApproximateNumberOfMessages'])
num_messages_in_flight = int(
attributes['Attributes']['ApproximateNumberOfMessagesNotVisible'])
# This is our ideal number of replicas
total_messages = num_waiting_messages + num_messages_in_flight
# We need to constrain this number by our min and max.
desired_replicas = min(max(min_replicas, total_messages), max_replicas)
container_group = get_container_group()
current_replicas = container_group["replicas"]
print(
f"Current replicas: {current_replicas}, Desired replicas: {desired_replicas}")
# always one of pending, running, stopped, failed, deploying
current_state = container_group["current_state"]["status"]
print(f"Current state: {current_state}")
if current_state == "stopped" and desired_replicas > 0:
start_container_group()
if current_state == "running" and desired_replicas == 0:
stop_container_group()
if desired_replicas != current_replicas:
set_replicas(desired_replicas)
return {
'statusCode': 200
}
```
Now, deploy and test your lambda. You can use the default test event, as our lambda does not use any information from
the event itself.
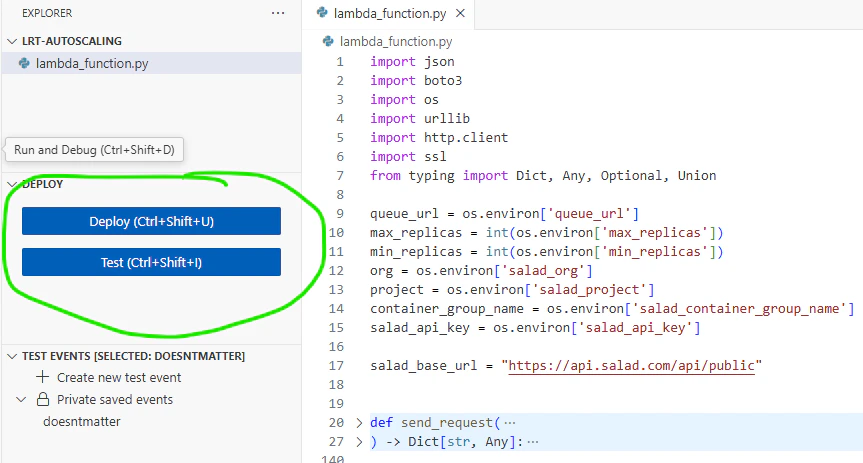 You should see it log the current and desired replicas, and the current state of the container group. Then, if you've
configured everything correctly, you should see the desired changes reflected in your SaladCloud Container Group.
The final step is adding a trigger for our lambda. We're going to use a CloudWatch Event, which will trigger our lambda
based on a schedule. We're going to set it to run every 5 minutes.
You should see it log the current and desired replicas, and the current state of the container group. Then, if you've
configured everything correctly, you should see the desired changes reflected in your SaladCloud Container Group.
The final step is adding a trigger for our lambda. We're going to use a CloudWatch Event, which will trigger our lambda
based on a schedule. We're going to set it to run every 5 minutes.
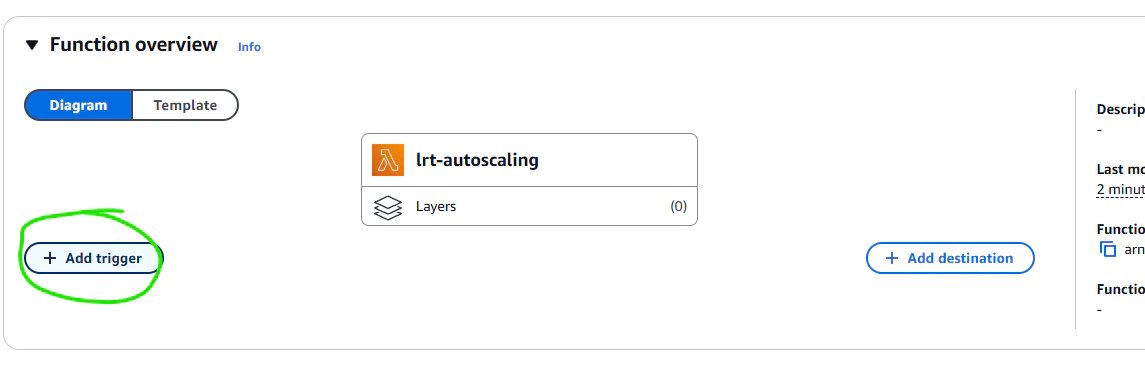
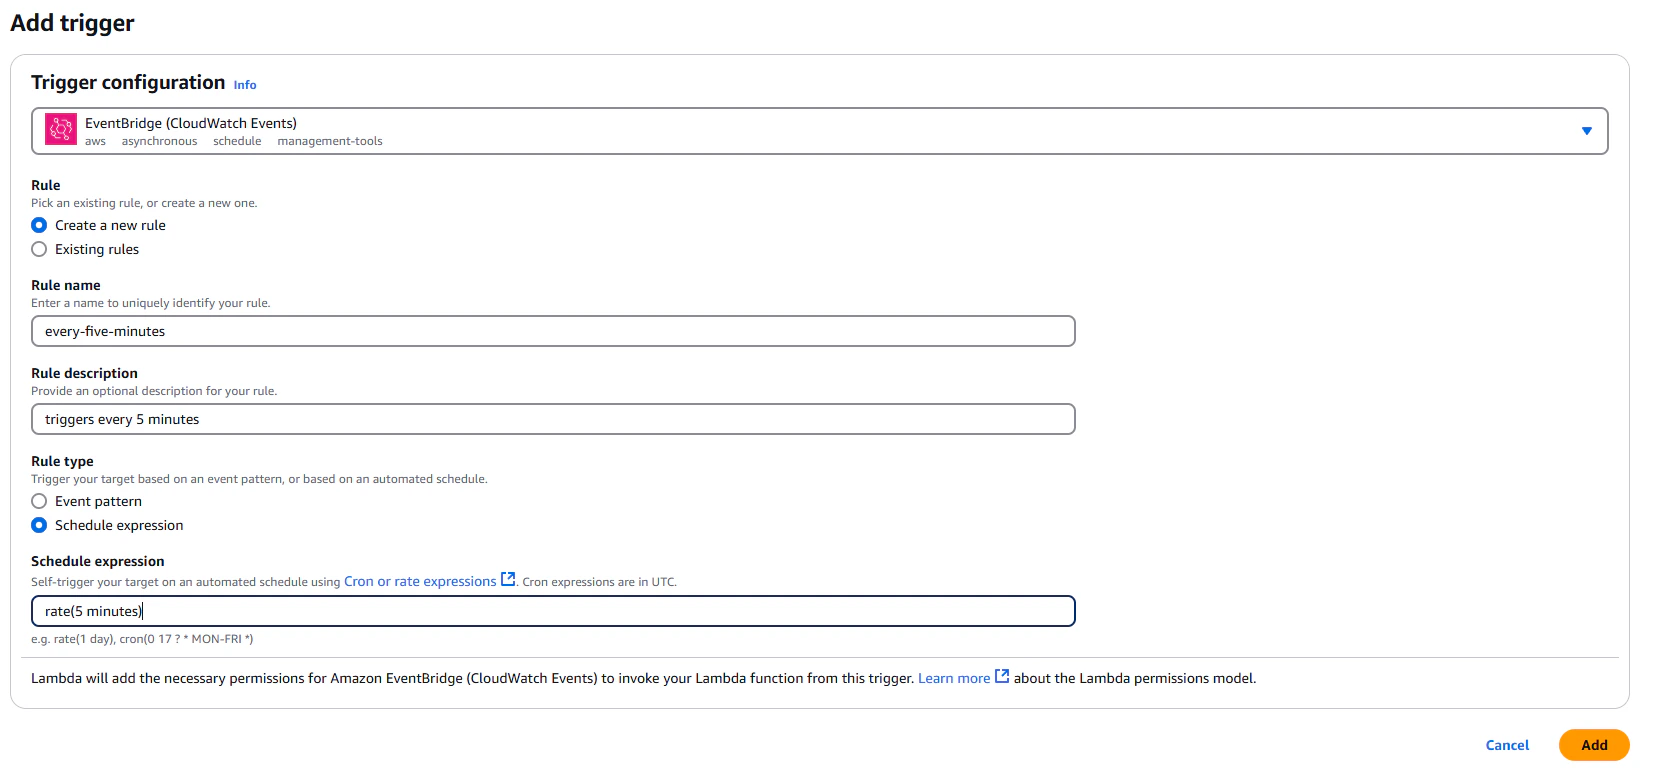 ## Conclusion
In this guide, we've built a simple worker application that processes jobs from an SQS queue, and we've deployed it to
SaladCloud. We've also implemented autoscaling for our worker using a scheduled Lambda function, so that it can
automatically scale up and down based on the number of messages in the queue.
## Conclusion
In this guide, we've built a simple worker application that processes jobs from an SQS queue, and we've deployed it to
SaladCloud. We've also implemented autoscaling for our worker using a scheduled Lambda function, so that it can
automatically scale up and down based on the number of messages in the queue.