> ## Documentation Index
> Fetch the complete documentation index at: https://docs.salad.com/llms.txt
> Use this file to discover all available pages before exploring further.
# Enabling IPv6
*Last Updated: October 15, 2024*
Our load balancing operates through IPv6 for stability across our network as it grows. Many docker images are generated
in ways that bind IPv6 ports and will work out of the box. Others, e.g. those created with build services like
[cog](https://github.com/replicate/cog) or [truss](https://github.com/basetenlabs/truss) may not. If you are having
problems with Container Gateway connections this may be the case. However your dreams of running on SaladCloud are not
lost, you just need to set an IPv6 host. Alternatively, adding [socat](http://www.dest-unreach.org/socat/) to your image
is an easy way to route IPv6 requests and get cooking.
# Checking IPv6 in your container
To check if IPv6 is enabled in your container, run a terminal in your container and run the following commands:
> Adapt this to the appropriate package manager for the base distro of your container, e.g. `apk add` for alpine
```
apt-get update
apt-get install net-tools
netstat -topln
```
If you see output with an IPv6 line, you're good to go!
```
Active Internet connections (only servers)
Proto Recv-Q Send-Q Local Address Foreign Address State PID/Program name Timer
tcp 0 0 0.0.0.0:5000 0.0.0.0:_ LISTEN 7/python off (0.00/0/0)
tcp6 0 0 :::8888 :::_ LISTEN 571/socat off (0.00/0/0)
```
However if there is no tcp6 line, follow the instructions below to add IPv6 support to your container.
```
Active Internet connections (only servers)
Proto Recv-Q Send-Q Local Address Foreign Address State PID/Program name
tcp 0 0 0.0.0.0:5000 0.0.0.0:\* LISTEN 7/python
```
# Configuring IPv6
## Using an IPv6 host
If you are defining the host of your server directly, e.g. with a host of `localhost`, replace it with the IPv6
equivalent `::` Equivalently replace a host of `0.0.0.0`with the IPv6 equivalent`*`.
## Uvicorn
```python theme={null}
from fastapi import FastAPI
import uvicorn
app = FastAPI()
@app.get("/hc")
async def health_check():
return "OK"
if __name__ == "__main__":
uvicorn.run(app, host='::', port=1234)
```
`uvicorn main:app --host '::' --port 1234`
## Gunicorn
`gunicorn -w 4 -k uvicorn.workers.UvicornWorker main:app --bind '[::]:1234'`
## Node.js
```javascript theme={null}
const http = require('http')
const hostname = '::' // Listen on all IPv6 addresses
const port = 1234
const server = http.createServer((req, res) => {
res.statusCode = 200
res.setHeader('Content-Type', 'text/plain')
res.end('Hello World\n')
})
server.listen(port, hostname, () => {
console.log(`Server running at http://[${hostname}]:${port}/`)
})
```
## Express.js
```javascript theme={null}
const express = require('express')
const app = express()
const hostname = '::' // Listen on all IPv6 addresses
const port = 1234
app.get('/', (req, res) => {
res.send('Hello World!')
})
app.listen(port, hostname, () => {
console.log(`Server running at http://[${hostname}]:${port}/`)
})
```
## Fastify
```javascript theme={null}
const fastify = require('fastify')({ logger: true })
// Declare a route
fastify.get('/', async (request, reply) => {
return { hello: 'world' }
})
// Run the server!
const start = async () => {
try {
await fastify.listen({ port: 1234, host: '::' })
fastify.log.info(`server listening on ${fastify.server.address().port}`)
} catch (err) {
fastify.log.error(err)
process.exit(1)
}
}
start()
```
## IPv6 with socat in custom containers
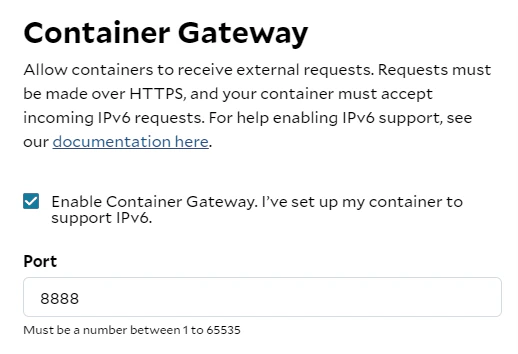
If you have direct access to the dockerfile used to create your image, you can modify it to install and start `socat`
which will forward IPv6 to IPv4. For the example below, you would enter port 8888 for SaladCloud, which would then be
routed to IPv4 port 8080. Adapt as needed for your setup. Alternatively, the `socat` command can be included in an
entryfile or setup script. Once you've rebuilt the image, check with `netstat` as above to verify it has worked.
```
...
RUN apt-get install -y socat
...
CMD ... & socat TCP6-LISTEN:8888,fork TCP4:127.0.0.1:8080;
```
 ## IPv6 with cog through socat
If you are using [cog](https://github.com/replicate/cog) to create your container, a few small changes can enable
`socat` to route IPv6 to IPV4 within the container.
1. Add socat to the `system_packages` section of `cog.yaml`. For example,
```python theme={null}
build:
...
system_packages:
- socat
predict: "predict.py:Predictor"
```
2. In [predict.py](http://predict.py/) (or other file included in the `predict` section of `cog.yaml`) add `import os`,
and add `os.system("socat TCP6-LISTEN:8888,fork TCP4:127.0.0.1:5000 &")` to `setup`. Update `5000` to the port your
container is expecting. The other port, here, 8888 is what would be used when setting up the container group
deployment.
## IPv6 with cog through socat
If you are using [cog](https://github.com/replicate/cog) to create your container, a few small changes can enable
`socat` to route IPv6 to IPV4 within the container.
1. Add socat to the `system_packages` section of `cog.yaml`. For example,
```python theme={null}
build:
...
system_packages:
- socat
predict: "predict.py:Predictor"
```
2. In [predict.py](http://predict.py/) (or other file included in the `predict` section of `cog.yaml`) add `import os`,
and add `os.system("socat TCP6-LISTEN:8888,fork TCP4:127.0.0.1:5000 &")` to `setup`. Update `5000` to the port your
container is expecting. The other port, here, 8888 is what would be used when setting up the container group
deployment.