> ## Documentation Index
> Fetch the complete documentation index at: https://docs.salad.com/llms.txt
> Use this file to discover all available pages before exploring further.
# Create and Deploy A Video Generation API on SaladCloud
> A step-by-step guide to creating and deploying a video generation API on SaladCloud, using ComfyUI and ComfyUI API.
*Last Updated: January 8, 2026*
This guide will take you step by step through the process of creating and deploying a production ready video-generation
service on SaladCloud. We will be using the following technologies:
* [ComfyUI](https://github.com/comfyanonymous/ComfyUI/) - A highly modular user interface and inference engine for
diffusion models.
* [ComfyUI API](https://github.com/SaladTechnologies/comfyui-api) - A RESTful API for ComfyUI.
* [SaladCloud](https://salad.com/) - A platform for deploying containerized GPU-accelerated applications at scale.
* [Docker](https://www.docker.com/) - A tool for developing, shipping, and running applications in containers.
* [LTX Video](https://huggingface.co/Lightricks/LTX-Video) - An open-source Apache 2.0 licensed video generation model
capable of both text to video, and image to video generation.
* [Typescript](https://www.typescriptlang.org/) - A strongly typed programming language that builds on JavaScript that
we can use to write a custom endpoint for our API.
* [wget](https://www.gnu.org/software/wget/) - A command-line utility for downloading files from the web. Optional, but
useful for downloading model weights.
This guide assumes you have a basic understanding of the technologies listed above. If you are new to any of these
tools, we recommend you familiarize yourself with them before proceeding. Additionally, you will need a SaladCloud
account to deploy your service. It will be helpful, but not strictly necessary to have a GPU available for local
development. Any terminal commands in this guide are written for a Unix-like shell, such as bash, and this guide was
developed using Ubuntu 22.
**Production Tip:** For production video generation, we recommend uploading outputs directly to cloud storage (S3,
Azure Blob, Hugging Face) rather than returning them as base64 strings in the response. Video files are significantly
larger than images and returning them in the response body can cause memory issues. See the [ComfyUI API storage
backends documentation](https://github.com/SaladTechnologies/comfyui-api#modular-storage-backends) for configuration
options.
## Step 1: Set Up Your Development Environment
Before we can start building our video generation API, we need to set up our development environment, and create a
repository to store our code. We will be using Typescript to write our API, so we need to install Node.js and
Typescript. If you don't already have Node.js installed, I recommend using [nvm](https://github.com/nvm-sh/nvm) to
install and manage Node.js versions. You will also need Docker installed on your machine to build and run your API, as
well as to deploy it to SaladCloud.
First, let's create a new directory for our project and initialize the git repo:
```bash theme={null}
mkdir video-generation-api
cd video-generation-api
git init
```
We'll also go ahead and download our model weights to this directory. You may instead link the file from a different
directory, if you already have it locally, e.g. in your ComfyUI installation (if you have one). Download the model
weights and save them to the `video-generation-api` directory:
* [Checkpoint](https://huggingface.co/Lightricks/LTX-Video/blob/main/ltx-video-2b-v0.9.1.safetensors)
* [Text Encoder](https://huggingface.co/Comfy-Org/mochi_preview_repackaged/blob/main/split_files/text_encoders/t5xxl_fp16.safetensors)
This can be done with the following commands:
```bash theme={null}
wget https://huggingface.co/Lightricks/LTX-Video/resolve/main/ltx-video-2b-v0.9.1.safetensors
wget https://huggingface.co/Comfy-Org/mochi_preview_repackaged/resolve/main/split_files/text_encoders/t5xxl_fp16.safetensors
```
Next, open your code editor in this directory.
Create a new file called `.gitignore` and add the following content:
```plaintext theme={null}
*.safetensors
node_modules
```
This will prevent you from checking the model weights themselves into version control, as they are quite large. Later in
this guide we're going to install javascript modules, and we don't want to check those in either.
## Step 2: Create a Docker Image
We'll use a manifest file to download models at container startup rather than baking them into the Docker image. This
keeps the image small and takes advantage of fast model registry downloads.
Create a file called `manifest.yaml`:
```yaml manifest.yaml theme={null}
apt:
- libgl1
- libgl1-mesa-glx
- libglib2.0-0
custom_nodes:
- comfyui-videohelpersuite
models:
before_start:
- url: https://huggingface.co/Lightricks/LTX-Video/resolve/main/ltx-video-2b-v0.9.1.safetensors
local_path: /opt/ComfyUI/models/checkpoints/ltx-video-2b-v0.9.1.safetensors
- url: https://huggingface.co/Comfy-Org/mochi_preview_repackaged/resolve/main/split_files/text_encoders/t5xxl_fp16.safetensors
local_path: /opt/ComfyUI/models/clip/t5xxl_fp16.safetensors
```
Create another new file, and name it `Dockerfile`. This file will contain the instructions for building your Docker
image. Add the following content to the file:
```dockerfile theme={null}
FROM ghcr.io/saladtechnologies/comfyui-api:comfy0.7.0-api1.16.1-torch2.8.0-cuda12.8-devel
COPY manifest.yaml .
ENV MANIFEST=manifest.yaml
```
This Dockerfile is based on the [ComfyUI API](https://github.com/SaladTechnologies/comfyui-api) image, which is a
pre-built docker image that includes ComfyUI, the ComfyUI API and all dependencies. The tag indicates the version of
ComfyUI, ComfyUI API, Torch, and CUDA that the image is built with. The `devel` tag indicates that this image contains
the full CUDA toolkit, which is necessary for running the LTX Video model. The manifest file specifies the model weights
and custom nodes to install at startup.
For now, we're going to build this docker image, and then run it to develop our workflow in ComfyUI.
```bash theme={null}
docker build -t video-generation-api .
```
Once the build has completed (this may take a while), you can run the image with the following command:
```bash theme={null}
docker run --gpus all --rm -it --name video-gen-api \
-p 8188:8188 -p 3000:3000 \
video-generation-api
```
After 5-10 seconds, you should see a log indicating the success of the ComfyUI API server starting up. You can now go to
`http://localhost:8188` in your browser to access the ComfyUI user interface. You can use this interface to develop and
test your video generation workflow.
## Step 3: Develop Your Video Generation Workflow
ComfyUI uses a node-based interface to compose and execute workflows. Each node represents a step in the workflow and
the links between nodes represent the flow of data and resources between them. This workflow graph can be saved as a
JSON file, which can be imported into ComfyUI to recreate the workflow.
### Example Workflow
For this example, we will create a workflow that generates a video of a cute fluffy husky puppy walking through the
snow. The workflow will use the LTX Video model to generate the video.
This video was created with the following workflow:
```json theme={null}
{
"6": {
"inputs": {
"text": "high quality nature documentary footage of one cute fluffy husky puppy walks from the left side of the screen to the right, through fresh powdery white snow. it is happy and in sharp focus. It is tricolor, with black, white and grey fur. the camera angle is close to the puppy, and focused on the puppy, following it as it moves. nature documentary footage of very high quality, bbc, planet earth",
"clip": ["38", 0]
},
"class_type": "CLIPTextEncode",
"_meta": {
"title": "CLIP Text Encode (Positive Prompt)"
}
},
"7": {
"inputs": {
"text": "low quality, worst quality, deformed, distorted, disfigured, motion smear, motion artifacts, fused fingers, bad anatomy, weird hand, ugly",
"clip": ["38", 0]
},
"class_type": "CLIPTextEncode",
"_meta": {
"title": "CLIP Text Encode (Negative Prompt)"
}
},
"38": {
"inputs": {
"clip_name": "t5xxl_fp16.safetensors",
"type": "ltxv",
"device": "default"
},
"class_type": "CLIPLoader",
"_meta": {
"title": "Load CLIP"
}
},
"44": {
"inputs": {
"ckpt_name": "ltx-video-2b-v0.9.1.safetensors"
},
"class_type": "CheckpointLoaderSimple",
"_meta": {
"title": "Load Checkpoint"
}
},
"69": {
"inputs": {
"frame_rate": 24,
"positive": ["6", 0],
"negative": ["7", 0]
},
"class_type": "LTXVConditioning",
"_meta": {
"title": "LTXVConditioning"
}
},
"70": {
"inputs": {
"width": 768,
"height": 512,
"length": 249,
"batch_size": 1
},
"class_type": "EmptyLTXVLatentVideo",
"_meta": {
"title": "EmptyLTXVLatentVideo"
}
},
"71": {
"inputs": {
"steps": 200,
"max_shift": 2.05,
"base_shift": 0.95,
"stretch": true,
"terminal": 0.1,
"latent": ["70", 0]
},
"class_type": "LTXVScheduler",
"_meta": {
"title": "LTXVScheduler"
}
},
"72": {
"inputs": {
"add_noise": true,
"noise_seed": 304543884178211,
"cfg": 3.5,
"model": ["44", 0],
"positive": ["69", 0],
"negative": ["69", 1],
"sampler": ["73", 0],
"sigmas": ["71", 0],
"latent_image": ["70", 0]
},
"class_type": "SamplerCustom",
"_meta": {
"title": "SamplerCustom"
}
},
"73": {
"inputs": {
"sampler_name": "euler"
},
"class_type": "KSamplerSelect",
"_meta": {
"title": "KSamplerSelect"
}
},
"77": {
"inputs": {
"tile_size": 512,
"overlap": 64,
"temporal_size": 64,
"temporal_overlap": 16,
"samples": ["72", 0],
"vae": ["44", 2]
},
"class_type": "VAEDecodeTiled",
"_meta": {
"title": "VAE Decode (Tiled)"
}
},
"78": {
"inputs": {
"frame_rate": 24,
"loop_count": 0,
"filename_prefix": "husky",
"format": "video/h265-mp4",
"pix_fmt": "yuv420p10le",
"crf": 5,
"save_metadata": true,
"pingpong": false,
"save_output": true,
"images": ["77", 0]
},
"class_type": "VHS_VideoCombine",
"_meta": {
"title": "Video Combine 🎥🅥🅗🅢"
}
}
}
```
### Importing and Exporting Workflows
You an import the workflow to ComfyUI by saving the above JSON to a file, and then dragging and dropping the file onto
the ComfyUI interface. You should see the nodes and links appear in the interface. Click "Queue" to run the workflow.
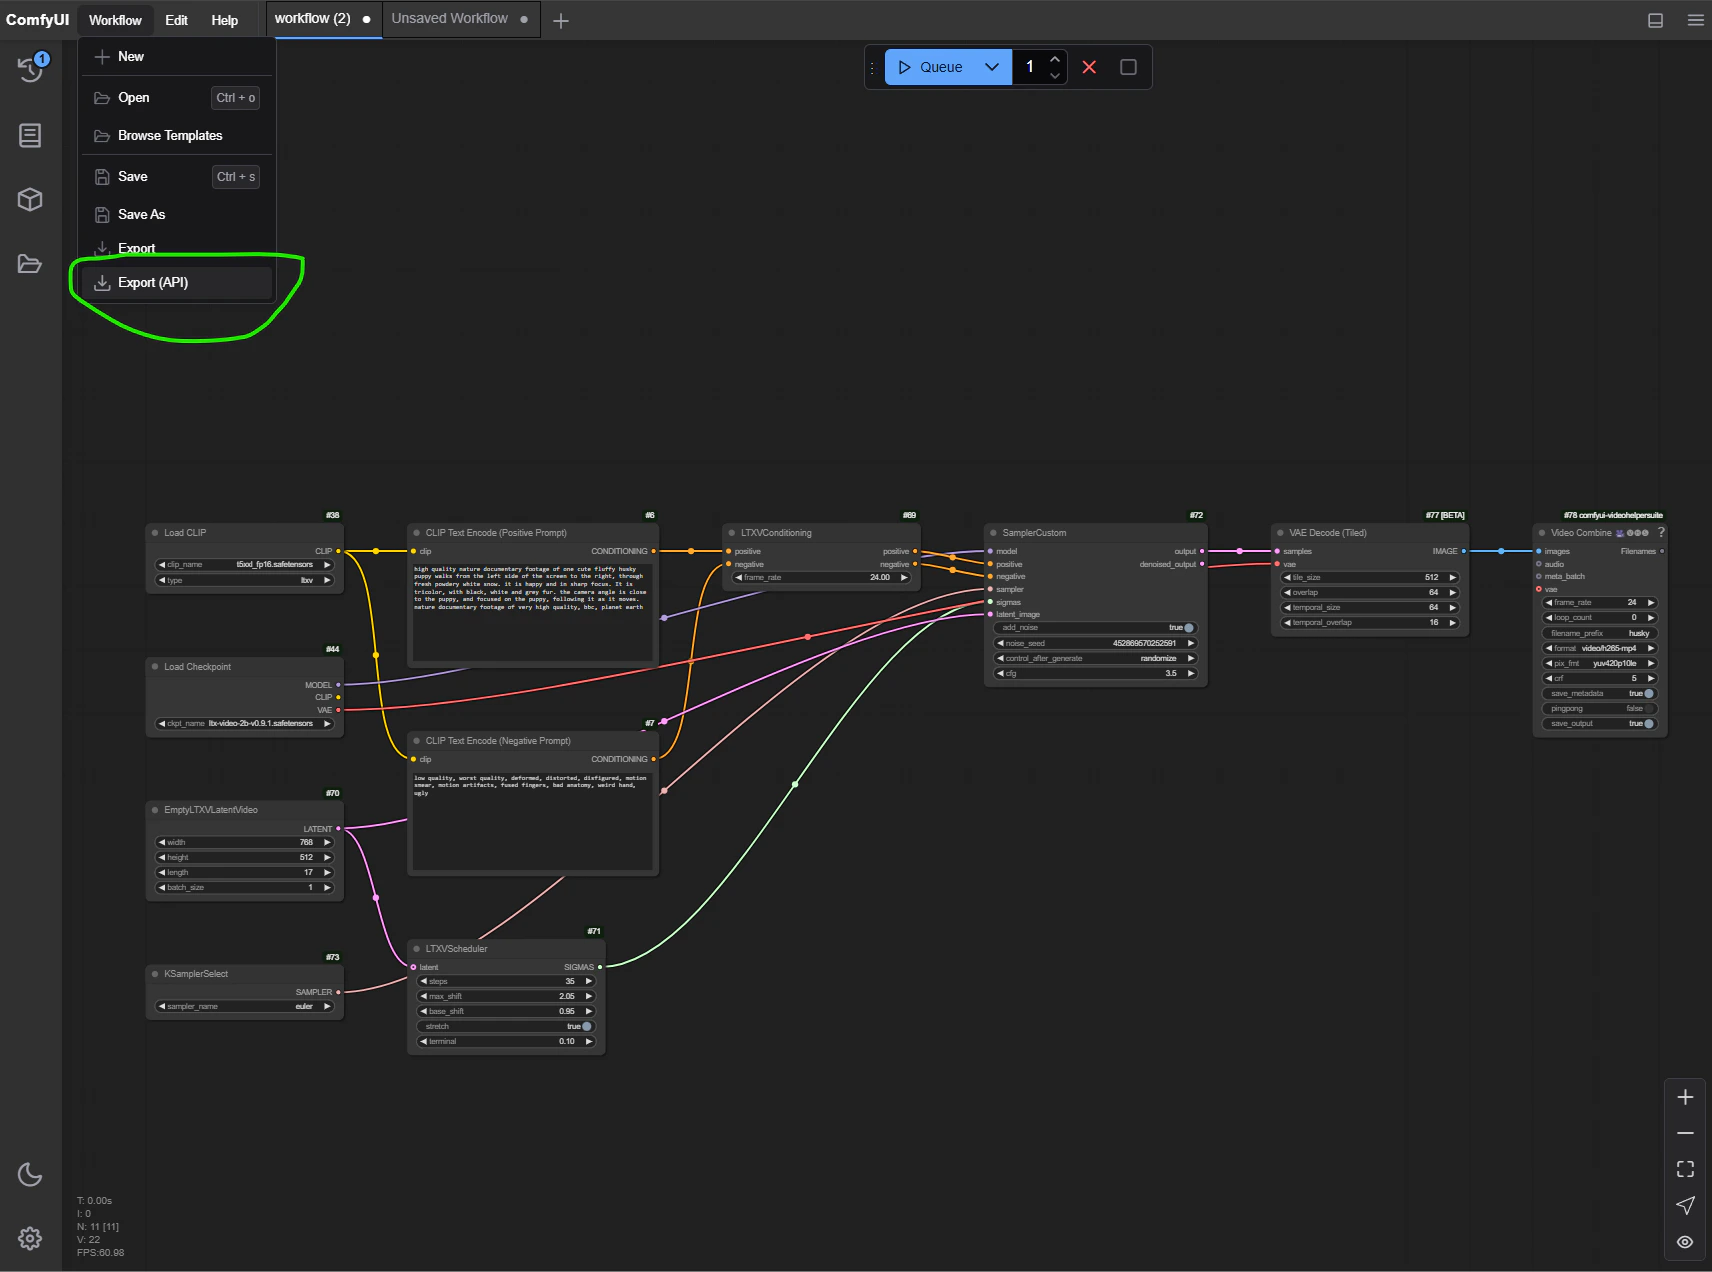 Make any adjustments to the workflow you'd like, and then export the workflow in the API format. This will generate a
JSON file that we're going to use in the next step.
## Setting A Warmup Workflow
ComfyUI API offers the ability to run a warmup workflow before the taking on normal traffic. This allows us to pre-Load
the models in vram, and avoid the overhead of loading them on the first request.
Save your workflow from the previous step to your project directory as a JSON file, and name it `workflow.json`.
Find the parameter for `steps`, and decrease it to a smaller number, e.g. 10. This will make the warmup workflow run
faster.
Find the parameter for `length`, and decrease it to a smaller number, e.g. 17. This will make the warmup workflow run
faster. Note this value must be a multiple of 16, plus 1.
Add the following lines to your dockerfile:
```dockerfile theme={null}
COPY workflow.json .
ENV WARMUP_PROMPT_FILE=workflow.json
```
This will copy the workflow file into the docker image, and set an environment variable that tells the ComfyUI API to
run this workflow as a warmup.
Rebuild your docker image:
```bash theme={null}
docker build -t video-generation-api .
```
And run it again:
```bash theme={null}
docker run --gpus all --rm -it --name video-gen-api \
-p 8188:8188 -p 3000:3000 \
video-generation-api
```
You will see that it runs the warmup workflow as the first action. Once the warmup is complete, the readiness probe at
`/ready` will return a 200 status code, and the ComfyUI API will be ready to accept requests.
## Step 4: Create a Custom Endpoint
ComfyUI API allows us to easily add custom endpoints to our API. We can use these endpoints to expose a much simpler
interface for video generation, as opposed to the node-based interface in ComfyUI. We will create a custom endpoint that
accepts just a few parameters, including prompt, and length in seconds.
Create a new directory in your project called `workflows`, and create a new file within it called `video-clip.ts`.
At the top, add the following imports and type definitions:
```typescript theme={null}
import { z } from 'zod'
import config from '../config'
const ComfyNodeSchema = z.object({
inputs: z.any(),
class_type: z.string(),
_meta: z.any().optional(),
})
type ComfyNode = z.infer
type ComfyPrompt = Record
interface Workflow {
RequestSchema: z.ZodObject
generateWorkflow: (input: any) => Promise | ComfyPrompt
description?: string
summary?: string
}
// This defaults the checkpoint to whatever was used in the warmup workflow
let checkpoint: any = config.models.checkpoints.enum.optional()
if (config.warmupCkpt) {
checkpoint = config.warmupCkpt
}
```
ComfyUI API uses Zod for schema validation, so we're importing that here. We're also defining a few types that we'll use
later on. Let's define our request schema in our typescript file. This will be the shape of the request that our
endpoint will accept:
```typescript theme={null}
const RequestSchema = z.object({
prompt: z.string().describe('The prompt to generate a video clip from.'),
negative_prompt: z
.string()
.optional()
.default(
'low quality, worst quality, deformed, distorted, disfigured, motion smear, motion artifacts, fused fingers, bad anatomy, weird hand, ugly',
)
.describe('The negative prompt to generate a video clip from.'),
duration_seconds: z.number().int().min(1).max(10).default(10).describe('The duration of the video clip in seconds.'),
steps: z.number().int().min(1).max(500).default(100).describe('The number of steps to run the model for.'),
cfg: z.number().min(0).default(3.0).describe('The cfg value to use for the model.'),
seed: z
.number()
.int()
.optional()
.default(() => Math.floor(Math.random() * 100000000000))
.describe('The seed to use for the model.'),
width: z
.number()
.int()
.optional()
.default(768)
.refine((value: number) => value % 32 === 0, {
message: 'Width must be a multiple of 32.',
})
.describe('The width of the video. Must be a multiple of 32.'),
height: z
.number()
.int()
.optional()
.default(512)
.refine((value: number) => value % 32 === 0, {
message: 'Height must be a multiple of 32.',
})
.describe('The height of the video. Must be a multiple of 32.'),
})
type InputType = z.infer
```
You can see Zod is used to define the shape of the request object. We're defining the prompt, negative prompt, duration
in seconds, steps, cfg, seed, width, and height as the parameters that our endpoint will accept. We're also defining the
default values for these parameters, and any constraints on their values. See the [Zod documentation](https://zod.dev/)
for more information on defining schemas.
Next, let's define the function that will generate the workflow based on the request parameters:
```typescript theme={null}
function generateWorkflow(input: InputType): ComfyPrompt {
return {
'6': {
inputs: {
text: input.prompt,
clip: ['38', 0],
},
class_type: 'CLIPTextEncode',
_meta: {
title: 'CLIP Text Encode (Positive Prompt)',
},
},
'7': {
inputs: {
text: input.negative_prompt,
clip: ['38', 0],
},
class_type: 'CLIPTextEncode',
_meta: {
title: 'CLIP Text Encode (Negative Prompt)',
},
},
'38': {
inputs: {
clip_name: 't5xxl_fp16.safetensors',
type: 'ltxv',
device: 'default',
},
class_type: 'CLIPLoader',
_meta: {
title: 'Load CLIP',
},
},
'44': {
inputs: {
ckpt_name: checkpoint,
},
class_type: 'CheckpointLoaderSimple',
_meta: {
title: 'Load Checkpoint',
},
},
'69': {
inputs: {
frame_rate: 24,
positive: ['6', 0],
negative: ['7', 0],
},
class_type: 'LTXVConditioning',
_meta: {
title: 'LTXVConditioning',
},
},
'70': {
inputs: {
width: input.width,
height: input.height,
length: input.duration_seconds * 24 + 1,
batch_size: 1,
},
class_type: 'EmptyLTXVLatentVideo',
_meta: {
title: 'EmptyLTXVLatentVideo',
},
},
'71': {
inputs: {
steps: input.steps,
max_shift: 2.05,
base_shift: 0.95,
stretch: true,
terminal: 0.1,
latent: ['70', 0],
},
class_type: 'LTXVScheduler',
_meta: {
title: 'LTXVScheduler',
},
},
'72': {
inputs: {
add_noise: true,
noise_seed: input.seed,
cfg: input.cfg,
model: ['44', 0],
positive: ['69', 0],
negative: ['69', 1],
sampler: ['73', 0],
sigmas: ['71', 0],
latent_image: ['70', 0],
},
class_type: 'SamplerCustom',
_meta: {
title: 'SamplerCustom',
},
},
'73': {
inputs: {
sampler_name: 'euler',
},
class_type: 'KSamplerSelect',
_meta: {
title: 'KSamplerSelect',
},
},
'77': {
inputs: {
tile_size: 512,
overlap: 64,
temporal_size: 64,
temporal_overlap: 16,
samples: ['72', 0],
vae: ['44', 2],
},
class_type: 'VAEDecodeTiled',
_meta: {
title: 'VAE Decode (Tiled)',
},
},
'78': {
inputs: {
frame_rate: 24,
loop_count: 0,
filename_prefix: 'video',
format: 'video/h265-mp4',
pix_fmt: 'yuv420p10le',
crf: 5,
save_metadata: true,
pingpong: false,
save_output: true,
images: ['77', 0],
},
class_type: 'VHS_VideoCombine',
_meta: {
title: 'Video Combine 🎥🅥🅗🅢',
},
},
}
}
```
You can see we've taken the workflow JSON from earlier, and we use the input parameters to customize the workflow. We're
using the prompt and negative prompt as the text inputs, the duration in seconds as the length of the video (multiplied
to be the correct number of frames), and the width and height as the dimensions of the video. We're also using the
steps, cfg, and seed parameters to customize the model behavior.
Finally, let's export the workflow and request schema:
```typescript theme={null}
const workflow: Workflow = {
RequestSchema,
generateWorkflow,
description: 'Generate a video clip from a prompt.',
summary: 'Text to Video',
}
export default workflow
```
### The Completed Endpoint
```typescript theme={null}
import { z } from 'zod'
import config from '../config'
const ComfyNodeSchema = z.object({
inputs: z.any(),
class_type: z.string(),
_meta: z.any().optional(),
})
type ComfyNode = z.infer
type ComfyPrompt = Record
interface Workflow {
RequestSchema: z.ZodObject
generateWorkflow: (input: any) => Promise | ComfyPrompt
description?: string
summary?: string
}
// This defaults the checkpoint to whatever was used in the warmup workflow
let checkpoint: any = config.models.checkpoints.enum.optional()
if (config.warmupCkpt) {
checkpoint = config.warmupCkpt
}
const RequestSchema = z.object({
prompt: z.string().describe('The prompt to generate a video clip from.'),
negative_prompt: z
.string()
.optional()
.default(
'low quality, worst quality, deformed, distorted, disfigured, motion smear, motion artifacts, fused fingers, bad anatomy, weird hand, ugly',
)
.describe('The negative prompt to generate a video clip from.'),
duration_seconds: z.number().int().min(1).max(10).default(10).describe('The duration of the video clip in seconds.'),
steps: z.number().int().min(1).max(500).default(100).describe('The number of steps to run the model for.'),
cfg: z.number().min(0).default(3.0).describe('The cfg value to use for the model.'),
seed: z
.number()
.int()
.optional()
.default(() => Math.floor(Math.random() * 100000000000))
.describe('The seed to use for the model.'),
width: z
.number()
.int()
.optional()
.default(768)
.refine((value: number) => value % 32 === 0, {
message: 'Width must be a multiple of 32.',
})
.describe('The width of the video. Must be a multiple of 32.'),
height: z
.number()
.int()
.optional()
.default(512)
.refine((value: number) => value % 32 === 0, {
message: 'Height must be a multiple of 32.',
})
.describe('The height of the video. Must be a multiple of 32.'),
})
type InputType = z.infer
function generateWorkflow(input: InputType): ComfyPrompt {
return {
'6': {
inputs: {
text: input.prompt,
clip: ['38', 0],
},
class_type: 'CLIPTextEncode',
_meta: {
title: 'CLIP Text Encode (Positive Prompt)',
},
},
'7': {
inputs: {
text: input.negative_prompt,
clip: ['38', 0],
},
class_type: 'CLIPTextEncode',
_meta: {
title: 'CLIP Text Encode (Negative Prompt)',
},
},
'38': {
inputs: {
clip_name: 't5xxl_fp16.safetensors',
type: 'ltxv',
device: 'default',
},
class_type: 'CLIPLoader',
_meta: {
title: 'Load CLIP',
},
},
'44': {
inputs: {
ckpt_name: checkpoint,
},
class_type: 'CheckpointLoaderSimple',
_meta: {
title: 'Load Checkpoint',
},
},
'69': {
inputs: {
frame_rate: 24,
positive: ['6', 0],
negative: ['7', 0],
},
class_type: 'LTXVConditioning',
_meta: {
title: 'LTXVConditioning',
},
},
'70': {
inputs: {
width: input.width,
height: input.height,
length: input.duration_seconds * 24 + 1,
batch_size: 1,
},
class_type: 'EmptyLTXVLatentVideo',
_meta: {
title: 'EmptyLTXVLatentVideo',
},
},
'71': {
inputs: {
steps: input.steps,
max_shift: 2.05,
base_shift: 0.95,
stretch: true,
terminal: 0.1,
latent: ['70', 0],
},
class_type: 'LTXVScheduler',
_meta: {
title: 'LTXVScheduler',
},
},
'72': {
inputs: {
add_noise: true,
noise_seed: input.seed,
cfg: input.cfg,
model: ['44', 0],
positive: ['69', 0],
negative: ['69', 1],
sampler: ['73', 0],
sigmas: ['71', 0],
latent_image: ['70', 0],
},
class_type: 'SamplerCustom',
_meta: {
title: 'SamplerCustom',
},
},
'73': {
inputs: {
sampler_name: 'euler',
},
class_type: 'KSamplerSelect',
_meta: {
title: 'KSamplerSelect',
},
},
'77': {
inputs: {
tile_size: 512,
overlap: 64,
temporal_size: 64,
temporal_overlap: 16,
samples: ['72', 0],
vae: ['44', 2],
},
class_type: 'VAEDecodeTiled',
_meta: {
title: 'VAE Decode (Tiled)',
},
},
'78': {
inputs: {
frame_rate: 24,
loop_count: 0,
filename_prefix: 'video',
format: 'video/h265-mp4',
pix_fmt: 'yuv420p10le',
crf: 5,
save_metadata: true,
pingpong: false,
save_output: true,
images: ['77', 0],
},
class_type: 'VHS_VideoCombine',
_meta: {
title: 'Video Combine 🎥🅥🅗🅢',
},
},
}
}
const workflow: Workflow = {
RequestSchema,
generateWorkflow,
description: 'Generate a video clip from a prompt.',
summary: 'Text to Video',
}
export default workflow
```
Now, we need to add this to our Dockerfile. Add the following lines to the end of your Dockerfile:
```dockerfile theme={null}
COPY workflows $WORKFLOW_DIR
```
Build and run your docker image again:
```bash theme={null}
docker build -t video-generation-api .
docker run --gpus all --rm -it --name video-gen-api \
-p 8188:8188 -p 3000:3000 \
video-generation-api
```
You should see the ComfyUI API server start up, and the warmup workflow run. Navigate to `http://localhost:3000/docs` in
your browser to see the Swagger documentation for your API. You should see a new endpoint called `/video-clip` that
accepts the parameters we defined in our custom endpoint.
Make any adjustments to the workflow you'd like, and then export the workflow in the API format. This will generate a
JSON file that we're going to use in the next step.
## Setting A Warmup Workflow
ComfyUI API offers the ability to run a warmup workflow before the taking on normal traffic. This allows us to pre-Load
the models in vram, and avoid the overhead of loading them on the first request.
Save your workflow from the previous step to your project directory as a JSON file, and name it `workflow.json`.
Find the parameter for `steps`, and decrease it to a smaller number, e.g. 10. This will make the warmup workflow run
faster.
Find the parameter for `length`, and decrease it to a smaller number, e.g. 17. This will make the warmup workflow run
faster. Note this value must be a multiple of 16, plus 1.
Add the following lines to your dockerfile:
```dockerfile theme={null}
COPY workflow.json .
ENV WARMUP_PROMPT_FILE=workflow.json
```
This will copy the workflow file into the docker image, and set an environment variable that tells the ComfyUI API to
run this workflow as a warmup.
Rebuild your docker image:
```bash theme={null}
docker build -t video-generation-api .
```
And run it again:
```bash theme={null}
docker run --gpus all --rm -it --name video-gen-api \
-p 8188:8188 -p 3000:3000 \
video-generation-api
```
You will see that it runs the warmup workflow as the first action. Once the warmup is complete, the readiness probe at
`/ready` will return a 200 status code, and the ComfyUI API will be ready to accept requests.
## Step 4: Create a Custom Endpoint
ComfyUI API allows us to easily add custom endpoints to our API. We can use these endpoints to expose a much simpler
interface for video generation, as opposed to the node-based interface in ComfyUI. We will create a custom endpoint that
accepts just a few parameters, including prompt, and length in seconds.
Create a new directory in your project called `workflows`, and create a new file within it called `video-clip.ts`.
At the top, add the following imports and type definitions:
```typescript theme={null}
import { z } from 'zod'
import config from '../config'
const ComfyNodeSchema = z.object({
inputs: z.any(),
class_type: z.string(),
_meta: z.any().optional(),
})
type ComfyNode = z.infer
type ComfyPrompt = Record
interface Workflow {
RequestSchema: z.ZodObject
generateWorkflow: (input: any) => Promise | ComfyPrompt
description?: string
summary?: string
}
// This defaults the checkpoint to whatever was used in the warmup workflow
let checkpoint: any = config.models.checkpoints.enum.optional()
if (config.warmupCkpt) {
checkpoint = config.warmupCkpt
}
```
ComfyUI API uses Zod for schema validation, so we're importing that here. We're also defining a few types that we'll use
later on. Let's define our request schema in our typescript file. This will be the shape of the request that our
endpoint will accept:
```typescript theme={null}
const RequestSchema = z.object({
prompt: z.string().describe('The prompt to generate a video clip from.'),
negative_prompt: z
.string()
.optional()
.default(
'low quality, worst quality, deformed, distorted, disfigured, motion smear, motion artifacts, fused fingers, bad anatomy, weird hand, ugly',
)
.describe('The negative prompt to generate a video clip from.'),
duration_seconds: z.number().int().min(1).max(10).default(10).describe('The duration of the video clip in seconds.'),
steps: z.number().int().min(1).max(500).default(100).describe('The number of steps to run the model for.'),
cfg: z.number().min(0).default(3.0).describe('The cfg value to use for the model.'),
seed: z
.number()
.int()
.optional()
.default(() => Math.floor(Math.random() * 100000000000))
.describe('The seed to use for the model.'),
width: z
.number()
.int()
.optional()
.default(768)
.refine((value: number) => value % 32 === 0, {
message: 'Width must be a multiple of 32.',
})
.describe('The width of the video. Must be a multiple of 32.'),
height: z
.number()
.int()
.optional()
.default(512)
.refine((value: number) => value % 32 === 0, {
message: 'Height must be a multiple of 32.',
})
.describe('The height of the video. Must be a multiple of 32.'),
})
type InputType = z.infer
```
You can see Zod is used to define the shape of the request object. We're defining the prompt, negative prompt, duration
in seconds, steps, cfg, seed, width, and height as the parameters that our endpoint will accept. We're also defining the
default values for these parameters, and any constraints on their values. See the [Zod documentation](https://zod.dev/)
for more information on defining schemas.
Next, let's define the function that will generate the workflow based on the request parameters:
```typescript theme={null}
function generateWorkflow(input: InputType): ComfyPrompt {
return {
'6': {
inputs: {
text: input.prompt,
clip: ['38', 0],
},
class_type: 'CLIPTextEncode',
_meta: {
title: 'CLIP Text Encode (Positive Prompt)',
},
},
'7': {
inputs: {
text: input.negative_prompt,
clip: ['38', 0],
},
class_type: 'CLIPTextEncode',
_meta: {
title: 'CLIP Text Encode (Negative Prompt)',
},
},
'38': {
inputs: {
clip_name: 't5xxl_fp16.safetensors',
type: 'ltxv',
device: 'default',
},
class_type: 'CLIPLoader',
_meta: {
title: 'Load CLIP',
},
},
'44': {
inputs: {
ckpt_name: checkpoint,
},
class_type: 'CheckpointLoaderSimple',
_meta: {
title: 'Load Checkpoint',
},
},
'69': {
inputs: {
frame_rate: 24,
positive: ['6', 0],
negative: ['7', 0],
},
class_type: 'LTXVConditioning',
_meta: {
title: 'LTXVConditioning',
},
},
'70': {
inputs: {
width: input.width,
height: input.height,
length: input.duration_seconds * 24 + 1,
batch_size: 1,
},
class_type: 'EmptyLTXVLatentVideo',
_meta: {
title: 'EmptyLTXVLatentVideo',
},
},
'71': {
inputs: {
steps: input.steps,
max_shift: 2.05,
base_shift: 0.95,
stretch: true,
terminal: 0.1,
latent: ['70', 0],
},
class_type: 'LTXVScheduler',
_meta: {
title: 'LTXVScheduler',
},
},
'72': {
inputs: {
add_noise: true,
noise_seed: input.seed,
cfg: input.cfg,
model: ['44', 0],
positive: ['69', 0],
negative: ['69', 1],
sampler: ['73', 0],
sigmas: ['71', 0],
latent_image: ['70', 0],
},
class_type: 'SamplerCustom',
_meta: {
title: 'SamplerCustom',
},
},
'73': {
inputs: {
sampler_name: 'euler',
},
class_type: 'KSamplerSelect',
_meta: {
title: 'KSamplerSelect',
},
},
'77': {
inputs: {
tile_size: 512,
overlap: 64,
temporal_size: 64,
temporal_overlap: 16,
samples: ['72', 0],
vae: ['44', 2],
},
class_type: 'VAEDecodeTiled',
_meta: {
title: 'VAE Decode (Tiled)',
},
},
'78': {
inputs: {
frame_rate: 24,
loop_count: 0,
filename_prefix: 'video',
format: 'video/h265-mp4',
pix_fmt: 'yuv420p10le',
crf: 5,
save_metadata: true,
pingpong: false,
save_output: true,
images: ['77', 0],
},
class_type: 'VHS_VideoCombine',
_meta: {
title: 'Video Combine 🎥🅥🅗🅢',
},
},
}
}
```
You can see we've taken the workflow JSON from earlier, and we use the input parameters to customize the workflow. We're
using the prompt and negative prompt as the text inputs, the duration in seconds as the length of the video (multiplied
to be the correct number of frames), and the width and height as the dimensions of the video. We're also using the
steps, cfg, and seed parameters to customize the model behavior.
Finally, let's export the workflow and request schema:
```typescript theme={null}
const workflow: Workflow = {
RequestSchema,
generateWorkflow,
description: 'Generate a video clip from a prompt.',
summary: 'Text to Video',
}
export default workflow
```
### The Completed Endpoint
```typescript theme={null}
import { z } from 'zod'
import config from '../config'
const ComfyNodeSchema = z.object({
inputs: z.any(),
class_type: z.string(),
_meta: z.any().optional(),
})
type ComfyNode = z.infer
type ComfyPrompt = Record
interface Workflow {
RequestSchema: z.ZodObject
generateWorkflow: (input: any) => Promise | ComfyPrompt
description?: string
summary?: string
}
// This defaults the checkpoint to whatever was used in the warmup workflow
let checkpoint: any = config.models.checkpoints.enum.optional()
if (config.warmupCkpt) {
checkpoint = config.warmupCkpt
}
const RequestSchema = z.object({
prompt: z.string().describe('The prompt to generate a video clip from.'),
negative_prompt: z
.string()
.optional()
.default(
'low quality, worst quality, deformed, distorted, disfigured, motion smear, motion artifacts, fused fingers, bad anatomy, weird hand, ugly',
)
.describe('The negative prompt to generate a video clip from.'),
duration_seconds: z.number().int().min(1).max(10).default(10).describe('The duration of the video clip in seconds.'),
steps: z.number().int().min(1).max(500).default(100).describe('The number of steps to run the model for.'),
cfg: z.number().min(0).default(3.0).describe('The cfg value to use for the model.'),
seed: z
.number()
.int()
.optional()
.default(() => Math.floor(Math.random() * 100000000000))
.describe('The seed to use for the model.'),
width: z
.number()
.int()
.optional()
.default(768)
.refine((value: number) => value % 32 === 0, {
message: 'Width must be a multiple of 32.',
})
.describe('The width of the video. Must be a multiple of 32.'),
height: z
.number()
.int()
.optional()
.default(512)
.refine((value: number) => value % 32 === 0, {
message: 'Height must be a multiple of 32.',
})
.describe('The height of the video. Must be a multiple of 32.'),
})
type InputType = z.infer
function generateWorkflow(input: InputType): ComfyPrompt {
return {
'6': {
inputs: {
text: input.prompt,
clip: ['38', 0],
},
class_type: 'CLIPTextEncode',
_meta: {
title: 'CLIP Text Encode (Positive Prompt)',
},
},
'7': {
inputs: {
text: input.negative_prompt,
clip: ['38', 0],
},
class_type: 'CLIPTextEncode',
_meta: {
title: 'CLIP Text Encode (Negative Prompt)',
},
},
'38': {
inputs: {
clip_name: 't5xxl_fp16.safetensors',
type: 'ltxv',
device: 'default',
},
class_type: 'CLIPLoader',
_meta: {
title: 'Load CLIP',
},
},
'44': {
inputs: {
ckpt_name: checkpoint,
},
class_type: 'CheckpointLoaderSimple',
_meta: {
title: 'Load Checkpoint',
},
},
'69': {
inputs: {
frame_rate: 24,
positive: ['6', 0],
negative: ['7', 0],
},
class_type: 'LTXVConditioning',
_meta: {
title: 'LTXVConditioning',
},
},
'70': {
inputs: {
width: input.width,
height: input.height,
length: input.duration_seconds * 24 + 1,
batch_size: 1,
},
class_type: 'EmptyLTXVLatentVideo',
_meta: {
title: 'EmptyLTXVLatentVideo',
},
},
'71': {
inputs: {
steps: input.steps,
max_shift: 2.05,
base_shift: 0.95,
stretch: true,
terminal: 0.1,
latent: ['70', 0],
},
class_type: 'LTXVScheduler',
_meta: {
title: 'LTXVScheduler',
},
},
'72': {
inputs: {
add_noise: true,
noise_seed: input.seed,
cfg: input.cfg,
model: ['44', 0],
positive: ['69', 0],
negative: ['69', 1],
sampler: ['73', 0],
sigmas: ['71', 0],
latent_image: ['70', 0],
},
class_type: 'SamplerCustom',
_meta: {
title: 'SamplerCustom',
},
},
'73': {
inputs: {
sampler_name: 'euler',
},
class_type: 'KSamplerSelect',
_meta: {
title: 'KSamplerSelect',
},
},
'77': {
inputs: {
tile_size: 512,
overlap: 64,
temporal_size: 64,
temporal_overlap: 16,
samples: ['72', 0],
vae: ['44', 2],
},
class_type: 'VAEDecodeTiled',
_meta: {
title: 'VAE Decode (Tiled)',
},
},
'78': {
inputs: {
frame_rate: 24,
loop_count: 0,
filename_prefix: 'video',
format: 'video/h265-mp4',
pix_fmt: 'yuv420p10le',
crf: 5,
save_metadata: true,
pingpong: false,
save_output: true,
images: ['77', 0],
},
class_type: 'VHS_VideoCombine',
_meta: {
title: 'Video Combine 🎥🅥🅗🅢',
},
},
}
}
const workflow: Workflow = {
RequestSchema,
generateWorkflow,
description: 'Generate a video clip from a prompt.',
summary: 'Text to Video',
}
export default workflow
```
Now, we need to add this to our Dockerfile. Add the following lines to the end of your Dockerfile:
```dockerfile theme={null}
COPY workflows $WORKFLOW_DIR
```
Build and run your docker image again:
```bash theme={null}
docker build -t video-generation-api .
docker run --gpus all --rm -it --name video-gen-api \
-p 8188:8188 -p 3000:3000 \
video-generation-api
```
You should see the ComfyUI API server start up, and the warmup workflow run. Navigate to `http://localhost:3000/docs` in
your browser to see the Swagger documentation for your API. You should see a new endpoint called `/video-clip` that
accepts the parameters we defined in our custom endpoint.
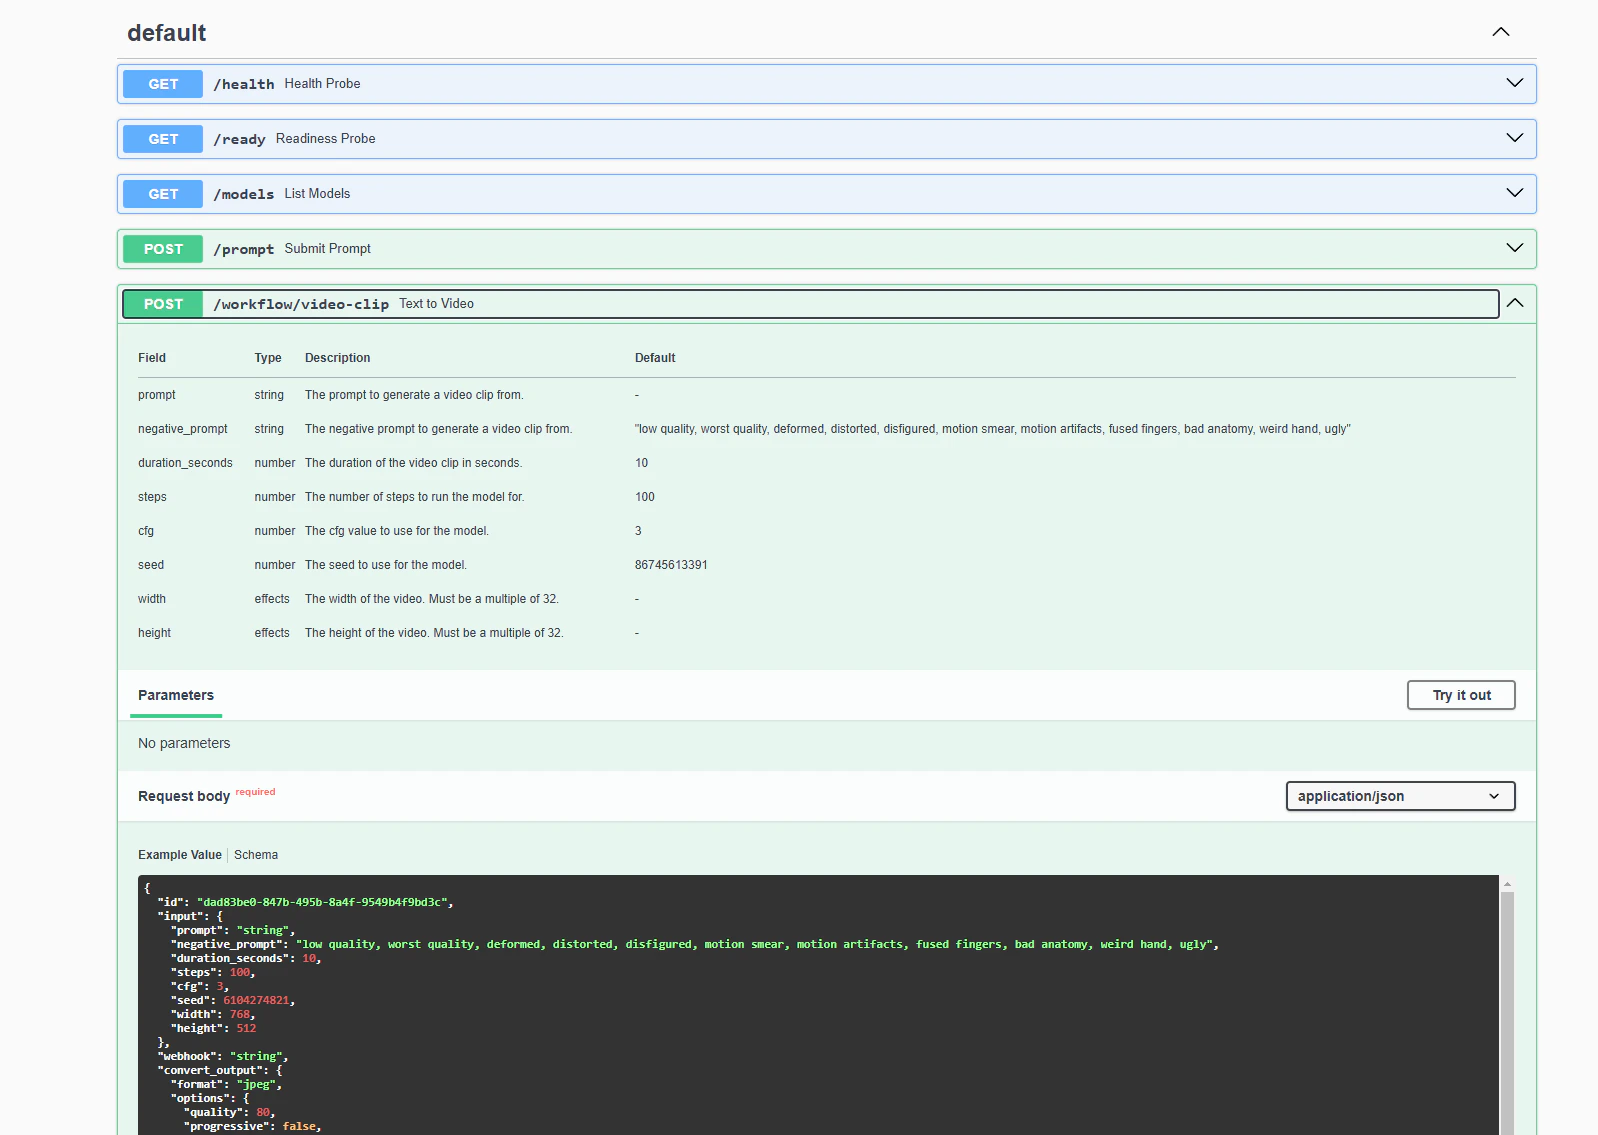 You can use this endpoint to generate video clips from prompts. Here is an example request:
```bash theme={null}
start_time=$(date +%s)
resp=$(curl -X 'POST' \
'http://localhost:3000/workflow/video-clip' \
-H 'accept: application/json' \
-H 'Content-Type: application/json' \
-d '{
"input": {
"prompt": "high quality nature documentary footage of one cute fluffy husky puppy walks from the left side of the screen to the right, through fresh powdery white snow. it is happy and in sharp focus. It is tricolor, with black, white and grey fur. the camera angle is close to the puppy, and focused on the puppy, following it as it moves. nature documentary footage of very high quality, bbc, planet earth",
"negative_prompt": "low quality, worst quality, deformed, distorted, disfigured, motion smear, motion artifacts, fused fingers, bad anatomy, weird hand, ugly",
"steps": 200,
"cfg": 3.8
}
}')
# Video in base64 is at .images[0]
video=$(echo $resp | jq -r '.images[0]')
# filename is at .filenames[0]
filename=$(echo $resp | jq -r '.filenames[0]')
# Save video to file
echo $video | base64 -d > $filename
end_time=$(date +%s)
echo "Video saved to $filename"
echo "Time taken: $((end_time - start_time)) seconds"
```
This script sends a request to the `/video-clip` endpoint with a prompt and negative prompt, and saves the resulting
video to a file. You can see this request structure is simpler and more intuitive than the full ComfyUI workflow graph.
You will also see that the video takes quite a while to generate. On my laptop RTX 3080Ti, it took almost 15 minutes to
generate a 10 second video. While this number is considerably lower on an RTX 4090, it could still easily exceed the 100
second ide request timeout that SaladCloud's container gateway imposes.
## Step 5: Add A Job Queue
To handle long-running requests like this, we can use
[SaladCloud's Job Queue](/container-engine/explanation/job-processing/job-queues). With the job queue, we can submit our
prompt, and then either poll for the result, or receive a webhook when the job is complete. Additionally, the job queue
will automatically handle retrying failed requests, buffer overflow requests, and includes some basic autoscaling
functionality.
To use the job queue, we simply need to add the Job Queue worker binary to our Dockerfile:
```dockerfile theme={null}
# Download and extract the job queue worker
RUN wget https://github.com/SaladTechnologies/salad-cloud-job-queue-worker/releases/download/v0.5.0/salad-http-job-queue-worker_x86_64.tar.gz && \
tar -xvf salad-http-job-queue-worker_x86_64.tar.gz && \
rm salad-http-job-queue-worker_x86_64.tar.gz && \
chmod +x salad-http-job-queue-worker
# Start the job queue worker in the background and the ComfyUI API in the foreground
CMD ["bash", "-c", "./salad-http-job-queue-worker & ./comfyui-api"]
```
Next, we need to create a Job Queue with the [Job Queue API](/reference/saladcloud-api/queues/create-queue).
## Step 6: Deploy to SaladCloud
Now, it's time to upload our container image, and deploy it to SaladCloud. First, we need to tag our image with a
registry url. For us here at Salad, that looks like this:
```bash theme={null}
docker tag video-generation-api saladtechnologies/comfyui:video-gen-example
```
Yours will need to be tagged for a registry you have access to.
Next, push it up to the container registry:
```bash theme={null}
docker push saladtechnologies/comfyui:video-gen-example
```
This may take some time, depending on your network speed. Once it's done, you can deploy your container to SaladCloud.
Because we are using the Job Queue, we need to create a new Container Group with the
[Public API](/reference/saladcloud-api/container-groups/create-container-group). This functionality is not available in
the portal.
* We're going to start with 3 replicas, and set the container image to the one we just pushed.
* We're going to use 4 vCPU, 30GB of RAM, and an RTX 4090 GPU.
* We're going to set the priority to "High", although if your usecase is not time-sensitive, you can achieve significant
cost savings by reducing the workload priority. Lower priority workloads can be preempted by higher priority
workloads.
* Additionally, we're going to reserve 1GB of additional storage, for the temporary storage of video files. ComfyUI API
cleans up after itself, but it's good to have a little extra space just in case.
* We're going to connect the container group to the job queue we made in the previous step. Configure the job queue for
port 3000 (where our API is running), and set the path to `/workflow/video-clip`, which is the endpoint we created.
For this tutorial, we won't enable autoscaling, but you can
[learn more about it here](/container-engine/explanation/infrastructure-platform/autoscaling#autoscaling-overview).
* Finally, we will configure the readiness probe to check the `/ready` endpoint
* Finally, ensure `autostart_policy` is set to `true` so that the container group starts automatically once the image is
pulled into our internal cache.
At this point, Salad will pull the container image into our own high-performance container image cache. You will see
this as a "preparing" status on the container group page.
You can use this endpoint to generate video clips from prompts. Here is an example request:
```bash theme={null}
start_time=$(date +%s)
resp=$(curl -X 'POST' \
'http://localhost:3000/workflow/video-clip' \
-H 'accept: application/json' \
-H 'Content-Type: application/json' \
-d '{
"input": {
"prompt": "high quality nature documentary footage of one cute fluffy husky puppy walks from the left side of the screen to the right, through fresh powdery white snow. it is happy and in sharp focus. It is tricolor, with black, white and grey fur. the camera angle is close to the puppy, and focused on the puppy, following it as it moves. nature documentary footage of very high quality, bbc, planet earth",
"negative_prompt": "low quality, worst quality, deformed, distorted, disfigured, motion smear, motion artifacts, fused fingers, bad anatomy, weird hand, ugly",
"steps": 200,
"cfg": 3.8
}
}')
# Video in base64 is at .images[0]
video=$(echo $resp | jq -r '.images[0]')
# filename is at .filenames[0]
filename=$(echo $resp | jq -r '.filenames[0]')
# Save video to file
echo $video | base64 -d > $filename
end_time=$(date +%s)
echo "Video saved to $filename"
echo "Time taken: $((end_time - start_time)) seconds"
```
This script sends a request to the `/video-clip` endpoint with a prompt and negative prompt, and saves the resulting
video to a file. You can see this request structure is simpler and more intuitive than the full ComfyUI workflow graph.
You will also see that the video takes quite a while to generate. On my laptop RTX 3080Ti, it took almost 15 minutes to
generate a 10 second video. While this number is considerably lower on an RTX 4090, it could still easily exceed the 100
second ide request timeout that SaladCloud's container gateway imposes.
## Step 5: Add A Job Queue
To handle long-running requests like this, we can use
[SaladCloud's Job Queue](/container-engine/explanation/job-processing/job-queues). With the job queue, we can submit our
prompt, and then either poll for the result, or receive a webhook when the job is complete. Additionally, the job queue
will automatically handle retrying failed requests, buffer overflow requests, and includes some basic autoscaling
functionality.
To use the job queue, we simply need to add the Job Queue worker binary to our Dockerfile:
```dockerfile theme={null}
# Download and extract the job queue worker
RUN wget https://github.com/SaladTechnologies/salad-cloud-job-queue-worker/releases/download/v0.5.0/salad-http-job-queue-worker_x86_64.tar.gz && \
tar -xvf salad-http-job-queue-worker_x86_64.tar.gz && \
rm salad-http-job-queue-worker_x86_64.tar.gz && \
chmod +x salad-http-job-queue-worker
# Start the job queue worker in the background and the ComfyUI API in the foreground
CMD ["bash", "-c", "./salad-http-job-queue-worker & ./comfyui-api"]
```
Next, we need to create a Job Queue with the [Job Queue API](/reference/saladcloud-api/queues/create-queue).
## Step 6: Deploy to SaladCloud
Now, it's time to upload our container image, and deploy it to SaladCloud. First, we need to tag our image with a
registry url. For us here at Salad, that looks like this:
```bash theme={null}
docker tag video-generation-api saladtechnologies/comfyui:video-gen-example
```
Yours will need to be tagged for a registry you have access to.
Next, push it up to the container registry:
```bash theme={null}
docker push saladtechnologies/comfyui:video-gen-example
```
This may take some time, depending on your network speed. Once it's done, you can deploy your container to SaladCloud.
Because we are using the Job Queue, we need to create a new Container Group with the
[Public API](/reference/saladcloud-api/container-groups/create-container-group). This functionality is not available in
the portal.
* We're going to start with 3 replicas, and set the container image to the one we just pushed.
* We're going to use 4 vCPU, 30GB of RAM, and an RTX 4090 GPU.
* We're going to set the priority to "High", although if your usecase is not time-sensitive, you can achieve significant
cost savings by reducing the workload priority. Lower priority workloads can be preempted by higher priority
workloads.
* Additionally, we're going to reserve 1GB of additional storage, for the temporary storage of video files. ComfyUI API
cleans up after itself, but it's good to have a little extra space just in case.
* We're going to connect the container group to the job queue we made in the previous step. Configure the job queue for
port 3000 (where our API is running), and set the path to `/workflow/video-clip`, which is the endpoint we created.
For this tutorial, we won't enable autoscaling, but you can
[learn more about it here](/container-engine/explanation/infrastructure-platform/autoscaling#autoscaling-overview).
* Finally, we will configure the readiness probe to check the `/ready` endpoint
* Finally, ensure `autostart_policy` is set to `true` so that the container group starts automatically once the image is
pulled into our internal cache.
At this point, Salad will pull the container image into our own high-performance container image cache. You will see
this as a "preparing" status on the container group page.
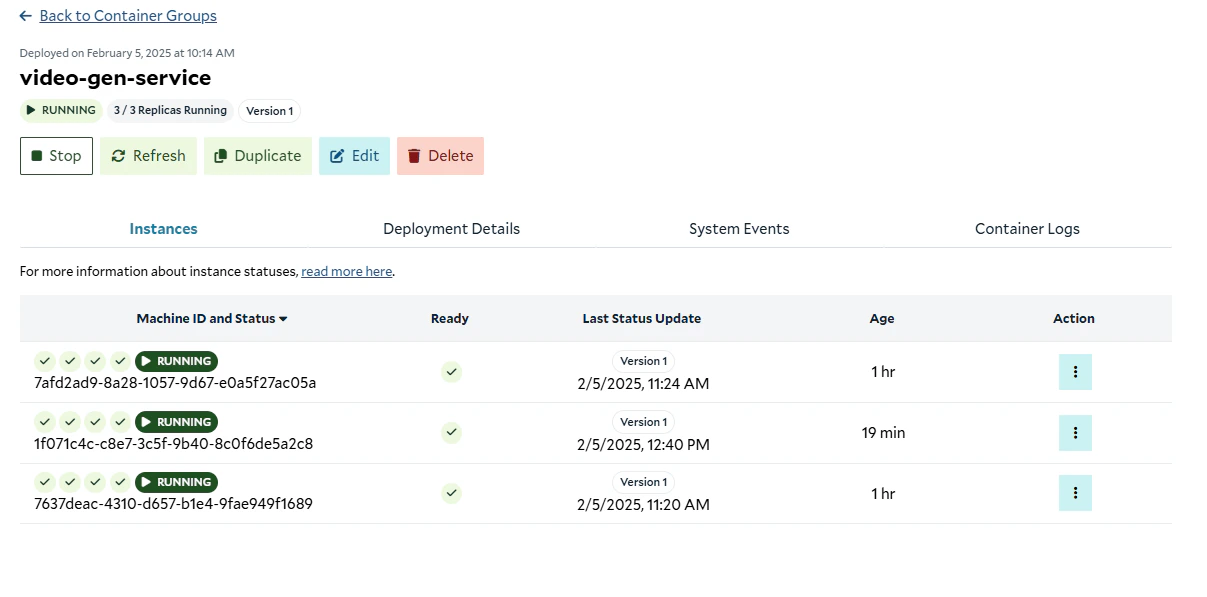
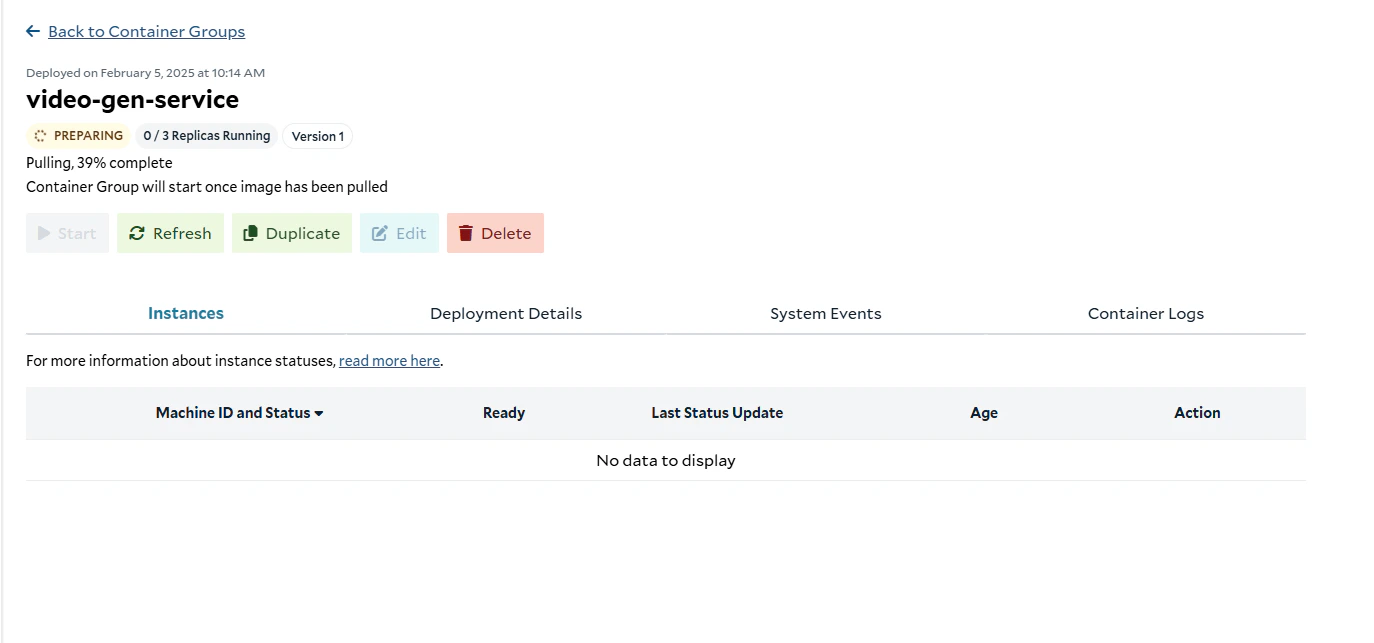 Once this has completed, SaladCloud will start to download the container image to compatible nodes in the network. This
will take some time, as the container image is quite large, and bandwidth can vary significantly between nodes.
Once this has completed, SaladCloud will start to download the container image to compatible nodes in the network. This
will take some time, as the container image is quite large, and bandwidth can vary significantly between nodes.
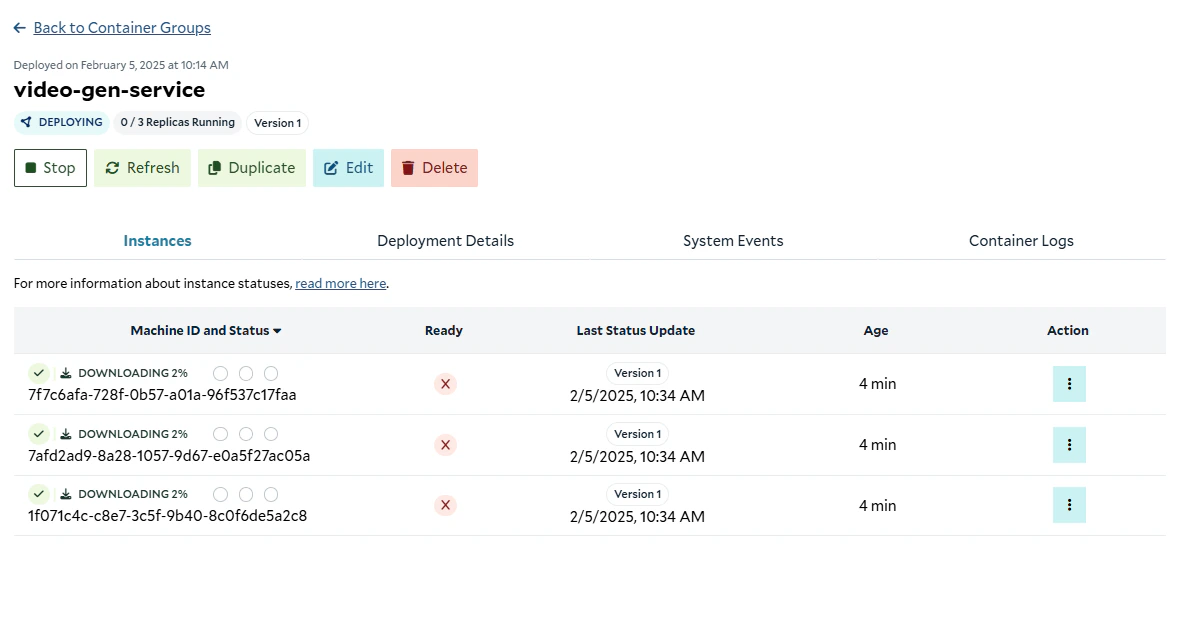 While this is happening, you can click on the "System Events" tab to see various events related to the deployment, such
as allocating an instance, and downloading the image.
Eventually, you will see the container group status change to "Running" when at least 1 instance is up and running.
While this is happening, you can click on the "System Events" tab to see various events related to the deployment, such
as allocating an instance, and downloading the image.
Eventually, you will see the container group status change to "Running" when at least 1 instance is up and running.
 ## Step 7: Using the API
Now, we're going to use the SaladCloud JavaScript SDK to create a function that submits a job to the job queue, and
polls for the result. First, we need to initialize a javascript project and install the SDK:
```bash theme={null}
npm init -y
npm install @saladtechnologies-oss/salad-cloud-sdk
npm install --save-dev typescript @types/node
```
Copy the following into a new file called `tsconfig.json`:
```json theme={null}
{
"compilerOptions": {
/* Visit https://aka.ms/tsconfig to read more about this file */
"target": "ES2021" /* Set the JavaScript language version for emitted JavaScript and include compatible library declarations. */,
"module": "commonjs" /* Specify what module code is generated. */,
"esModuleInterop": true /* Emit additional JavaScript to ease support for importing CommonJS modules. This enables 'allowSyntheticDefaultImports' for type compatibility. */ /* Disable resolving symlinks to their realpath. This correlates to the same flag in node. */,
"forceConsistentCasingInFileNames": true /* Ensure that casing is correct in imports. */,
"strict": true /* Enable all strict type-checking options. */,
"skipLibCheck": true /* Skip type checking all .d.ts files. */
},
"include": ["example.ts"]
}
```
In a new file called `example.ts`, add the following code:
```typescript theme={null}
import { SaladCloudSdk } from '@saladtechnologies-oss/salad-cloud-sdk'
import assert from 'assert'
import fs from 'fs/promises'
// Get some configuration from the environment
const { SALAD_API_KEY, SALAD_ORG_NAME, SALAD_PROJECT_NAME, SALAD_QUEUE_NAME } = process.env
// Ensure that we have all the required configuration
assert(SALAD_API_KEY, 'SALAD_API_KEY is required')
const saladApiKey = SALAD_API_KEY as string
assert(SALAD_ORG_NAME, 'SALAD_ORG_NAME is required')
const saladOrgName = SALAD_ORG_NAME as string
assert(SALAD_PROJECT_NAME, 'SALAD_PROJECT_NAME is required')
const saladProjectName = SALAD_PROJECT_NAME as string
assert(SALAD_QUEUE_NAME, 'SALAD_QUEUE_NAME is required')
const saladQueueName = SALAD_QUEUE_NAME as string
// Create an instance of the SaladCloud SDK
const salad = new SaladCloudSdk({
apiKey: saladApiKey,
})
```
Here we've imported the SDK, and set up some configuration from environment variables. We're using the `assert` function
to ensure that these variables are set. Finally, we've created an authenticated instance of the SDK. Next, let's define
an interface that matches our endpoint's request schema:
```typescript theme={null}
interface Request {
/** The prompt to generate a video clip from. */
prompt: string
/** The negative prompt to generate a video clip from. */
negative_prompt?: string
/** The duration of the video clip in seconds. */
duration_seconds?: number
/** The number of steps to run the model for. */
steps?: number
/** The cfg value to use for the model. */
cfg?: number
/** The seed to use for the model. */
seed?: number
/** The width of the video. Must be a multiple of 32. */
width?: number
/** The height of the video. Must be a multiple of 32. */
height?: number
}
```
There's some polling involved, so we're going to define a sleep function:
```typescript theme={null}
const sleep = (ms: number) => new Promise((resolve) => setTimeout(resolve, ms))
```
Next, we're going to define a function that submits a job to the job queue, and polls for the result:
```typescript theme={null}
async function generateVideoClip(request: Request): Promise<{ video: Buffer; filename: string }> {
let queuedJob
const failureStatuses = ['failed', 'cancelled']
/**
* Step 1: Queue the job
*/
try {
const { data } = await salad.queues.createQueueJob(saladOrgName, saladProjectName, saladQueueName, {
// The Salad job schema has an input field
input: {
// Our API schema also has an input field
input: request,
},
})
if (!data) {
throw new Error('Failed to queue job')
}
queuedJob = data
} catch (error) {
console.error(error)
throw new Error('Failed to queue job')
}
console.log(`Queued job with ID: ${queuedJob.id}`)
/**
* Step 2: Wait for the job to be picked up
* If there are jobs in the queue already, we will have to wait for
* this job to get picked up.
*/
while (queuedJob.status === 'pending') {
await sleep(500)
try {
const { data } = await salad.queues.getQueueJob(saladOrgName, saladProjectName, saladQueueName, queuedJob.id)
if (!data) {
throw new Error('Failed to get job status')
}
queuedJob = data
} catch (error) {
console.error(error)
throw new Error('Failed to get job status')
}
}
if (failureStatuses.includes(queuedJob.status)) {
console.error(JSON.stringify(queuedJob, null, 2))
throw new Error(`Job ${queuedJob.status}`)
}
console.log(`Job status: ${queuedJob.status}`)
/**
* Step 3: Wait for the job to complete
* Once the job has been picked up, it will be running until
* it is completed.
*/
while (queuedJob.status === 'running') {
await sleep(1000)
try {
const { data } = await salad.queues.getQueueJob(saladOrgName, saladProjectName, saladQueueName, queuedJob.id)
if (!data) {
throw new Error('Failed to get job status')
}
queuedJob = data
} catch (error) {
console.error(error)
throw new Error('Failed to get job status')
}
}
if (failureStatuses.includes(queuedJob.status)) {
console.error(JSON.stringify(queuedJob, null, 2))
throw new Error(`Job ${queuedJob.status}`)
}
console.log(`Job status: ${queuedJob.status}`)
const { output } = queuedJob
if (output.statusCode) {
/**
* If the API returns a 400 series status code, the job will have
* the status "succeeded", but the output will contain an error message.
*/
console.error(JSON.stringify(output, null, 2))
throw new Error(`Job failed with status code ${output.statusCode}`)
}
/**
* Step 4: Get the output
*/
const base64Video = output.images[0]
const filename = output.filenames[0]
const video = Buffer.from(base64Video, 'base64')
return { video, filename }
}
```
Finally, we're going to call this function with a request object, and save the video to a file:
```typescript theme={null}
async function main() {
const request: Request = {
prompt:
'high quality nature documentary footage of one cute fluffy husky puppy walks from the left side of the screen to the right, through fresh powdery white snow. it is happy and in sharp focus. It is tricolor, with black, white and grey fur. the camera angle is close to the puppy, and focused on the puppy, following it as it moves. nature documentary footage of very high quality, bbc, planet earth',
negative_prompt:
'low quality, worst quality, deformed, distorted, disfigured, motion smear, motion artifacts, fused fingers, bad anatomy, weird hand, ugly',
steps: 200,
cfg: 3.8,
}
const { video, filename } = await generateVideoClip(request)
await fs.writeFile(filename, video)
}
main().catch(console.error)
```
### Completed Example
```typescript theme={null}
import { SaladCloudSdk } from '@saladtechnologies-oss/salad-cloud-sdk'
import assert from 'assert'
import fs from 'fs/promises'
// Get some configuration from the environment
const { SALAD_API_KEY, SALAD_ORG_NAME, SALAD_PROJECT_NAME, SALAD_QUEUE_NAME } = process.env
// Ensure that we have all the required configuration
assert(SALAD_API_KEY, 'SALAD_API_KEY is required')
const saladApiKey = SALAD_API_KEY as string
assert(SALAD_ORG_NAME, 'SALAD_ORG_NAME is required')
const saladOrgName = SALAD_ORG_NAME as string
assert(SALAD_PROJECT_NAME, 'SALAD_PROJECT_NAME is required')
const saladProjectName = SALAD_PROJECT_NAME as string
assert(SALAD_QUEUE_NAME, 'SALAD_QUEUE_NAME is required')
const saladQueueName = SALAD_QUEUE_NAME as string
// Create an instance of the SaladCloud SDK
const salad = new SaladCloudSdk({
apiKey: saladApiKey,
})
// Define an interface that matches our endpoint's request schema
interface Request {
/** The prompt to generate a video clip from. */
prompt: string
/** The negative prompt to generate a video clip from. */
negative_prompt?: string
/** The duration of the video clip in seconds. */
duration_seconds?: number
/** The number of steps to run the model for. */
steps?: number
/** The cfg value to use for the model. */
cfg?: number
/** The seed to use for the model. */
seed?: number
/** The width of the video. Must be a multiple of 32. */
width?: number
/** The height of the video. Must be a multiple of 32. */
height?: number
}
const sleep = (ms: number) => new Promise((resolve) => setTimeout(resolve, ms))
async function generateVideoClip(request: Request): Promise<{ video: Buffer; filename: string }> {
let queuedJob
const failureStatuses = ['failed', 'cancelled']
/**
* Step 1: Queue the job
*/
try {
const { data } = await salad.queues.createQueueJob(saladOrgName, saladProjectName, saladQueueName, {
// The Salad job schema has an input field
input: {
// Our API schema also has an input field
input: request,
},
})
if (!data) {
throw new Error('Failed to queue job')
}
queuedJob = data
} catch (error) {
console.error(error)
throw new Error('Failed to queue job')
}
console.log(`Queued job with ID: ${queuedJob.id}`)
/**
* Step 2: Wait for the job to be picked up
* If there are jobs in the queue already, we will have to wait for
* this job to get picked up.
*/
while (queuedJob.status === 'pending') {
await sleep(500)
try {
const { data } = await salad.queues.getQueueJob(saladOrgName, saladProjectName, saladQueueName, queuedJob.id)
if (!data) {
throw new Error('Failed to get job status')
}
queuedJob = data
} catch (error) {
console.error(error)
throw new Error('Failed to get job status')
}
}
if (failureStatuses.includes(queuedJob.status)) {
console.error(JSON.stringify(queuedJob, null, 2))
throw new Error(`Job ${queuedJob.status}`)
}
console.log(`Job status: ${queuedJob.status}`)
/**
* Step 3: Wait for the job to complete
* Once the job has been picked up, it will be running until
* it is completed.
*/
while (queuedJob.status === 'running') {
await sleep(1000)
try {
const { data } = await salad.queues.getQueueJob(saladOrgName, saladProjectName, saladQueueName, queuedJob.id)
if (!data) {
throw new Error('Failed to get job status')
}
queuedJob = data
} catch (error) {
console.error(error)
throw new Error('Failed to get job status')
}
}
if (failureStatuses.includes(queuedJob.status)) {
console.error(JSON.stringify(queuedJob, null, 2))
throw new Error(`Job ${queuedJob.status}`)
}
console.log(`Job status: ${queuedJob.status}`)
const { output } = queuedJob
if (output.statusCode) {
/**
* If the API returns a 400 series status code, the job will have
* the status "succeeded", but the output will contain an error message.
*/
console.error(JSON.stringify(output, null, 2))
throw new Error(`Job failed with status code ${output.statusCode}`)
}
/**
* Step 4: Get the output
*/
const base64Video = output.images[0]
const filename = output.filenames[0]
const video = Buffer.from(base64Video, 'base64')
return { video, filename }
}
async function main() {
const request: Request = {
prompt:
'high quality nature documentary footage of one cute fluffy husky puppy walks from the left side of the screen to the right, through fresh powdery white snow. it is happy and in sharp focus. It is tricolor, with black, white and grey fur. the camera angle is close to the puppy, and focused on the puppy, following it as it moves. nature documentary footage of very high quality, bbc, planet earth',
negative_prompt:
'low quality, worst quality, deformed, distorted, disfigured, motion smear, motion artifacts, fused fingers, bad anatomy, weird hand, ugly',
steps: 200,
cfg: 3.8,
}
const { video, filename } = await generateVideoClip(request)
await fs.writeFile(filename, video)
}
main().catch(console.error)
```
### Running the Example
Customize the request object in `example.ts` to your liking, and copy the following script into a file
`run-ts-example.sh`, replacing the placeholders with your organization, project, and queue names. Make sure to set the
`SALAD_API_KEY` environment variable. For help finding your API Key,
[see this guide](/container-engine/tutorials/quickstart-api#step-1-obtain-your-api-key).
```bash theme={null}
#!/bin/bash
export SALAD_ORG_NAME="salad-benchmarking"
export SALAD_PROJECT_NAME="ltx-video-testing"
export SALAD_QUEUE_NAME="video-gen-jobs"
if [ -z "$SALAD_API_KEY" ]; then
echo "Please set the SALAD_API_KEY environment variable"
exit 1
fi
# Compile the TypeScript file
npx tsc
start_time=$(date +%s)
node example.js
end_time=$(date +%s)
echo "Time taken: $((end_time - start_time)) seconds"
```
Make the script executable:
```bash theme={null}
chmod +x run-ts-example.sh
```
Run the script:
```bash theme={null}
./run-ts-example.sh
```
On an RTX 4090, this script takes just under 4 minutes to generate a 10 second video and save it to a file.
Now that we have everything working, let's go ahead and commit our work to git.
```bash theme={null}
git add .
git commit -m "Video Generation API with Job Queue"
```
## Next Steps
Now that you have a working video generation service, and the beginnings of a client that can submit jobs to the job
queue, you can start to integrate the video generation service into your own applications. You can also start
experimenting with [autoscaling](/container-engine/explanation/infrastructure-platform/autoscaling#autoscaling-overview)
to handle more requests, and reduce costs during periods of low demand.
ComfyUI API also supports sending workflow
[progress updates](https://github.com/SaladTechnologies/comfyui-api?tab=readme-ov-file#progress) to a webhook, which can
be useful to provide real-time feedback to users.
The SaladCloud Job Queue also supports webhooks, which can be used to notify your application when a job is complete.
This may be preferable to polling, depending on the architecture of the rest of your application and the billing model
of your hosting provider.
## Summary
In this guide, we used ComfyUI to design a video generation workflow using LTX Video. We created a custom endpoint with
ComfyUI API that generates video clips from prompts using that workflow. We deployed this endpoint to a GPU cluster with
SaladCloud, behind a job queue for resiliency. We used the SaladCloud SDK to submit jobs to the queue, poll for the
result of the job, and save the resulting video to a file.
## Step 7: Using the API
Now, we're going to use the SaladCloud JavaScript SDK to create a function that submits a job to the job queue, and
polls for the result. First, we need to initialize a javascript project and install the SDK:
```bash theme={null}
npm init -y
npm install @saladtechnologies-oss/salad-cloud-sdk
npm install --save-dev typescript @types/node
```
Copy the following into a new file called `tsconfig.json`:
```json theme={null}
{
"compilerOptions": {
/* Visit https://aka.ms/tsconfig to read more about this file */
"target": "ES2021" /* Set the JavaScript language version for emitted JavaScript and include compatible library declarations. */,
"module": "commonjs" /* Specify what module code is generated. */,
"esModuleInterop": true /* Emit additional JavaScript to ease support for importing CommonJS modules. This enables 'allowSyntheticDefaultImports' for type compatibility. */ /* Disable resolving symlinks to their realpath. This correlates to the same flag in node. */,
"forceConsistentCasingInFileNames": true /* Ensure that casing is correct in imports. */,
"strict": true /* Enable all strict type-checking options. */,
"skipLibCheck": true /* Skip type checking all .d.ts files. */
},
"include": ["example.ts"]
}
```
In a new file called `example.ts`, add the following code:
```typescript theme={null}
import { SaladCloudSdk } from '@saladtechnologies-oss/salad-cloud-sdk'
import assert from 'assert'
import fs from 'fs/promises'
// Get some configuration from the environment
const { SALAD_API_KEY, SALAD_ORG_NAME, SALAD_PROJECT_NAME, SALAD_QUEUE_NAME } = process.env
// Ensure that we have all the required configuration
assert(SALAD_API_KEY, 'SALAD_API_KEY is required')
const saladApiKey = SALAD_API_KEY as string
assert(SALAD_ORG_NAME, 'SALAD_ORG_NAME is required')
const saladOrgName = SALAD_ORG_NAME as string
assert(SALAD_PROJECT_NAME, 'SALAD_PROJECT_NAME is required')
const saladProjectName = SALAD_PROJECT_NAME as string
assert(SALAD_QUEUE_NAME, 'SALAD_QUEUE_NAME is required')
const saladQueueName = SALAD_QUEUE_NAME as string
// Create an instance of the SaladCloud SDK
const salad = new SaladCloudSdk({
apiKey: saladApiKey,
})
```
Here we've imported the SDK, and set up some configuration from environment variables. We're using the `assert` function
to ensure that these variables are set. Finally, we've created an authenticated instance of the SDK. Next, let's define
an interface that matches our endpoint's request schema:
```typescript theme={null}
interface Request {
/** The prompt to generate a video clip from. */
prompt: string
/** The negative prompt to generate a video clip from. */
negative_prompt?: string
/** The duration of the video clip in seconds. */
duration_seconds?: number
/** The number of steps to run the model for. */
steps?: number
/** The cfg value to use for the model. */
cfg?: number
/** The seed to use for the model. */
seed?: number
/** The width of the video. Must be a multiple of 32. */
width?: number
/** The height of the video. Must be a multiple of 32. */
height?: number
}
```
There's some polling involved, so we're going to define a sleep function:
```typescript theme={null}
const sleep = (ms: number) => new Promise((resolve) => setTimeout(resolve, ms))
```
Next, we're going to define a function that submits a job to the job queue, and polls for the result:
```typescript theme={null}
async function generateVideoClip(request: Request): Promise<{ video: Buffer; filename: string }> {
let queuedJob
const failureStatuses = ['failed', 'cancelled']
/**
* Step 1: Queue the job
*/
try {
const { data } = await salad.queues.createQueueJob(saladOrgName, saladProjectName, saladQueueName, {
// The Salad job schema has an input field
input: {
// Our API schema also has an input field
input: request,
},
})
if (!data) {
throw new Error('Failed to queue job')
}
queuedJob = data
} catch (error) {
console.error(error)
throw new Error('Failed to queue job')
}
console.log(`Queued job with ID: ${queuedJob.id}`)
/**
* Step 2: Wait for the job to be picked up
* If there are jobs in the queue already, we will have to wait for
* this job to get picked up.
*/
while (queuedJob.status === 'pending') {
await sleep(500)
try {
const { data } = await salad.queues.getQueueJob(saladOrgName, saladProjectName, saladQueueName, queuedJob.id)
if (!data) {
throw new Error('Failed to get job status')
}
queuedJob = data
} catch (error) {
console.error(error)
throw new Error('Failed to get job status')
}
}
if (failureStatuses.includes(queuedJob.status)) {
console.error(JSON.stringify(queuedJob, null, 2))
throw new Error(`Job ${queuedJob.status}`)
}
console.log(`Job status: ${queuedJob.status}`)
/**
* Step 3: Wait for the job to complete
* Once the job has been picked up, it will be running until
* it is completed.
*/
while (queuedJob.status === 'running') {
await sleep(1000)
try {
const { data } = await salad.queues.getQueueJob(saladOrgName, saladProjectName, saladQueueName, queuedJob.id)
if (!data) {
throw new Error('Failed to get job status')
}
queuedJob = data
} catch (error) {
console.error(error)
throw new Error('Failed to get job status')
}
}
if (failureStatuses.includes(queuedJob.status)) {
console.error(JSON.stringify(queuedJob, null, 2))
throw new Error(`Job ${queuedJob.status}`)
}
console.log(`Job status: ${queuedJob.status}`)
const { output } = queuedJob
if (output.statusCode) {
/**
* If the API returns a 400 series status code, the job will have
* the status "succeeded", but the output will contain an error message.
*/
console.error(JSON.stringify(output, null, 2))
throw new Error(`Job failed with status code ${output.statusCode}`)
}
/**
* Step 4: Get the output
*/
const base64Video = output.images[0]
const filename = output.filenames[0]
const video = Buffer.from(base64Video, 'base64')
return { video, filename }
}
```
Finally, we're going to call this function with a request object, and save the video to a file:
```typescript theme={null}
async function main() {
const request: Request = {
prompt:
'high quality nature documentary footage of one cute fluffy husky puppy walks from the left side of the screen to the right, through fresh powdery white snow. it is happy and in sharp focus. It is tricolor, with black, white and grey fur. the camera angle is close to the puppy, and focused on the puppy, following it as it moves. nature documentary footage of very high quality, bbc, planet earth',
negative_prompt:
'low quality, worst quality, deformed, distorted, disfigured, motion smear, motion artifacts, fused fingers, bad anatomy, weird hand, ugly',
steps: 200,
cfg: 3.8,
}
const { video, filename } = await generateVideoClip(request)
await fs.writeFile(filename, video)
}
main().catch(console.error)
```
### Completed Example
```typescript theme={null}
import { SaladCloudSdk } from '@saladtechnologies-oss/salad-cloud-sdk'
import assert from 'assert'
import fs from 'fs/promises'
// Get some configuration from the environment
const { SALAD_API_KEY, SALAD_ORG_NAME, SALAD_PROJECT_NAME, SALAD_QUEUE_NAME } = process.env
// Ensure that we have all the required configuration
assert(SALAD_API_KEY, 'SALAD_API_KEY is required')
const saladApiKey = SALAD_API_KEY as string
assert(SALAD_ORG_NAME, 'SALAD_ORG_NAME is required')
const saladOrgName = SALAD_ORG_NAME as string
assert(SALAD_PROJECT_NAME, 'SALAD_PROJECT_NAME is required')
const saladProjectName = SALAD_PROJECT_NAME as string
assert(SALAD_QUEUE_NAME, 'SALAD_QUEUE_NAME is required')
const saladQueueName = SALAD_QUEUE_NAME as string
// Create an instance of the SaladCloud SDK
const salad = new SaladCloudSdk({
apiKey: saladApiKey,
})
// Define an interface that matches our endpoint's request schema
interface Request {
/** The prompt to generate a video clip from. */
prompt: string
/** The negative prompt to generate a video clip from. */
negative_prompt?: string
/** The duration of the video clip in seconds. */
duration_seconds?: number
/** The number of steps to run the model for. */
steps?: number
/** The cfg value to use for the model. */
cfg?: number
/** The seed to use for the model. */
seed?: number
/** The width of the video. Must be a multiple of 32. */
width?: number
/** The height of the video. Must be a multiple of 32. */
height?: number
}
const sleep = (ms: number) => new Promise((resolve) => setTimeout(resolve, ms))
async function generateVideoClip(request: Request): Promise<{ video: Buffer; filename: string }> {
let queuedJob
const failureStatuses = ['failed', 'cancelled']
/**
* Step 1: Queue the job
*/
try {
const { data } = await salad.queues.createQueueJob(saladOrgName, saladProjectName, saladQueueName, {
// The Salad job schema has an input field
input: {
// Our API schema also has an input field
input: request,
},
})
if (!data) {
throw new Error('Failed to queue job')
}
queuedJob = data
} catch (error) {
console.error(error)
throw new Error('Failed to queue job')
}
console.log(`Queued job with ID: ${queuedJob.id}`)
/**
* Step 2: Wait for the job to be picked up
* If there are jobs in the queue already, we will have to wait for
* this job to get picked up.
*/
while (queuedJob.status === 'pending') {
await sleep(500)
try {
const { data } = await salad.queues.getQueueJob(saladOrgName, saladProjectName, saladQueueName, queuedJob.id)
if (!data) {
throw new Error('Failed to get job status')
}
queuedJob = data
} catch (error) {
console.error(error)
throw new Error('Failed to get job status')
}
}
if (failureStatuses.includes(queuedJob.status)) {
console.error(JSON.stringify(queuedJob, null, 2))
throw new Error(`Job ${queuedJob.status}`)
}
console.log(`Job status: ${queuedJob.status}`)
/**
* Step 3: Wait for the job to complete
* Once the job has been picked up, it will be running until
* it is completed.
*/
while (queuedJob.status === 'running') {
await sleep(1000)
try {
const { data } = await salad.queues.getQueueJob(saladOrgName, saladProjectName, saladQueueName, queuedJob.id)
if (!data) {
throw new Error('Failed to get job status')
}
queuedJob = data
} catch (error) {
console.error(error)
throw new Error('Failed to get job status')
}
}
if (failureStatuses.includes(queuedJob.status)) {
console.error(JSON.stringify(queuedJob, null, 2))
throw new Error(`Job ${queuedJob.status}`)
}
console.log(`Job status: ${queuedJob.status}`)
const { output } = queuedJob
if (output.statusCode) {
/**
* If the API returns a 400 series status code, the job will have
* the status "succeeded", but the output will contain an error message.
*/
console.error(JSON.stringify(output, null, 2))
throw new Error(`Job failed with status code ${output.statusCode}`)
}
/**
* Step 4: Get the output
*/
const base64Video = output.images[0]
const filename = output.filenames[0]
const video = Buffer.from(base64Video, 'base64')
return { video, filename }
}
async function main() {
const request: Request = {
prompt:
'high quality nature documentary footage of one cute fluffy husky puppy walks from the left side of the screen to the right, through fresh powdery white snow. it is happy and in sharp focus. It is tricolor, with black, white and grey fur. the camera angle is close to the puppy, and focused on the puppy, following it as it moves. nature documentary footage of very high quality, bbc, planet earth',
negative_prompt:
'low quality, worst quality, deformed, distorted, disfigured, motion smear, motion artifacts, fused fingers, bad anatomy, weird hand, ugly',
steps: 200,
cfg: 3.8,
}
const { video, filename } = await generateVideoClip(request)
await fs.writeFile(filename, video)
}
main().catch(console.error)
```
### Running the Example
Customize the request object in `example.ts` to your liking, and copy the following script into a file
`run-ts-example.sh`, replacing the placeholders with your organization, project, and queue names. Make sure to set the
`SALAD_API_KEY` environment variable. For help finding your API Key,
[see this guide](/container-engine/tutorials/quickstart-api#step-1-obtain-your-api-key).
```bash theme={null}
#!/bin/bash
export SALAD_ORG_NAME="salad-benchmarking"
export SALAD_PROJECT_NAME="ltx-video-testing"
export SALAD_QUEUE_NAME="video-gen-jobs"
if [ -z "$SALAD_API_KEY" ]; then
echo "Please set the SALAD_API_KEY environment variable"
exit 1
fi
# Compile the TypeScript file
npx tsc
start_time=$(date +%s)
node example.js
end_time=$(date +%s)
echo "Time taken: $((end_time - start_time)) seconds"
```
Make the script executable:
```bash theme={null}
chmod +x run-ts-example.sh
```
Run the script:
```bash theme={null}
./run-ts-example.sh
```
On an RTX 4090, this script takes just under 4 minutes to generate a 10 second video and save it to a file.
Now that we have everything working, let's go ahead and commit our work to git.
```bash theme={null}
git add .
git commit -m "Video Generation API with Job Queue"
```
## Next Steps
Now that you have a working video generation service, and the beginnings of a client that can submit jobs to the job
queue, you can start to integrate the video generation service into your own applications. You can also start
experimenting with [autoscaling](/container-engine/explanation/infrastructure-platform/autoscaling#autoscaling-overview)
to handle more requests, and reduce costs during periods of low demand.
ComfyUI API also supports sending workflow
[progress updates](https://github.com/SaladTechnologies/comfyui-api?tab=readme-ov-file#progress) to a webhook, which can
be useful to provide real-time feedback to users.
The SaladCloud Job Queue also supports webhooks, which can be used to notify your application when a job is complete.
This may be preferable to polling, depending on the architecture of the rest of your application and the billing model
of your hosting provider.
## Summary
In this guide, we used ComfyUI to design a video generation workflow using LTX Video. We created a custom endpoint with
ComfyUI API that generates video clips from prompts using that workflow. We deployed this endpoint to a GPU cluster with
SaladCloud, behind a job queue for resiliency. We used the SaladCloud SDK to submit jobs to the queue, poll for the
result of the job, and save the resulting video to a file.